This post was created in partnership with Snapfish. All opinions are my own.
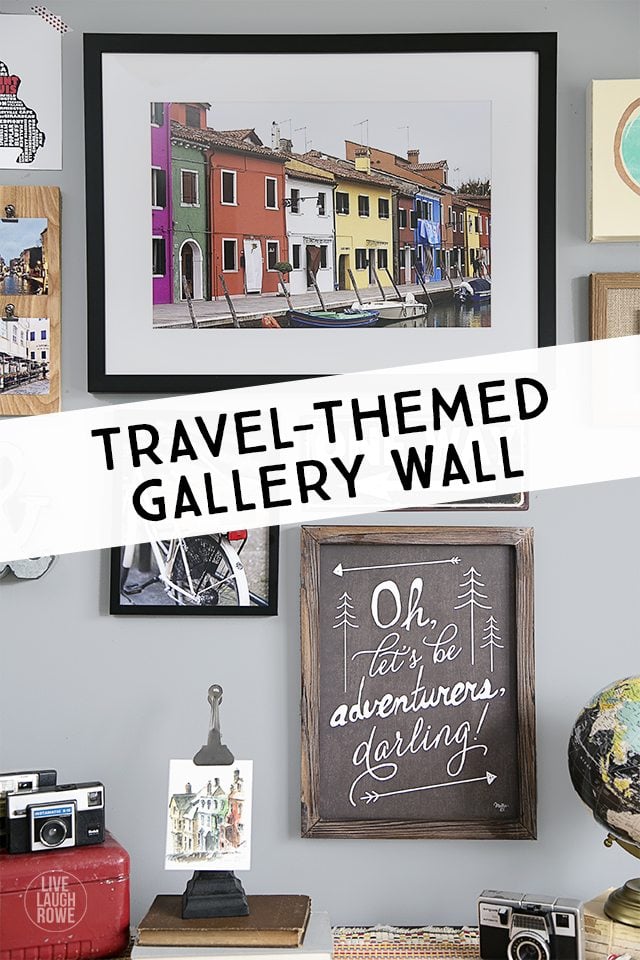
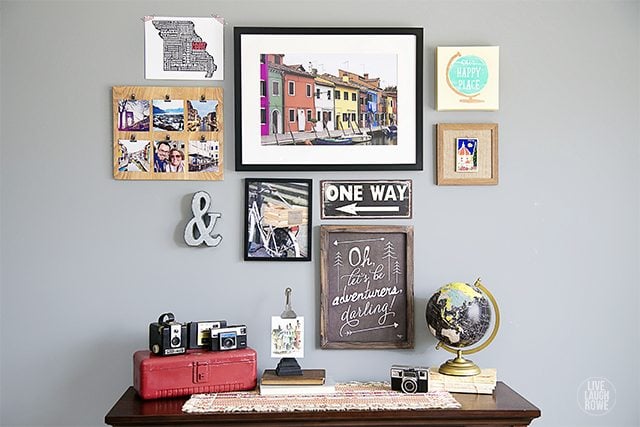
So, as you may or may not know, the hubs and I love to travel! I’ve shared a few of our adventures here on the blog such as St. Maarten, Newfoundland, Bermuda, Rome, Florence, Venice , etc. I recently decided that it would be fun to do a travel-themed gallery wall –- using pictures from our travels along with other pieces that would compliment it.
 Travel-Themed Gallery Wall
I jumped on to Snapfish to scope things out. Did you know they have a brand new site with a designated Snapfish Home Decor section? So, I started experimenting with some of my pictures! I think it’s safe to say that is the hardest part — finding the right pictures and seeing if they’ll fit into the sizes you’re looking for.
 Snapfish was super easy, tablet and smartphone friendly — aaaand you can add and save photos to your Snapfish account to access from almost anywhere, including Instagram. I loved that I could pick up where I left off on any of my devices. Win-win!
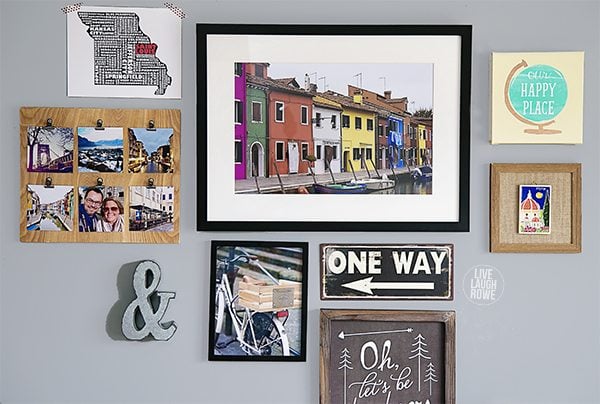
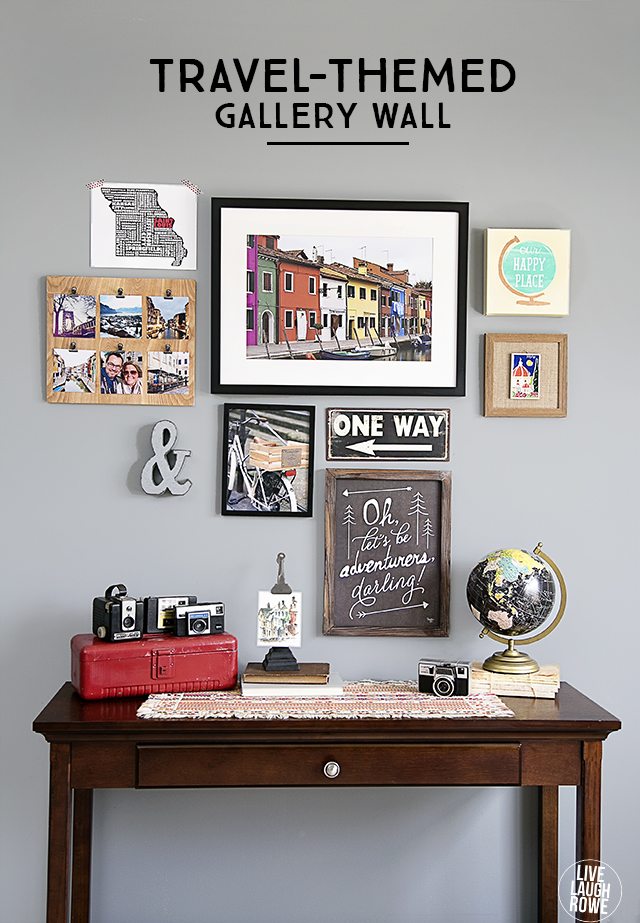 Anywho, I decided on a few fabulous pieces: a large matted picture, a tabletop frame (which can also be hung), a square canvas (designed on Snapfish) and a dozen or so of the 4×4 prints (using pictures from my Instagram account). I wasn’t certain how I going to use the 4×4 prints. However, I did know that I wanted to make some sort of instagram photo frame.
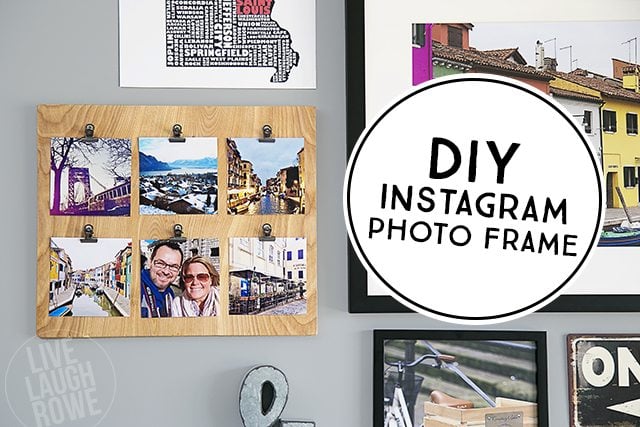
Making my own frames/clipboards is something I love to do, so it only made sense to make another version using a few of my favorite things. I honestly couldn’t be more thrilled with how it turned out. Let’s take a quick look at how you can whip one of these up too!
 Supplies for DIY Instagram Photo Frame:
Plywood cut to 12×14
Polyurethane
Rags or Brush, to apply polyurethane
Tim Holtz Metal Hinge Clips
Screws
Screwdriver
4×4 prints
Sawtooth Hanger
My board was cut and designed to fit six 4×4 prints, so we cut it to be a 12×14 in size. Feel free to customize your board to meet your needs. Once your board is cut, you’re ready to go!
 DIY Instagram Frame Tutorial
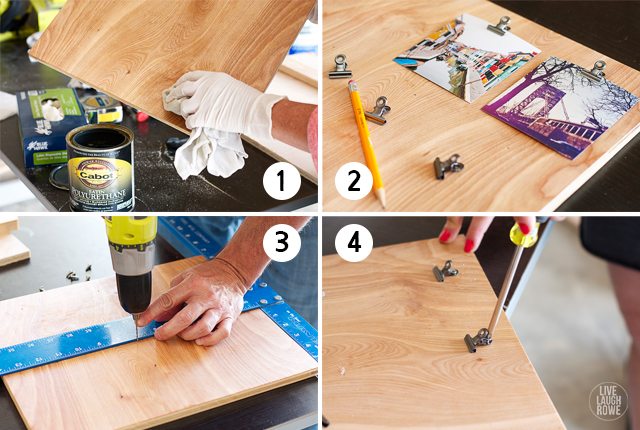
Step One: Poly or Stain the board.
Be sure board has been sanded around the edges and on each side, if necessary. You could easily stain your board; however, I decided to keep the wood more of a raw, natural color and applied a couple coats of polyurethane.
Step Two: Clip Placement.
Decide where you’ll be placing your pictures and clips. Horizontally or vertically? I decided to place mine with the board horizontally, with three pictures across in two rows.
Step Three: Drill Holes.
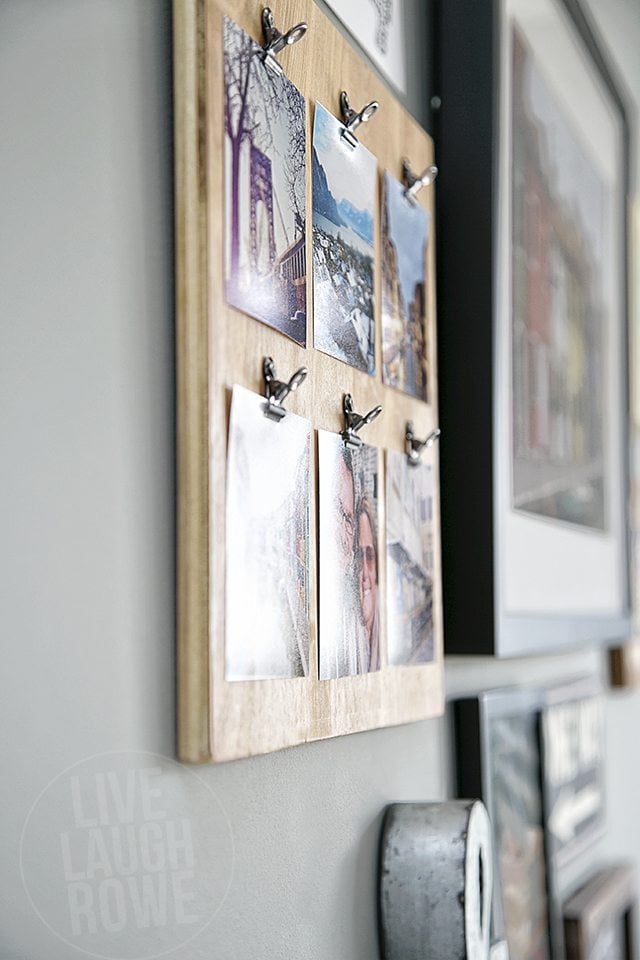
Step Four: Attach Clips and Sawtooth Hanger.
I used flat phillips screws (6 x 1/2) to attach the clips. We then attached a sawtooth hanger on the back to mount on the wall. Here’s a side view. I love the raw wood look. What do you think?
 And here’s a couple more pictures of the gallery wall….
 Be sure to visit with me here too:
Facebook | Instagram | Pinterest | Twitter | Google+


Sandy says
Love this idea.
Kelly Rowe says
Thanks so much Sandy! Appreciate you stopping by. 🙂 Have a great day! xo.
Aly says
I would finish off my office wall with some great pictures!
Kelly Rowe says
Sounds like a great idea Aly! Go for it. 🙂 Enjoy the rest of your week. xo.
Denise Smith says
I think it’s great to have a theme for a gallery wall and travel is good one! We just returned from Portugal where I bought a small piece of original art. I plan to make it my “jumping off piece” for my new gallery wall. I make framed art from maps in my Etsy shop and many customers order with a gallery wall in mind. Yours is inspirational! Thanks!
Kelly Rowe says
Thanks so much Denise! It sounds like the piece you brought back from Portugal will make a wonderful focal point for your wall gallery. 🙂 I’m sure it will look amazing! Have fun. HUGS.
Tammy says
I have a huge empty wall I could use this with
Kelly Rowe says
Tammy, If could fill all my walls with galleries…I think I would. {hee, hee} Maybe you should start piecing together a gallery. You just need one piece to start. 🙂 Have a great day! xo.
Maria says
I would do a selfie wall for my daughter that I saw on another post
Kelly Rowe says
Sounds like lots of fun Maria! Go for it. 🙂 HUGS!
Maria B says
I have the perfect wall for this. I’ve been thinking of making a feature wall but I’ve been stumped on a theme. This one fits our family nicely. Thanks for the inspiration!
TidyMom says
I love this Kelly!
Kelly Rowe says
Thanks so much Cheryl! Appreciate it. 🙂 Have a great day! xo.
Meegan says
What a lovely idea. Your gallery wall looks fabulous. I would use picture from our trip to DC. My hubby loves history. It would great in our living room.
Katy says
We have a lot of neat pics from our travels out west. We already have a “Montana” room in our house so I’d imagine we’d decorate with one of our favorite pics from Montana to add to that room.
Kelly Rowe says
Sounds like a great plan Katy! Thanks for stopping by. Have a wonderful day. HUGS.
Caitlin says
I would do exactly what you did…I want to take a U.S. map with pictures in every state!
Kelly Rowe says
Thank Caitlin! Your idea of taking a U.S. map with pictures is great! Happy travels! 🙂 xo.
the wheelchair mommy says
I love this! We don’t travel much though. We just bought a camper so maybe soon.
Kelly Rowe says
Thanks so much! Appreciate you stopping by. With a camper…the adventures await! …and maybe a wall gallery as well? 🙂 Have a great day! xo.
Jessica says
Such an easy project, and cute too! I am really digging the natural wood, so happy you did not paint it.
Kelly Rowe says
Thanks Jessica! I appreciate it. I’m glad that I kept the natural wood as well. Wasn’t sure how it would look with the other pieces, but it was a perfect combination! Enjoy the rest of your week. HUGS.
Sandy says
I am SO loving all of this! 😀
Kelly Rowe says
Thanks so much Sandy! Appreciate you stopping by. 🙂 Have a wonderful day! xo.
Kimberly @ Stuffed Suitcase says
Kelly, this is fabulous! Love all the parts individually and how they came together! Pinning!
Kelly Rowe says
Thanks so much Kimberly! Appreciate it…and the Pin as well. Have a great day! HUGS!
Gina says
I love the idea of a travel wall! I’d use the GC to print some large prints of our favorite Chichen Itza photographs.
Kelly Rowe says
Thanks Gina! Sounds like you have a great plan in mind. 🙂 Have a great day. xo.
Kelly Rowe says
CONGRATULATIONS, Gina!! You’re the winner of the Snapfish giveaway. YAY!!! A brand representative will be in touch soon. Please keep me posted. xo
Erin Prohaska says
I would likely get a canvas of the kiddos for our new home…maybe try a wood or metal print to switch it up a bit since the risk is not as big of an issue with a gift card! 🙂 Thanks for the opportunity!
Melissa B says
I would do a gallery wall for my bedroom if I won!
Shannon Peterson says
I would use this to finish our walls in our brand new house!
Heather says
My living room is kind of bare. I would love to make it look wonderful.
Angie @ Postcards from the Ridge says
I love all the elements of your gallery wall! And that photo with the bright buildings on the canal is amazing!
Randell says
I love love love this!! I am definitely doing some kind of thing like this when I move into my new house. Thanks for sharing, super cute!
Kelly Rowe says
Thanks so much Randell! Appreciate it. Have fun creating a wall gallery of your own. 🙂 Enjoy the rest of your weekend. xo.
Condo Blues says
Print the photos I keep putting off and start my own gallery wall!
Kim @ This Ole Mom says
Your gallery wall is gorgeous! I love it all. What a great way to display all your beautiful pictures from your travels. I ‘m pinning!!!
Kelly Rowe says
Aw, thanks so much Kim! …and I appreciate the Pin as well. You are too kind! Enjoy the rest of your weekend. HUGS.
Deborah D says
I really like the photo wall grouping. You have given me much to think about and possible ideas. Thanks so much.
Kelly Rowe says
Thanks for stopping by Deborah! Wall galleries are such fun! I hope you’ll give it a try…if you haven’t already. Enjoy the rest of your weekend. xo.
Stacey Grantham says
I love the clip board. I have a picture frame with jute twine and clips. My youngest son changes out pictures and artwork on it. I would love the Snapfish to finally do something with a large blank wall that I have. I was thinking of doing like a family tree on a large scale with picture frames hanging from the branches.
Emily Smith // The Best of this Life says
I would love to purchase the framed matt print and add it to our family gallery wall. I have a picture of my two kids together in mind that would be perfect! I love your gallery wall and how colourful it is!
Vidhi says
I would decorate my desk area, thanks for the inspiration. 😀
Brenda @ a farmgirl's dabbles says
LOOOOOOOOOVE this!! I have incorporated various photos from travels onto canvases, etc. It’s the most common art in our home. I was thinking to do a larger gallery wall, though, more mixed media like you’ve done. Fabulous!!
Julie says
I love your gallery wall and vignette! It’s fun, colorful, functional, and changeable…perfect!
meg says
This is beautiful! I love the little vintage cameras.
meg says
I would order a canvas print from snapfish. Thanks for the opportunity to win.
Sara @ Mom Endeavors says
Love this! We’d get some large prints from some of our travels as well!
Amy says
Your gallery wall looks great – I want one like it!
Kelly Rowe says
Thanks Amy! You should do one for yourself. 🙂 It’s easy…you just need to start with finding one image to build on. It’s a fun project to take on. HUGS.
Debbie @ Refresh Restyle says
Love it! I’d love to do a gallery wall!
judy says
Your travel gallery is an inspiration! I’d love to enlarge photos of our adventures & do a summer vacation album!
Kelly Rowe says
Sounds like a great idea Judy! I say go for it! Thanks for stopping by. Have a great evening. xo.
Megan says
What a great gallery wall! I love the theme! And way to represent Missouri in such a fun piece of art! Did you make that? I’m now off to see more of your blog. 🙂
Steph says
Love this idea! It turned out fantastic! I have a blank wall at home that I’d like to make a travel wall. Did you make the canvas that says “our happy place”? I really want one!
Kelly Rowe says
Hi Steph! Thanks so much for your kind words. I am in love with wall myself. That canvas was made on Shutterfly’s new site 🙂 Graphics and all. xo
Steph says
Awesome! Can you give me more details on how you made it? Is the graphic yours or was it available on the site?
Kelly Rowe says
The graphic/clipart was from their site, I think it was under travel… not sure I can give you any more details, you might just jump on their website and do a little exploring 🙂
Karuna Patil says
really great instructions and beautiful dislplay – i’m curious, did you make/purchase the vintage looking clip stand that is sitting on top of the books in the full display photos – I love it. It would be awesome if you could make those yourself!
Kelly Rowe says
Hi Karuna! Thanks so much for loving on my project. I purchased that clip stand in a little country store in Illinois. I would have to agree with you, it would make an awesome DIY. Hmmmm, now you’ve got m thinking 😉
Lori says
Hi Kelly! I LOVE this wall!! Where did you get the Missouri print?