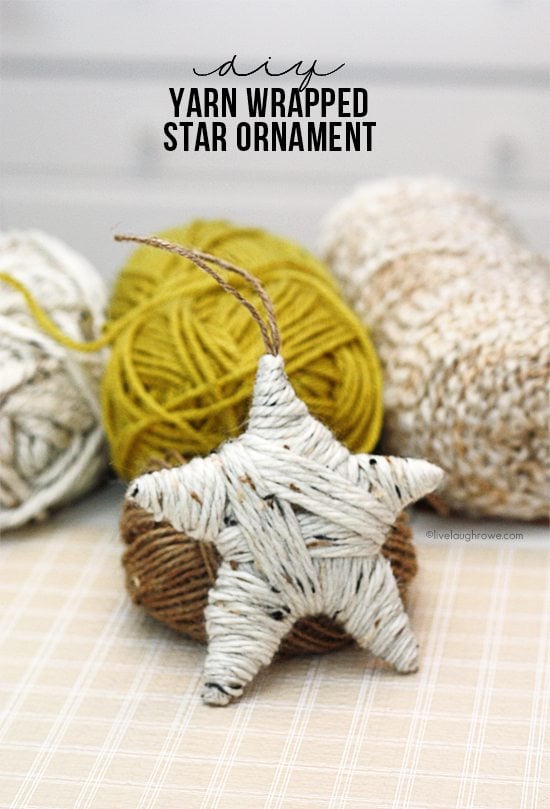
 DIY Yarn Wrapped Star Ornament

Supplies Needed :
Cardboard or Chipboard
Glue Gun
Scissors
Yarn (pictured is Aspen Tweed)
Twine
Star Template (the size and shape of your choice personalizes this tutorial).
 The very first thing you’ll want to do is decide on the shape and size of your star. Trace it onto the cardboard and cut. Note: My cardboard is white on one side and kraft on the other (as you will see throughout the images).
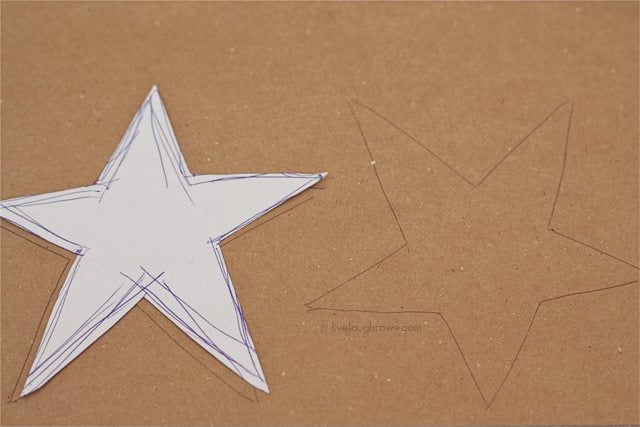 Cutting out Stars using a Template
Once you have your star(s) cut out, you’ll want to cut a piece of twine to use for your loop. I usually do a 7″-8″ strand for my ornaments, but that can vary based on personal preferences. Make sure your glue gun is warmed up and ready to go to work, here is where the fun gets started.
Now you’ll want to place a small amount of glue on the tip of the star and ensure that each end of your twine is secure. You’ll also want to put a dot of glue to place the yarn on before you start wrapping. And now you wrap… there is no mathematical, order or system to this.
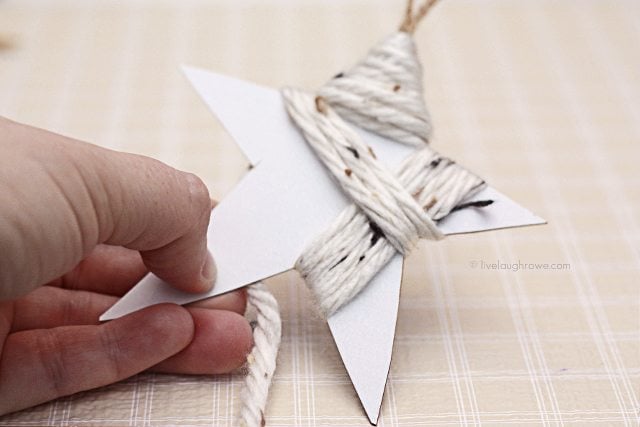 Just keep wrapping, going in different directions. This is thee element of this ornament that makes each and everyone unique, with a rustic feel. No perfection is necessary here {yay!}. For the perfectionist in me, that’s like a breath of fresh air {smile}.
Now, when you get to the points, you’ll want to be sure to use your glue gun. Place glue on both side to ensure that the yarn cannot unravel.
 Use Glue Gun on Corners
It’s a little hard to see, but it is picture above in the spotlighted section. So, how is your wrapping coming along? Just keep wrapping…until the entire piece of cardboard is covered and it appears that that the star is balanced overall. While a perfect wrap isn’t necessary, you don’t want one side of the star much thicker than the other.
As your wrapping, you can evaluate and adjust as necessary. However, once you glue a point, turning back is a little harder to do. As you near completion, wrap until you have the perfect spot to cut the yarn and inner twine it within the ornament. When that is determined, be sure to apply a dot of glue again to ensure it’s secure.
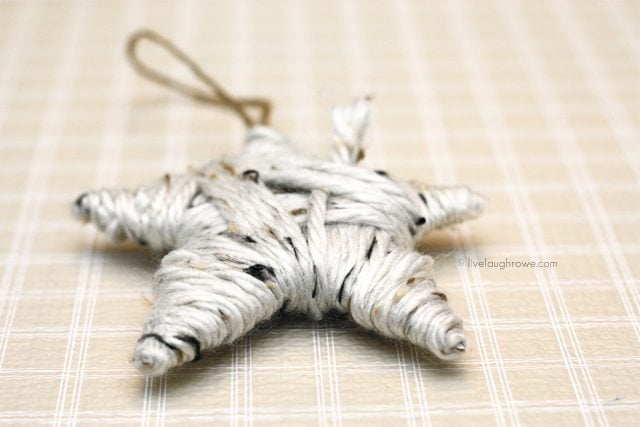 Once you’ve completed that step — VOILA! You have yourself a Yarn Wrapped Star Ornament. Isn’t this yarn fabulous too? It’s a favorite of mine, the color is called Aspen Tweed. I picked it up at Walmart and I’m in love with it’s color and texture. Their not difficult and can be made in all different shapes, sizes and color. Add one to your gifts for a little extra touch of love. Happy Crafting!
 Be sure to visit with me here too:


Mindie Hilton says
I adore your star ornament. Will have to make some. I would love for you to join my weekly linky, fri-monday, anything goes. I would also love to invite you to a 66 Etsy shop giveaway for Breaking Dawn that I am running now. Happy Thanksgiving.
http://bacontimewiththehungryhypo.blogspot.com/
Gen says
Love it! I'm going home later to make 10 of these beauties with jute to ornate my presents this year. Thank you so much Kelly for sharing! Gen
http://www.cabinfeveredgem@blogspot.com
Cathy @My 1929 Charmer says
I adore the star, such a creative idea, and quick, and easy. What more could a girl want. I will be making some of these and thanks so much for the tut. Would you share this over at Sunday's Best party going on now. I really think many of these will be make once they see your project.
Jamie - Snow In December says
That is beautiful! I'm pinning it, and it's going on my list of gifts to make for Christmas. Thanks for sharing such a cute idea.
Anonymous says
GREAT tutorial! Wonderful idea and images. 🙂 Thanks for sharing!
Marilyn says
Sooo creative and simply beautiful.. I absolutely love this.. I have a linky party happening for Christmas ornaments and I will LOVE for you to please share this lovely feature with me and my friends please : )) http://theartsygirlconnection.blogspot.com/2011/11/special-christmas-soiree1st-feature.html –Happily a new follower..wishing ya a great start to your week. TY
Crafty Mischief says
What a fun idea! I found you through The Girl Creative. Thanks for sharing!
fromgentogen says
These are precious — I love how pretty and easy it is. Thanks for sharing!
Blessings, Becky
http://www.fromgentogen.com
Elise says
I've been looking for ideas for inexpensive ornaments and these are perfect! So cute 🙂
http://growcreative.blogspot.com/
EvA. . . says
wow how cute! very pretty! 🙂 happy new follower 🙂
Tutus & Tea Parties says
Such a great project. I love using yarn since it's always on hand for me. I just might have to attach these to gifts this year.
I'd love for you to link up and share: http://tutusandteaparties.blogspot.com/2011/11/pinteresting-linky-party-week-fourteen.html
Tutus & Tea Parties says
Such a great project. I love using yarn since it's always on hand for me. I just might have to attach these to gifts this year.
I'd love for you to link up and share: http://tutusandteaparties.blogspot.com/2011/11/pinteresting-linky-party-week-fourteen.html
Tutus & Tea Parties says
Such a great project. I love using yarn since it's always on hand for me. I just might have to attach these to gifts this year.
I'd love for you to link up and share: http://tutusandteaparties.blogspot.com/2011/11/pinteresting-linky-party-week-fourteen.html
Heidi @ {Junk in their Trunk} says
Beautiful!! I would love for you to come link up at our link party right now…junkintheirtrunk.blogspot.com/2011/11/link-it-up-wednesday-4.html
Cathy @My 1929 Charmer says
I don't see the comment I just posted, so am trying again. I love the nature look of these stars. I will be making a few, or maybe a dozen. Wishing you a happy Thanksgiving. Thanks so much for sharing over at Sunday's Best.
Vicky says
This is so cute! I can totally see making these with my kids when they are a little older. LOVE! I am a new FB follower from A Glimpse Inside and I am pinning and stumbling this post. Vicky from Mess For Less
poindextr says
completely adorable! visiting from homework where I saw your star featured. And I so love it!! -diane
Liz says
I'm all about something that doesn't have to be perfect! A very cute ornament! Found this through the weekend wrap up party at Tatertots and Jello. Very neat!
CLH says
This is so cute and fun. I love the simplicity of it, and the variety of ornaments you could make. I think these would make a nice touch tied to the outside of a package.
Kelley @ TheGrantLife.com says
visiting from chic on a shoestring. what a stinkin cute little star! I love it! Thank you for the tutorial.. hopefully mine come out this nice 🙂
I would love for you to share this at my Friday link party.. and enter my TinyPrints giveaway while youre there 🙂
lauryn says
i love this! such a cute and inexpensive idea.
i think i will be making some of these!
definitely pinning it!
{love} lauryn @ lovenotesbylauryn.blogspot.com
Cathy @My 1929 Charmer says
I am so glad you shared these, now I know where to go for the tutorial when i start to make them. Thanks so much for sharing over at Sunday's Best.
ReMadeSimple Kristina says
These are so adorable! I've been decorating with yarn this Christmas and will be trying these for my home-they are beautiful and so affordable to make. Thanks for sharing!
Katherines Corner says
Very pretty, thank you for sharing this tutorial. Hugs
Rebecca @ My Girlish Whims says
I featured this on my blog tonight! Thanks so much for linking up to Your Whims Wednesday. Stop by and grab a button 🙂 http://www.mygirlishwhims.blogspot.com/2011/11/your-whims-wednesday-35-and-features.html
Rachel {Lines Across} says
I love these! Also thanks for the very helpful tutorial. I would love it if you would stop by and share at my crafty link party going on right now at Lines Across My Face.
I hope to see you soon,
Rachel
http://linesacrossmyface.blogspot.com/2011/11/cure-for-common-monday-19.html
Desiree @ The 36th Avenue says
Kelly, I love it!
Featuring you tomorrow during STICKER TIME 2!
Chris says
Hi there, well that's an unique ornament, very rustic. Thank you for sharing. I have recently found your blog and am now following you, and will visit often. Please stop by my blog and perhaps you would like to follow me also. Have a wonderful day. Hugs, Chris
OAK House 5. says
I love this idea! Going to make these this weekend with my girls! Thanks for the inspiration!
Jennifer Hayes says
These are so cute!! Thank you for sharing the tutorial. I featured you today in my Friday I'm In Love favorites!
http://socialsalutations.blogspot.com/2011/12/friday-im-in-loveits-chrstmas-time.html
xoxo
Jenn @ Social Salutations
Judy says
Just a great idea!
Thanks for the tutorial.
Hug
April says
So cute! I love the rustic look. I'd love to have you come link up at my Handmade Christmas linky party!
http://cupofdelight.blogspot.com/2011/12/link-party-delightfully-handmade.html
Rachel says
Beautiful. Thanks for sharing. You are being featured this week.
http://linesacrossmyface.blogspot.com/2011/12/cure-for-common-monday-20.html
Mary Sara P. says
Found you through Pinterest and just love this and your blog. Am now a follower of your blog. Thanks for the inspiration.
Kimara says
So simple, so beautiful. Thanks for sharing.
Nathaly says
I lIKE 🙂
ReMadeSimple Kristina says
Love love love! I will have to try these they will make a great gift also.
mauiloot says
Saw YOUR STAR on an Etsy treasury list and IMMEDIATELY had to figure out how to create…I will be selling these at my local outdoor craft market on Maui…thanks for your tutorial and inspiration Kelly..i finally know what to do with all that VINTAGE colored yarn I got at an estate sale years ago :))))
Mahalo,
Leslie
Kara at Petals to Picots says
Love, love, love these ornaments! Thank you for sharing at my party!
~Kara
Marti says
That’s adorable! Thanks for sharing.
{HUGS}
Marti
Sandra Fowler says
I tried hot glue with these but I have one of those super hot glue guns that burns skin off and melts way too fast and heats up so much that the glue sticks get jammed if you don’t unplug it constantly – so mostly I just made a huge mess.
BUT, I found that white glue makes a pretty good substitute. Easier to control. takes longer to dry but that was fine with me…it being April and all….
Kelly Rowe says
Awww, I’m sorry to hear you had a hard time with the glue gun, but YAY on making the white glue work… I’m not so patient, so I prefer the good ole’ glue gun 🙂 Thanks so much for sharing your crafting fun with us. I {love} that you’re making them in April too! Hugs.
Linda C In Seattle says
I love this idea!
So cute and fun.
Linda C in Seattle.
Michelle+(The+Ribbon+Retreat) says
I love this sweet, sweet ornament! It is so simple but so adorable. My Christmas Tree would love having these fun ornaments all over it! Thanks for sharing! PINNED!
Katie Hardin says
This is great! I like to change things up with my holiday decor but cannot go out and buy all new ornaments every year. I can’t wait to make these to spice up my decor!
Ntina says
I love your ornament! It’s such an inspiration!
Kyla+@HouseOfHipsters says
Kelly! These are super cute! I love them! I hope you share them at my new linky party starting this Saturday at 8pm called “Found & Foraged” Can’t wait to party with you at http://www.houseofhipsters.com
madeleine says
Yay! Thanks for the tutorial. It’s exactly what I had in mind to make with my twins for their teacher’s special christmas gift! Happy holidays!