
Easter, how I {love} thee! Spring ,come quickly!! I’m actually going to share one of two bunny projects with you today…. and Vintage Easter Bunny Favors tomorrow. I decided to break it up so that it wasn’t a mile long post {giggle}. You’re welcome! {hee-hee}. I’m super excited about these DIY Stuffed Bunnies. They turned out even cuter than I imagined and I think they would make cute decor sitting on a mantel or used as an Easter basket filler.

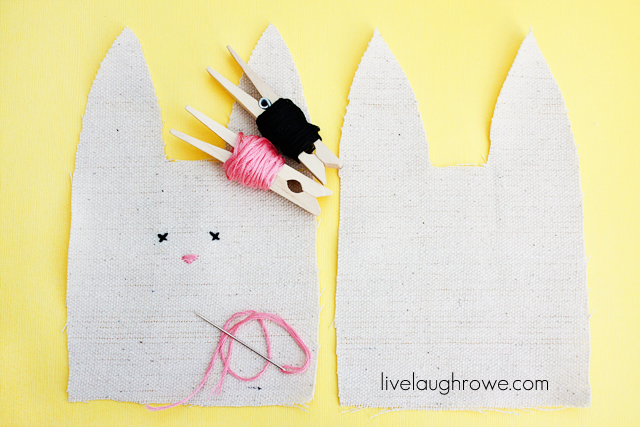
I started by drawing out the size and shape of the bunny I wanted to make on paper and cutting it out to use as my template. Mine measured approximately 6″ high (measuring from the bottom to the top of the ear) by 3-3/4″ wide. I used canvas drop cloth for this project. I wanted to use something a little more dense then fabric and also something I had on-hand. My canvas drop cloth from Lowe’s fit the bill! The same drop cloth I used for my Painted Drop Cloth Soap Wraps.
Anywho, once you have your template, trace and cut out two of the bunny shapes. You’ll then want to stitch on your eyes with black embroidery floss and pink for the nose.
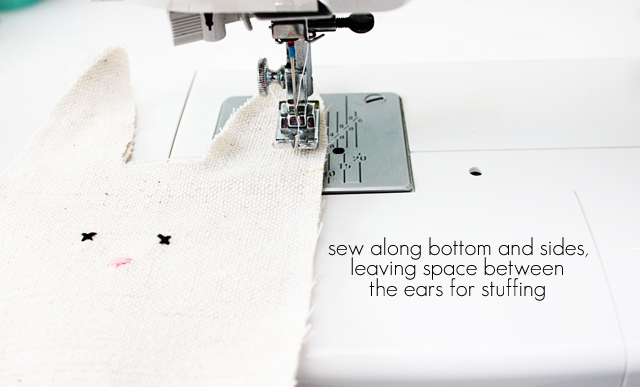
It’s now time to sew this sweet bunny up. I used my sewing machine and sewed up each side two times. The weave on drop cloth is a little on the looser side, so stitching up all off the sides a second time ensured that it wouldn’t fall apart (at least not easily).
As the picture states above and shows below, you’re going to need to leave a space for stuffing. I chose to keep the area between the ears for stuffing purposes. You could easily choose to this along the bottom as well, that is a matter of preference.

You’ll then stuff (I used a poly-fil) and stitch! Technically you’re done at this point; however, if you want to add a little extra personality, add a little ribbon bow or fabric bow tie to distinguish between a boy and/0r girl. These are super easy, adorable and perfectly festive for theEaster holiday. I love-love-love the unraveled edging around these sweet bunnies too. I guess it adds an extra bit of character, a little imperfection can be fun.
 What do you think of these stuffed bunnies?
Do you have any bunny crafts to share?
Link them up in the comments! I’d {love} to see.
Be sure to swing back by tomorrow for a drop cloth bunny favor idea!
I’m super excited to share it with you! “Hoppy” Crafting! xo
I’ll be partying {here and here}.
Subscribe to Updates | Like on Facebook | Follow on Pinterest


Maria says
These are too cute!
Jess says
These are too cute! I think I may make them!! 🙂
I would love for you to join my Link Up! 🙂
http://www.pluckys-secondthought.com/pluckys-link-up-and-blogiversary-celebration-giveaway/
Lana @ Never Enough Thyme says
Now, how precious are these little bunnies! Love them.
Stacy E. says
Adorable! I love these; you did a great job.
Stacy
Amy Mayen says
I can just see those in my nephews little Easter baskets. I’d put their names on them too!
Márcia Carvalho de Souza says
I’ll make two them!! So beutiful!
Cindy Eikenberg says
Kelly, these are so adorable!! A whole family of these would look so cute on the mantel. Am pinning! Have a great weekend!
Brenda @ a farmgirl's dabbles says
These are way cute. I love their tattered edges!
Debbie says
So cute! I love the unraveling edge too. It does add character.
Debbie 🙂
Amanda says
Kelly, these are incredibly adorable!
Melissa B says
These are so cute! I love the unraveling around the edges too! =)
Pinned to save.
TidyMom says
These are so cute Kelly! i love the raw edges too, makes this super duper easy!!
Taelia88 says
Wonderful tutorial! I loved the outcome! They turned out so cute!
Great post!! I included it in my post Βόλτα στη Γειτονιά #25 🙂
Have a great week!!
Kathy says
Very cute! Thanks for the tutorial.
Susan says
Adorable!
kristine says
These are absolutely adorable! LOVE-LOVE! GREAT DIY! Thank you for sharing your creativity with us!!
Bonnie @ Uncommon says
Kelly…these are soooo cute!! Adorable! Thanks for sharing the tute!
Mindie says
Cute!
Emily says
Oh my, those are too cute! How fun would those be in my boys Easter Baskets!!??? pinning :o) I stopped over from Ginger Snap Crafts… would love to have you come check out my link party.
Maysem says
Super duper cute bunnies!
DesignedByBH says
Aww, these are adorable! I like the little noses. 🙂
Thank you for sharing them!
aquariann says
Adorable! ^.^
Btw, I’m hopping by from Whimsy Wednesday and hope you’ll join my Bunny Blog Hop fun, too.
Christina @ I Gotta Create! says
These are so cute, Kelly! I will be singing their praises on facebook and g+ 🙂
Thanks so much for linking up at the party,
<3 Christina @ I Gotta Create!
Jenn says
These are super cute Kelly! Love the rustic look! Thanks so much for coming out to the party at Clean and Scentsible. I will be featuring these tomorrow. Enjoy your Sunday!
Jenn 🙂
Charlotte says
I saw these via craftgawker, they are soo cute, love them!!
Christine says
Absolutely ADORABLE Kelly!
Thanks so much for sharing this at The DIY Dreamer… From Dream To Reality last week. I can’t wait to see what you link up tomorrow evening!
Christine says
CONGRATS!!!!!! You have been featured at The DIY Dreamer! YAY!! Come on over and grab your featured button, you deserve it!!
http://thediydreamer.com/from-dream-to-reality/features-58/
Don’t forget to swing by this evening to link up again to From Dream To Reality!
Susan @ SunfowerHugs.blogspot.com says
This is such a great idea I have tons of leftover drop cloth from a slipcover project and I am definitely going to make some of these for my daughter.
Thanks for sharing!
Kelly says
Hello there! This pretty post will be featured on Whimsy Wednesday at Smart School House today. We are always so honored to have you with us (I know a good partier when I see one!). The new party and your fabulous feature will start this afternoon!
XOXO
Kelly at Smart School House
FB- http://www.facebook.com/SmartSchoolHouse
G+ https://plus.google.com/u/0/111902135882668872474/posts
Twitter- https://twitter.com/SmartSchoolHous
Denise... On A Whim says
I’m pinning these adorable bunnies. They just couldn’t be any cuter! 🙂