Since we moved into our house almost 5 years ago… I’ve ALWAYS wanted an oversized kitchen chalkboard! I was going to just buy one — which would cost hundreds of dollars.
Well, I’m happy to report that I finally got around to teaming up with the hubs and we made one for under $30. Woot!
 You can purchase all of the following supplies for this project at your local hardware store.
Three 1×4’s
Sheet of plywood (32″ x 48″ and 1/4″ thick, see below)
Chalkboard Paint
Tacks or Staple Gun
Mini Rollers for painting
Rags or Brushes for staining

 Step One: Apply the Chalkboard Paint
Go ahead and put a couple of layers of chalkboard paint on your plywood. While that’s drying, let’s take a few minutes to beat up our 1×4’s a bit. Note: This is optional.
 Step Two: Distress Wood for Frame.
These two tools will create some character. A few gouges and dings here and there.
Step Three: Stain Wood for Frame.
Stain the wood, I used a Chestnut color; however, your favorite stain will work.
 Step Four: Attach Plywood to Frame
Tack the plywood on to all four sides with small nails or a staple gun.
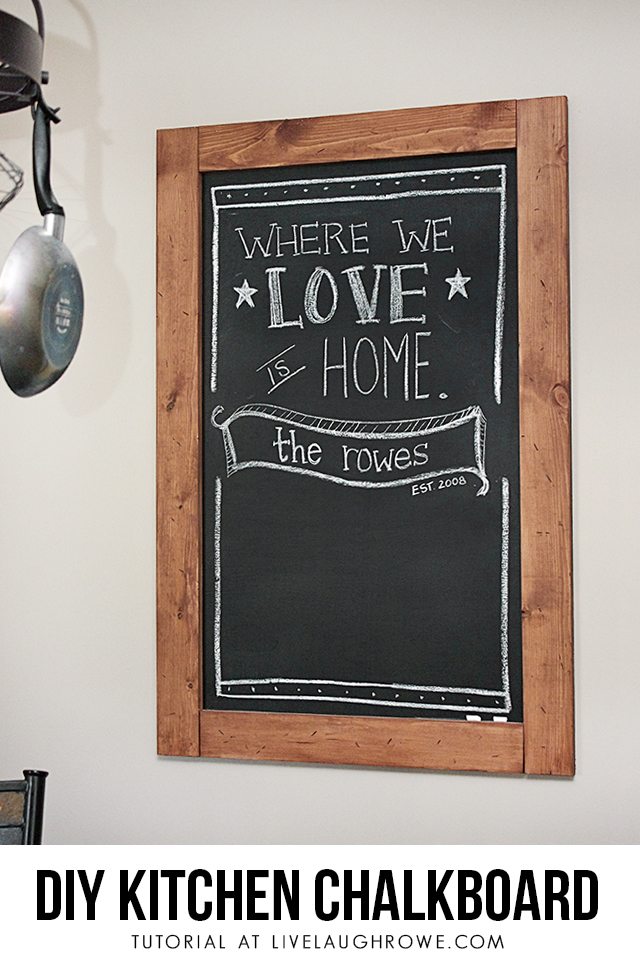
 …and you have yourself a fabulous chalkboard!
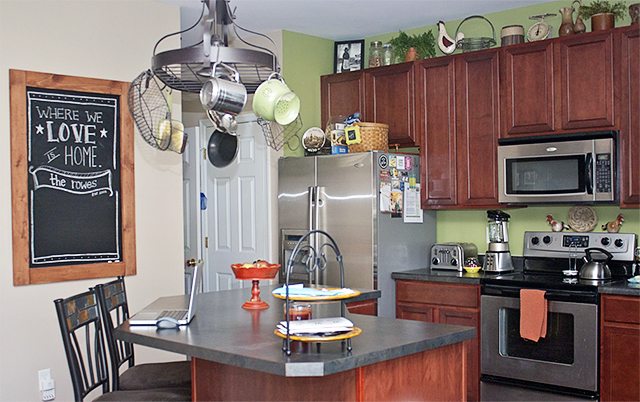
 Check out the before and after.
 I think it was always meant to be — such a shame that I waited so many years. Right? I couldn’t be happier with how it turned out. Oh the fun… quotes, love notes, etc.
 What do you think of my kitchen chalkboard? I’d love to hear from you in the comments below.
 Be sure to visit with me here too:
Facebook | Instagram | Pinterest | Twitter | Google+


Jessica @ Mom 4 Real says
Love it! I can’t believe you and hubs made it yourself! Your kitchen is too cute!
Kelly says
Thanks, Jessica 🙂 It’s been a fabulous addition to the kitchen. Hugs.
Sarah @ Alderberry Hill says
So purdy in your lovely kitchen…love the quote too! Happy Canadian Thanksgiving!
Kelly says
Thanks, Sarah! Happy Canadian Thanksgiving to you too!! Hugs.
Claire says
This looks great 🙂
I was thing of doing similar to make a menu board …
Hope your having a great day
Claire x
Kelly says
Hi Claire! You should definitely consider making one for a menu board. You’d love it!!
Laura @ Our Prairie Home says
Oh wow, Kelly! I love that chalkboard! What a perfect touch to your kitchen! (My kitchen is the same color green… LOVE!) Hope you have a fantastic day!
Kelly says
Thanks so much, Laura! Have a fabulous weekend. Hugs.
nest of posies says
it looks awesome! great job.
Kelly says
Thanks so much, Kellie!
Natassia says
I love this!!! Love it and want to do this!!!
Kelly says
YAY! Thanks so much for loving on my project 🙂 I hope you do make one, just be sure to send me the link! I’d love to see it. Hugs, Natassia.
Deborah says
LOVE IT! You will have so much fun now putting up messages ang fun sayings! Why did you wait so long?!?
Kelly says
Hi Deborah! I know… why did I wait so long. That silly thing called procrastination…. hee-hee. Hugs!
Camille says
Wow!!! I think it REALLY adds to your kitchen! It’s a perfect place. It was yellin’ at you for 5 years…”give me a chalkboard..PULEEEZ put a chalkboard here!” lol It looks just great, Kelly!
Kelly says
Thanks so much, Camille! I think the wall is officially happy {giggle} Have a great weekend. Hugs!
Leslie Stewart says
Loving this!!! It made such an amazing difference. Perfect size for that spot!
Leslie
House on the Way
Kelly says
Hi Leslie! Thanks so muh for loving on my project. I couldn’t be happier. Have a fantastic weekend. Hugs.
Judy H. says
Your chalkboard looks like something out of Pottery Barn, or better! You guys did a fabulous, very professional job on this. Not only is this going to be amazingly useful for you and your family, but it’s also a wonderfurl piece of wall decor!
Kelly says
THANKS SO MUCH, Judy! I’ll take a Pottery Barn knock-off compliment any day 🙂 We are both so pleased as to how it turned out. Thanks again. Have a great weekend. xo, Kelly
Sandra @Beneath this Roof, Within these Walls says
Perfect!! It is a shame you waited so long, but what a treasure you have now, I love it.
Kelly says
Thanks so much, Sandra!! I know, it is a shame that we waited so long… We absolutely love it!!
deana rogers says
I have been wanting to do a chalk board in my kitchen as well. I am not sure if I have the wall space for it though. There is a place next to one of my cabinets that looks like it might have had a cork board or even a chalk board in it at one time or another. There is nothing in that space now and I had been thinking of adding one there. I did buy some the spray paint version on the intention of using it on material till I was told I could buy chalkboard material. I like the farm work you put around your chalk board it looks really good in your kitchen. I guess this year the color green is the color for the kitchens. I have green in mine as well just a shade darker than yours though. With chickens and chicks for decor and any farm type items to add to it. When I get it done I will post a pic so you can see it.
deana
Kelly says
Hi Deana! Yay, so glad to hear that you might be adding one to your space. Please do share, I’d love to see it! Thanks for stopping by. HUGS!
SherryBee in AZ says
L.O.V.E.!
Now, I want one, too!!!
LOVE your kitchen, too!!!
Kelly says
Thanks so much for stopping by and loving on my projects! Have a fabulous weekend! Hugs.
Emily says
VERY cute!! Looks too difficult for me to make LOL and I LOVE the color of your kitchen!
Kelly says
Hi Emily! It really isn’t that difficult… I promise. Thanks for stopping by — and leaving some comment love. Hugs.
Gina says
Oh my gosh Kelly!!!!! I love it! Definitely have to find a wall for that because I have always wanted one for the kids.
Kelly says
YAY! So glad you love it — it’s a perfect addition to any kitchen. Send pics if you do make one 😉
Bliss says
Love it, pinned it.
Bliss
Kelly says
Thanks so much, Bliss! xo, Kelly
Cassie says
This is co cute!!
Kelly says
Thanks, Cassie! I’m kind of in love with it. Have a great weekend!
Debbie says
I love it! I’ve got some chalkboard spray paint and just last night told my husband we need to make a chalkboard for our grandsons so they don’t have to climb on a chair to use his small one in the pool cue/scoreboard hanger.
Thanks for the inspiration!
Debbie 🙂
Kelly says
Thanks so much, Debbie! Be sure to share your chalkboard if you do make one 🙂 I’d love to see the finished product. Have a great weekend. Hugs!
christina says
Hello
I currently copied your instructions except I used Valspar spray paint and when i used a chalkboard marker it will not come off. What kind of chalkboard paint did you use?
Thank you
Kate says
This is perfect!! I was looking for a chalkboard for my kitchen but I havent found anything I liked. I LOVE this!! I am going to try to make one myself
Paula Parrish says
Love your new Chalkboard. Nice Work! ;o)
Jennie says
FANTASTIC! I love the after, and the chalkboard is perfect. hugs, jen
Felicia says
We are in the process of one of these ourselves. I’ve decided to paint the entire side of our pantry because we need a lot of space to write! ha!
Ellora@ Creatively Southern says
Love this! I already have the chalkboard in our dining room, but have never got around to framing it. I’m definitely doing this after seeing your post. Looks great! Thanks for the inspiration!
Bonnie and Trish @ Uncommon says
Love this Kelly!! what a welcoming feeling!!! Great job!
Laura @ The Turquoise Home says
Thanks so much for posting this! I just bought a can of chalkboard paint at a yard sale this weekend and have the perfect wall for it in my kitchen. I was planning to do this before I saw your post, but now I know how to! Thanks so much!!
Rachel (Lines Across) says
I love it! I also love your kitchen… especially the wall that the chalkboard is on. I’ve been dying to do some sort of chalk board project and you’ve made me want to even more. 🙂
Naimah says
Great project! I just had to share this on Facebook!
Kelly says
Thank you!! Hugs, Kelly
Beckie says
This is a great tutorial and it turned out super awesome! love it! Sharing it over on my FB tonight….
Kelly says
Woo-Hoo! Excellent news, Beckie! Thank you so very much. Have a great day.
Crystal says
Ouhh I love this! It reminds me of something I’d find at World Market. 🙂
KATHY says
I love it, I wanted to do one just like that in my kitchen. It seems like it might be heavy, how did you hang it up?
I don’t want mine falling off the wall while I am writing on it. LOL
Kelly says
Hi Kathy. Thanks so much for loving on my project 🙂 The plywood is so thin and lightweight, so the chalkboard doesn’t weigh all that much. We hung ours with two saw tooth hangers on either side.
Lizzy Jude says
Lovelove this idea! It makes such a difference in your kitchen and is such a fun, creative, and functional way to add a statement piece to your wall.
Tazz says
love it! we’re moving into our own house soon, and I’m pretty adamant on having one of these!
Regina says
The chalkboard is so cute! I’m looking to make one for my kitchen. The one you created is the perfect size!
Joy says
I love this. It would be great for the “hey we are out of milk and bread” notes that I never remember to write, then of course get back from the store without milk and bread! LOL. Great project and great price!
Heather says
I have a question, is the tacking of the plywood to the four corners holding the frame together? how did you get the frame to stay together? Liquid nails?