• Skip to primary navigation
  • Skip to main content
  • Skip to primary sidebar
  • Skip to footer
Live Laugh Rowe
  • About
    • About Me
    • Contact Me
    • The Rowes
    • In The Press
    • PR & Advertise
    • Privacy Policy
    • Resources
  • Recipes
    • Appetizers/Snacks
    • Beverages
    • Breakfast
    • Desserts
    • Main Dish
    • Side Dishes
    • Sandwiches
    • Skinny Dishes
    • Slow Cooker
    • Soups/Chilis
    • Weight Watchers
  • Crafts & DIY
    • Crafts
    • Decor
    • DIY Projects
    • Fall Projects
    • Holidays
    • Home Projects
  • Printables
  • Shop My Home
  • Facebook
  • Instagram
  • Pinterest
  • Twitter
Subscribe
Live Laugh Rowe

Live Laugh Rowe

A lifestyle blog that shares crafts, recipes, tutorials and life's moments.

  • About
    • About Me
    • Contact Me
    • The Rowes
    • In The Press
    • PR & Advertise
    • Privacy Policy
    • Resources
  • Recipes
    • Appetizers/Snacks
    • Beverages
    • Breakfast
    • Desserts
    • Main Dish
    • Side Dishes
    • Sandwiches
    • Skinny Dishes
    • Slow Cooker
    • Soups/Chilis
    • Weight Watchers
  • Crafts & DIY
    • Crafts
    • Decor
    • DIY Projects
    • Fall Projects
    • Holidays
    • Home Projects
  • Printables
  • Shop My Home
  • Facebook
  • Instagram
  • Pinterest
  • Twitter
Subscribe

DIY Snowman Soup Can

12/05/2011 · Kelly Rowe · 18 Comments

This post may contain Amazon or other affiliate links. As an Amazon Associate I earn from qualifying purchases.

Pin
Share
Tweet
Share

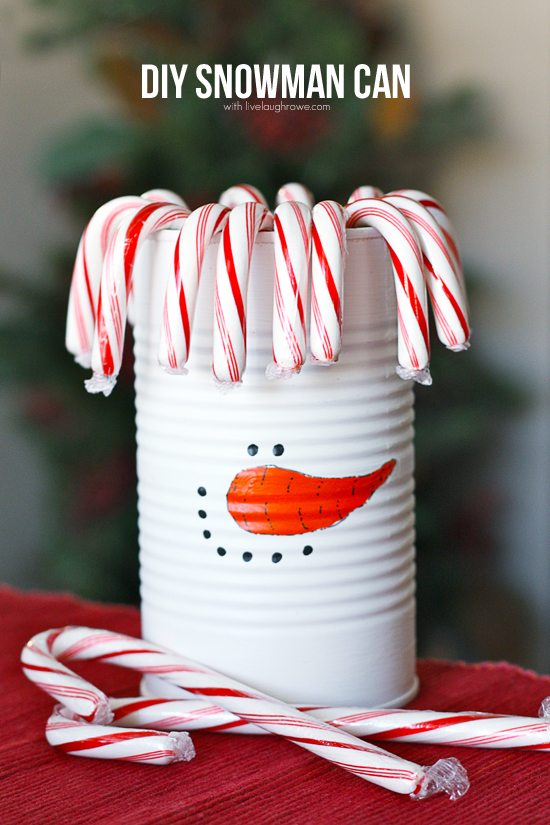
Todays craft is for the snowman lover.  Here is a simple, yet fun DIY project using soup cans. It’s perfectly wintery and would make a fun gift!  Add candy canes or use as a pen holder. This DIY Snowman Soup Can is sure to be a hit!

DIY Snowman Can using a soup can and acrylic paint to create this adorable snowmans! Tutorial at livelaughrowe.com
Snowman Tin Can

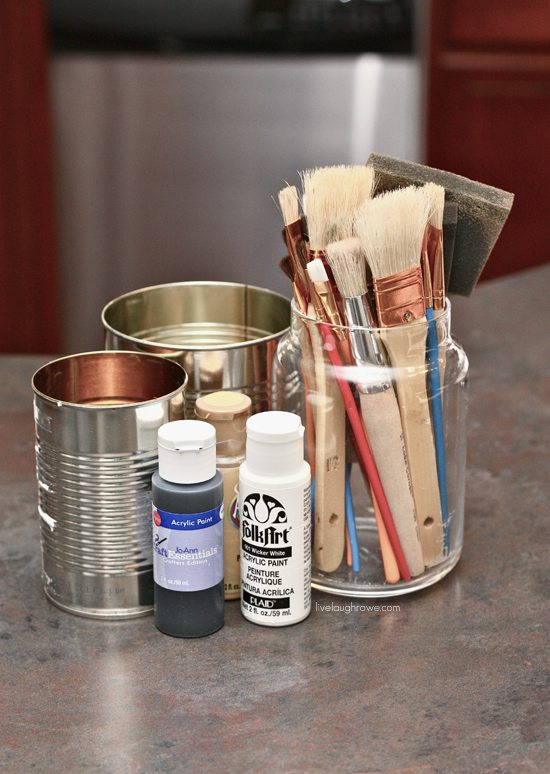
Supplies for Snowman Can:

Soup Cans (or any can in the shapes/size of choice)
White Acrylic Paint
Black Acrylic Paint
Orange Acrylic Paint
Paint Brushes (I like to use foam brushes for the cans/jars)

There really isn’t any step by step pictures because it’s pretty self explanatory.  Start by painting the can white.  You could spray paint it, but I chose to paint the can using a brush or foam sponge with the basic white acrylic paint. 

Once that’s done and dry, you can paint your snowman’s face on free hand.  No stencils or patterns are necessary.  Sometimes toothpicks can come in very handy when painting those small ‘coal’ dots for the eyes and the mouth. 

Once you’ve completed these steps — you’re basically done!  Voila.  You have a perfectly sweet and frosty Snowman Can.

Fill with candy canes… or any of your favorite sweet treats.  I’m personally in {love} with the candy cane hairdo {giggle}. Isn’t it the cutest?  And super duper festive?

DIY Snowman Can using a soup can and acrylic paint to create this adorable snowmans! Tutorial at livelaughrowe.comIt’s such a fun time of the year!!
What are you busy crafting?

xo KellyBe sure to visit with me here too:
Facebook | Instagram | Pinterest | Twitter | Google


Pin
Share
Tweet
Share

Related Posts

Soup and Crackers

Crockpot Chicken Noodle Soup Recipe

Tortellini Soup Recipe

Tortellini Soup Recipe with Beef

French Onion Soup with Bread Bowls

25+ Best Soup Recipes and MORE! A great round up for the soup lovers! livelaughrowe.com

25+ Best Soup Recipes and More!

Soup is Served

Chicken Tortilla Soup Recipe | Classic Mexican Recipe

Slow Cooker Soups and Chili Recipes Collage

Slow Cooker Soups + Chili Recipes

Christmas, Crafts

Previous Post: « Eden Ministry Jewelry {WINNER}
Next Post: Christmas with the Rowes 2011 »
about kelly

ABOUT KELLY

A DIY fanatic, Kelly shares her journey through her blog, Live Laugh Rowe, where she showcases her recipes, tutorials, crafts, home projects, and all things DIY. This East Coast Girl at heart believes family is number one as she finds the perfect balance of being a daughter, wife, sister, entrepreneur, writer and woman of God. Be sure to follow along as she shares her passion for life, love and family! Read more...

Reader Interactions

Leave a Reply Cancel reply

Your email address will not be published. Required fields are marked *

Recipe Rating


Comments

  1. I am LOVD says

    12/05/2011 at 3:40 pm

    So cute and simple but I know, surely, my carrot nose will not come out like that. Not with my paint talents – no way, no how! Great job!

    Reply
  2. Kaysi says

    12/05/2011 at 10:22 pm

    Super cute!

    Reply
  3. fromgentogen says

    12/06/2011 at 7:17 am

    Love the hair-do 🙂 Very cute, thank you for sharing!
    Blessings, Becky
    http://www.fromgentogen.com

    Reply
  4. Kim says

    12/06/2011 at 7:59 am

    So cute!

    Reply
  5. SJB AKA SUE J-B. says

    12/06/2011 at 1:15 pm

    So cute.

    New follower via The Sasse Life(Sunday social)

    http://www.sjb-myphotopage.com/

    Reply
  6. kris says

    12/06/2011 at 10:02 pm

    Love it. 🙂 Thanks for sharing!

    Reply
  7. AmieAnn says

    12/07/2011 at 2:03 am

    This is sooo stinkin cute! And I just love that the candy canes look like hair!
    Thanks so much for sharing with the Pink Hippo Party.. can't wait to see what you share next!

    Reply
  8. DannyB says

    12/07/2011 at 7:30 am

    Great work! I think these would be great gifts for the secretaries at work! Certainly would brighten up their desks in a very fun way. Oh and teachers, dispatchers, clerks… on and on!

    Reply
  9. Marilyn says

    12/07/2011 at 5:03 pm

    Thanks SO much for linking to Pin'Inspirational Thursday's last week.. This is SO awesome and festive for the season.. I love it.. Hope you can come back this evening and link up again.. xoxox.. Marilyn

    Reply
  10. June Scott says

    12/07/2011 at 10:23 pm

    He's adorable, Kelly. I definitely need to make one for my collection 🙂

    Reply
  11. Sherry says

    12/08/2011 at 7:27 am

    This is so cute, I can see me doing this and filling it up with cookies or brownies…thanks for sharing. I'm a new follower, please drop by for a visit when you can.

    Reply
  12. Lindsi B says

    12/09/2011 at 12:57 pm

    A for adorable! I love reusing things from the house! Would you please share this with my readers for Fun Stuff Fridays linky party? http://www.toysinthedryer.com/2011/12/fun-stuff-fridays-3.html

    Reply
  13. Jennifer @ The Brilliant Crafty Type says

    12/09/2011 at 7:50 pm

    This post made me go "eeeee!" I have a couple of cans that I JUST used so I was holding on to them to make something adorable to put outside… THIS IS IT! Thank you for sharing!

    Reply
  14. Jennifer @ The Brilliant Crafty Type says

    12/09/2011 at 7:52 pm

    Oh and I LOVE the way you list your link ups. I am officially thieving that idea!

    Reply
  15. Tina @ MOMS CRAZY COOKING says

    12/10/2011 at 12:42 am

    We are doing “Gifts in a Jar” today on 12 Days of Christmas Goodies. We would love for you to come share this great idea!

    http://momscrazycooking.blogspot.com/2011/12/12-days-of-christmas-goodies-day-9.html

    Reply
  16. Jenny says

    12/11/2011 at 11:00 pm

    I love this!! So adorable! I linked you up on my linky party today!! My readers will love seeing your project!!!!
    http://aworldofcrafts.blogspot.com/

    Reply
  17. cathy@my1929charmer says

    12/14/2011 at 8:04 am

    So cute, simple and inexpensive, so a great project to do. I'm not very good at free hand, I think it's because I have one of the worse handwriting in the world. People complain about it forever. But I'll give it a try. Cause who will see but me! Thanks for sharing over at Sunday's Best. Now following you, hope you follow back! Love how you list the linky parties you join in with.

    Reply
  18. Evelene says

    12/14/2016 at 8:36 pm

    Okay I should have read your directions. I spray painted the cans – the fumes were horrible. I also run with scissors. I haven’t learned yet? Thank you cute office gifts.

    Reply

Primary Sidebar

Looking for something?

Hey there! I’m Kelly.

I’m the author, creator, cook, and photographer behind the blog. I am so glad you’re here!  I’m passionate about life, family, and my faith. If there’s one thing I’ve learned in my journey, life is hard, but God is good.  Read More

Popular on Pinterest

Valentine Favors with cones and candy.

Footer

  • Facebook
  • Instagram
  • Pinterest
  • Twitter
  • YouTube

Looking for something?

Copyright © Live Laugh Rowe, LLC • Privacy Policy • Log in