
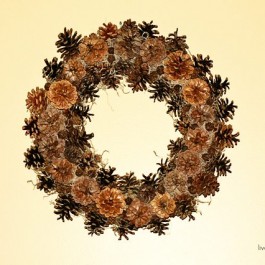
 First things first — do you follow me on Instagram? If not, you should {smile}. I shared the picture above as a sneak peek last week. Paper Pinecones. Can you believe how fabulous this looks and that it’s made with PAPER!?! Love it! I think I was giddy as I assembled these pinecones. It was mesmerizing to watch it come together. Seriously.
Confession: this post is a bit of a teaser. Why? Well, because this was made with a Sihouette Cameo. The good news is that if you don’t own one, I’ll be co-hosting a fabulous giveaway for one on Friday, November 16th. Woot! YOU could win your very own. Yay!!
So, let’s take a quick look as to how to make these beauties. I downloaded the 3D Pinecone from the Silhouette shop. It happened to be FREE at the time; however, you could purchase one for only .99
Supplies:
Silhouette Cameo
3D Pinecone template
12×12 Brown Cardstock
Craft Wire
Wire Cutters
Round Nosed Pliers
 Once I downloaded the file, I opened it up in Silhouette. I did not resize anything. I went ahead and used as-is. The numbers will not print/cut, they are simply guides for assembling the pinecone. You’ll need 12×12 sheets of brown card stock Different shades are fun for some added color. Place your sheet of paper on the cutting made, load and cut.
 Here it is after the cutting is done. Lots of little pieces {smile}.
 I’ll be honest in saying that at first I was a little overwhelmed by all the pieces. Plus, I didn’t have the silhouette tool to assist in removing them from the mat. However, we (as clever crafters) always seem to make do — hee-hee! Don’t laugh, but I used one of my Pampered Chef stone scrapers. It worked like a charm!
You’ll want to be sure that you remove these pieces from the mat from 1 to 17 (as seen on your computer screen — see above) and create a pile that will then be used to assemble the paper pinecones. From here on out, I’ll refer to the pieces as stars/snowflakes.
 Now you have your stack of stars/snowflakes for assembly. You’ll flip your pile over so that the small round piece is used first. Cut a 4-1/2″ to 5″ piece of wire and loop at one end so that the pieces cannot slide off. You’re now going to add your first star/snowflake and wrap each side up and over the wire.

 You’ll just continue to add each piece to the wire.
Wrapping each side of the star/snowflake up and over the wire.
 The more you add, the more you see the making of your paper pinecone. Once all the pieces are added, you’ll loop the wire again at the top to complete the project. You may or may not have extra wire, depending on how loose/tight you make your pinecones. Be sure to trim off any excess and be sure it’s not sharp. We wouldn’t want anyone injured on these little beauties.
 Use as a festive favor — or for some rustic decor! You could also string and use as garland.
The possibilities are endless. Ooooo and Awwww your guests!
What do you think? Are you ready to win the Silhouette Cameo?
Happy Crafting!
.
I’ll be partying {here and here}.
Subscribe to Updates | Like on Facebook | Follow on Pinterest


Jill @ Create.Craft.Love. says
Those are so stinkin adorable! I can’t believe they are so easy to put together! It looks like it would have been more difficult to assemble! They look great!
Rebecca @ My Girlish Whims says
so fun! I missed snagging that free shape – boo!!
Jessica @ Dear Emmeline says
those are so fun! I see so many fun projects with the silhouette. wish I had one!
Rose :: Fine Craft says
Really beautiful cones. Glad you had so much fun with ‘m. and they look fantastic. Come link it up at http://www.finecraftguild.com/party-3/
Mignonne says
These are beautiful. They would make a nice center piece
Gina says
How clever is that!!! Love those.
TidyMom says
These are adorable Kelly!
Rachel (Lines Across) says
So cute! Makes me want a Silhouette! I saw these at Craftgawker and I was immediately drawn to them before I even knew they were yours 🙂
nest of posies says
so cute & clever. i