• Skip to primary navigation
  • Skip to main content
  • Skip to primary sidebar
  • Skip to footer
Live Laugh Rowe
  • About
    • About Me
    • Contact Me
    • The Rowes
    • In The Press
    • PR & Advertise
    • Privacy Policy
    • Resources
  • Recipes
    • Appetizers/Snacks
    • Beverages
    • Breakfast
    • Desserts
    • Main Dish
    • Side Dishes
    • Sandwiches
    • Skinny Dishes
    • Slow Cooker
    • Soups/Chilis
    • Weight Watchers
  • Crafts & DIY
    • Crafts
    • Decor
    • DIY Projects
    • Fall Projects
    • Holidays
    • Home Projects
  • Printables
  • Shop My Home
  • Facebook
  • Instagram
  • Pinterest
  • Twitter
Subscribe
Live Laugh Rowe

Live Laugh Rowe

A lifestyle blog that shares crafts, recipes, tutorials and life's moments.

  • About
    • About Me
    • Contact Me
    • The Rowes
    • In The Press
    • PR & Advertise
    • Privacy Policy
    • Resources
  • Recipes
    • Appetizers/Snacks
    • Beverages
    • Breakfast
    • Desserts
    • Main Dish
    • Side Dishes
    • Sandwiches
    • Skinny Dishes
    • Slow Cooker
    • Soups/Chilis
    • Weight Watchers
  • Crafts & DIY
    • Crafts
    • Decor
    • DIY Projects
    • Fall Projects
    • Holidays
    • Home Projects
  • Printables
  • Shop My Home
  • Facebook
  • Instagram
  • Pinterest
  • Twitter
Subscribe

DIY Vintage Book | Paper Mache

09/11/2012 · Kelly Rowe · 35 Comments

This post may contain Amazon or other affiliate links. As an Amazon Associate I earn from qualifying purchases.

Pin
Share
Post
Share

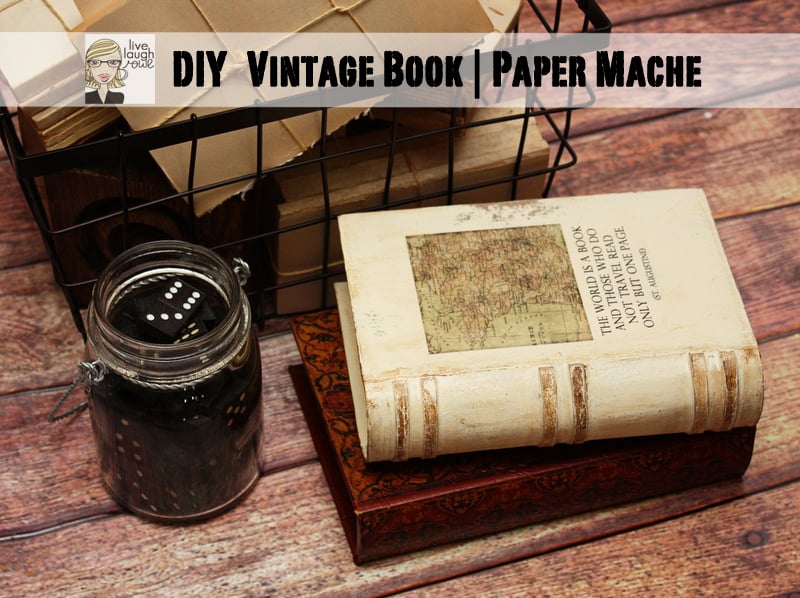
Today I have a super fun project — DIY Vintage Book with paper mache.  So, let’s get this project underway.
Supplies:  

Paper Mache book
Paintbrushes/sponges
Acrylic paints
Adhesive (mod-podge, spray, or glue stick)
Image if you so choose

I used the Scrapbooking Attitude product to transfer my image onto the book.

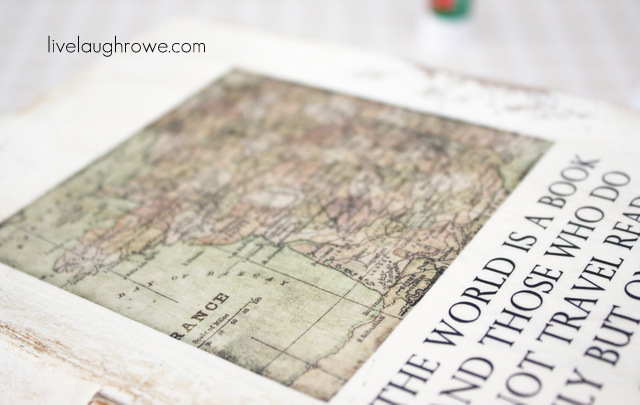
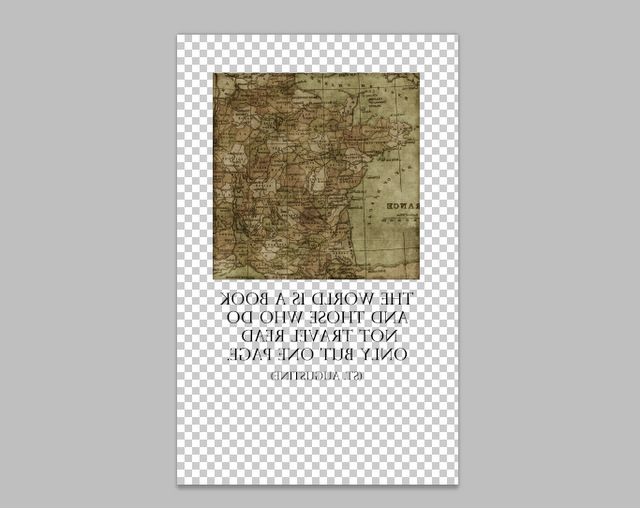
The first thing I did was design what I wanted on the front of my vintage book.  I designed this in Adobe Photoshop, then flipped the image (as seen below).   I printed this on a sheet of the printable scrapbooking film by Scrapbooking Attitude.  This will ensure that the picture and words are facing the right direction when applied to the book.  

p.s. This product is pretty cool and can be used to transfer images onto just about any surface!  I was dying to work on some paper mache, so the book won {smile}.
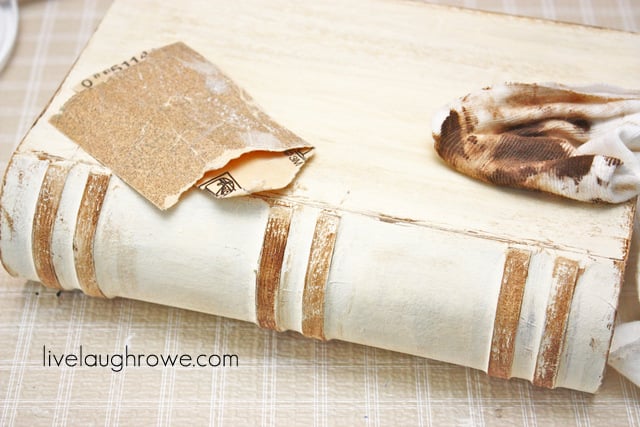
Once the image is printed, we’re ready to go to work on the book.  The first thing we need to do is paint the paper mache book.  I applied two separate coats.  Obviously, I wasn’t super particular due to the fact that I was wanting the book to look vintage.  I sanded the book a little bit,  then went ahead and added a faux stain with brown acrylic paint that I watered down.  I then sanded some more.  Sand until your piece has the wear and tear that you’re looking for.

Now it’s time to add the image.  I loved this map and quote together — I just thought it was the perfect combination.  So, we need to adhere the image to the book.  I did have to do this twice.  My first attempt was not as successful.  I had originally tried adhering the image with a spray adhesive; however, the consistency of the mache made it tough and the image bubbled.  

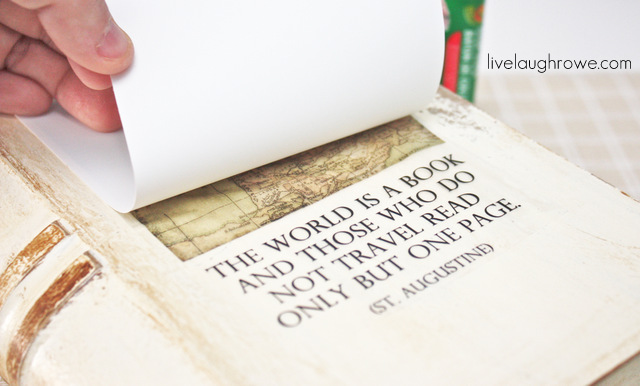
No worries, I then attempted to apply the image with the glue stick.  I thoroughly applied the glue over the image and laid it on top of my surface.  applied pressure over the entire back of the image before slowly lifting the paper.  If necessary, be sure to rub out any remaining air bubbles.

And done!  I sanded just a wee bit more to ensure it had the perfect appearance of wear and tear.  I just love the vintage look of the book.  Regardless of what I think — what do you think? Want to know another reason I love this project? The paper mache book serves as not only a decorative piece, but it opens for storage too {smile}.  That’s a huge bonus for me… I adore little storage nooks!

Happy creating and crafting…
Pin
Share
Post
Share

Related Posts

variety of spring gift boxes in a variety of colors and prints

Easter Treat Boxes

decoupage easter eggs in a wooden bowl with fern fronds hanging over it

Decoupage Easter Eggs

Paper Mache Suitcase |Hazel & Ruby Blog Hop

Easter Egg Craft with Paper Mache

Paper Mache Letter {Winthrop Chronicles}

25+ DIY Paper Blooms

DIY Projects

Previous Post: « Skinny Chocolate Souffle
Next Post: Ross Dress for Less #Giveaway »
about kelly

ABOUT KELLY

A DIY fanatic, Kelly shares her journey through her blog, Live Laugh Rowe, where she showcases her recipes, tutorials, crafts, home projects, and all things DIY. This East Coast Girl at heart believes family is number one as she finds the perfect balance of being a daughter, wife, sister, entrepreneur, writer and woman of God. Be sure to follow along as she shares her passion for life, love and family! Read more...

Reader Interactions

Leave a Reply Cancel reply

Your email address will not be published. Required fields are marked *

Recipe Rating


Comments

  1. Marilyn says

    09/11/2012 at 7:40 am

    Nice!

    Reply
    • Kelly says

      09/11/2012 at 7:56 am

      Thanks, Marilyn 🙂

  2. Jill @ Create.Craft.Love. says

    09/11/2012 at 7:50 am

    That’s great! I’ve been looking for old books for my Halloween mantle and can’t find any I like! Now I can just make it! Where did you get the paper mache book? Just curious… =)

    Reply
    • Kelly says

      09/11/2012 at 7:57 am

      YAY! Super glad to hear these will come in handy for you 🙂 I got mine at Micheal’s. Be sure to grab that 40% off coupon. HUGS!

  3. Bromeliad says

    09/11/2012 at 8:37 am

    Book covers seem like a smart use of Scrapbooking Attitude.

    Reply
    • Kelly says

      09/12/2012 at 7:30 pm

      Thanks for stopping by 🙂

  4. Joules (from Pocketful of Joules) says

    09/11/2012 at 8:41 am

    Kelly – This project is really cool and I can see it having so many uses. Like old school Christmas stories piled up as books by the tree… Darn, I think you added yet another project to my list… =)

    BTW, I really like your blog so I awarded you the Liebster Award: http://pocketfulofjoules.com/2012/09/10/im-a-liebster-award-winner-heck-yeah/

    Reply
    • Kelly says

      09/11/2012 at 9:23 am

      Thanks so much for loving on my project –and– nominating me for the Liebster Award. I’m flattered! Have a fabulous day. xo, Kelly
      p.s. LOVE the idea of the old Christmas inspired vintage books!!

  5. Tonia@thegunnysack says

    09/11/2012 at 8:44 am

    I love how it turned out! Great idea!!

    Reply
    • Kelly says

      09/12/2012 at 7:30 pm

      Thanks so much, Tonia! I think a Christmas book is in order 🙂

  6. Jenn says

    09/11/2012 at 2:53 pm

    That looks amazing!! So realistic!

    Reply
    • Kelly says

      09/11/2012 at 3:14 pm

      Thanks so much, Jenn 🙂 I was pretty excited with how it turned out. Have a great week. xo, Kelly

  7. Kelly says

    09/11/2012 at 3:16 pm

    Awww. Thanks so much, Jo 🙂 I’m kinda crushing on this book.. might need to make more! Thanks for stopping by…and visiting with me on FB. HUGS!

    Reply
  8. Vanessa says

    09/11/2012 at 5:43 pm

    Kelly that is seriously awesome!!! You just never cease to amaze me and it looks like something people would pay big bucks for at a boutique. Well done girlie! 🙂
    Vanessa

    Reply
    • Kelly says

      09/12/2012 at 7:31 pm

      Vanessa! You are seriously toooooo kind…. thanks so much for your sweet words. This was an exceptionally fun project. I think a Christmas one is in order 🙂

  9. carolyn - homework says

    09/11/2012 at 6:01 pm

    Wow – fantastic job! I love the vintage look.

    Reply
    • Kelly says

      09/12/2012 at 7:40 pm

      Thanks so much, Carolyn 🙂 I wish I could just build a vintage style home {hee-hee}

  10. Gina says

    09/11/2012 at 6:55 pm

    Very cool!!!! I can definitely put this to use! Thanks!!!

    Reply
    • Kelly says

      09/12/2012 at 7:41 pm

      Yay! Super glad to hear you like and can put it to good use. Woot!! Have a fabulous end to your week, Gina. xo

  11. Katherines corner says

    09/11/2012 at 8:56 pm

    awesome, thank you for sharing. xo

    Reply
    • Kelly says

      09/12/2012 at 7:45 pm

      Thanks, Katherine! Hugs.

  12. must love junk says

    09/12/2012 at 3:51 pm

    Very fun idea! Love it!
    Susan

    Reply
    • Kelly says

      09/12/2012 at 7:46 pm

      Thanks so much for loving on my project 🙂 xo

  13. Gina @ The Shabby Creek Cottage says

    09/13/2012 at 9:11 am

    I ADORE this project! Love, love, LURVE 🙂 Beautiful job!

    Reply
    • Kelly says

      09/13/2012 at 9:34 am

      WOW! Thanks so much, Gina! It was a pretty fantastic project… I already have a Christmas one on my to-do list. Have a fabulous day. xo, Kelly

  14. Rachel (Lines Across) says

    09/17/2012 at 12:08 pm

    Kelly, I love this! This would make a great photo prop or backdrop too 🙂

    Reply
  15. Roeshel says

    09/17/2012 at 2:16 pm

    That is so fun! What a great craft and decorative accent! Love it, Kelly!

    Reply
  16. Holly @ My Sister's Suitcase says

    09/17/2012 at 8:18 pm

    I was just thinking about how I could make some custom vintage books for my Halloween Mantel!! Thank you so much… I will be heading to Michaels to grab one or two of those. Yours turned out just beautifully!

    Reply
  17. Trish @ Uncommon says

    09/18/2012 at 8:46 am

    This is such a cool idea! It really looks fantastic!

    Take care,

    Trish

    Reply
  18. PAULA says

    09/19/2012 at 8:14 pm

    OMG how cute is this book. Great job! This is such a creative post. I would love it if you would share this post at our WIW linky party. Hope you can join us. 🙂

    Paula
    ivyandelephants.blogspot.com

    Reply
  19. Christine says

    09/21/2012 at 6:38 am

    I just LOVE IT Kelly!!!!! Soooo cool!!!! Feel free to make a couple for me 🙂 hehe

    Thanks so much for sharing this at The DIY Dreamer.. From Dream To Reality!

    Reply
  20. Kristine says

    09/24/2012 at 1:43 pm

    LOVE-LOVE! GREAT job!! I just might have to try this out at some point! 🙂

    Reply
  21. april says

    09/24/2012 at 9:50 pm

    Whats up pretty girl!!! You won the most viewed link for sweet saturday! Get excited!!! Email me your address and I will send out your goodies! xoxo
    http://www.thegingerbreadblog.com/2012/09/sweet-saturday-link-party-v57-features.html

    Reply
    • Kelly says

      09/25/2012 at 7:59 am

      YAY!! I’ll e-mail now 🙂 Thanks, April.

  22. Pat C. says

    10/05/2013 at 5:16 pm

    I hope it’s not too late to tell you how much I love this project!♥ Thank you for your excellent tutorial! xoxo

    Reply

Primary Sidebar

Looking for something?

Hey there! I’m Kelly.

I’m the author, creator, cook, and photographer behind the blog. I am so glad you’re here!  I’m passionate about life, family, and my faith. If there’s one thing I’ve learned in my journey, life is hard, but God is good.  Read More

Top Pin on Pinterest:

Festive Winter Printable

Footer

  • Facebook
  • Instagram
  • Pinterest
  • Twitter
  • YouTube

Looking for something?

Copyright © Live Laugh Rowe, LLC • Privacy Policy • Log in