Welcome to the Hazel & Ruby,
Michaels-Arts & Crafts Reveal Party +Blog Hop!
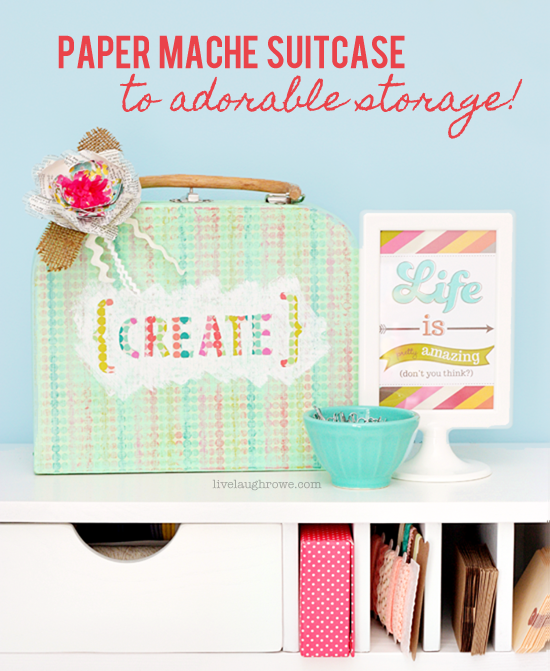
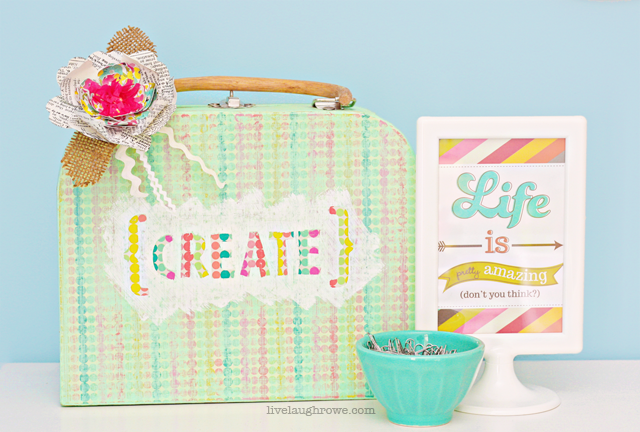
 Today I’m collaborating with Hazel & Ruby, Michaels and some awesome sauce bloggers! I’m sharing a super fab tutorial for a Decorative Paper Mache Suitcase that makes great storage too — sooooo, keep reading!
All month long, Hazel & Ruby have been celebrating their little secret…. Michaels is now carrying their entire line of Stencil-Masks, Wrap It UpPaper, & Pass the Tissue Paper! They’ve made DIY easy and fun for everyone! To celebrate handmade, they’ve gathered together some amazingly talented bloggers whose passion is to create, make and share every day. Each one will share project inspiration, product tips and how-to’s to teach and inspire. We are so excited to introduce you to each one of them and get ready to be awed! For the next 2 days, you can hop around to each of their blogs, stopping by to say Hi and Hello! Everyone is super excited to share their project ideas with you and how they were DIY inspired. Simply follow the Blog Hop list below as you hop from one blog to the next. Lost? Return to the Hazel & Ruby blog to see who is next on your hopping list!
Hazel & Ruby | Amber Packer | Carmen Rogge | Cheryl Sorce
Jana Eubank | Kelly Rowe – that’s ME. | Margie Romney-Aslett
Ronda Palazzari | Stephanie Bryan | Tamara Jensen
Tammy Tutterow | Thuy Bui | Tina Walker | Hazel & Ruby
But what’’s a Blog Hop without a giveaway? Nothing, you may say! {hee-hee}. In true Hazel & Ruby style, they like to celebrate BIG, so they’ll be randomly picking a winner who will win a prize package worth $500. They’ll be announcing the prize package over the next couple weeks, but it will contain product from your favorite manufacturers! (They like to keep secrets, can you tell?).
What do you need to do? Leave a comment on the Hazel & Ruby blog AND on the blog post of our talented makers telling us what you enjoyed most about their ideas. Easy Peasy! They’ll also be featuring each of these ladies on our Hazel & Ruby blog over the next 3 weeks. A winner will be selected on June 6th, so stay tuned for more details on the prize package (oh the suspense!!) Blog comments are due by midnight MST, June 5th to qualify for the drawing. Winners will be announced shortly after the end of the comment period, so be sure to check back to see if you’ve won.
Are you ready to Hop? Let’s go!
Here’s the fun I’ll be sharing…
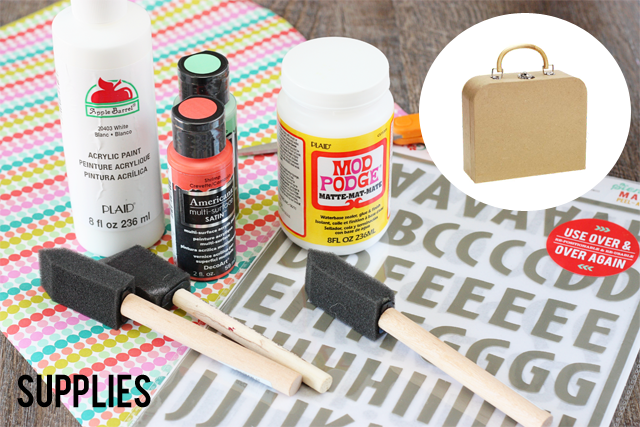
 Let’s grab a few supplies, shall we?
Paper Mache Suitcase
Mod Podge
Foam Brushes
Hazel & Ruby Mask Stencils
Hazel & Ruby Tissue & Paper Rolls
Acrylic Paint (colors of choice)
 Once you’ve gathered your goodies, we’re ready to roll! Let’s do this.
 Step One:
Trace the sides of your paper mache suitcase onto the back side of paper (unless you use something that’s double sided).
Step Two:
Brush on a coat of mod podge onto one side of the suitcase
Step Three:
Attach paper (I used the Polka Dot Party paper) and remove any wrinkles or bubbles. Trim any access paper as necessary
Step Four:
Attach your stencil masks. I used the letters from the Brooklyn Alpha and the brackets were from the Blindside Alpha set. They can easily be moved and repositioned, a BIG perk for the perfectionist in me {hee-hee}
Step Five:
Apply one coat of paint. Depending on how dark and/or thick you are wanting your paint to be, you might apply two coats. I applied only one. I used Soft Jade by Americana paints.
Step Six:
To allow my letters to pop a little more, I applied a smaller artsy coat of white paint over the masks as well. Promptly remove the masks before the paint dries to ensure the paint doesn’t peel with the masks.
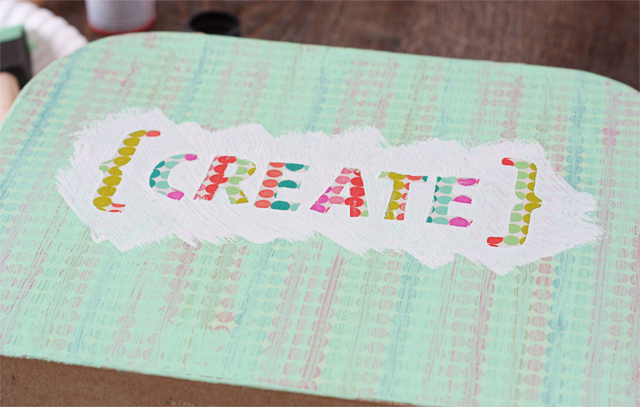
I then painted the remainder of the paper mache suitcase with the solid Soft Jade color. Once everything was dry, I added a little extra TLC by sanding down the suitcase a bit more.
 And you’re done!
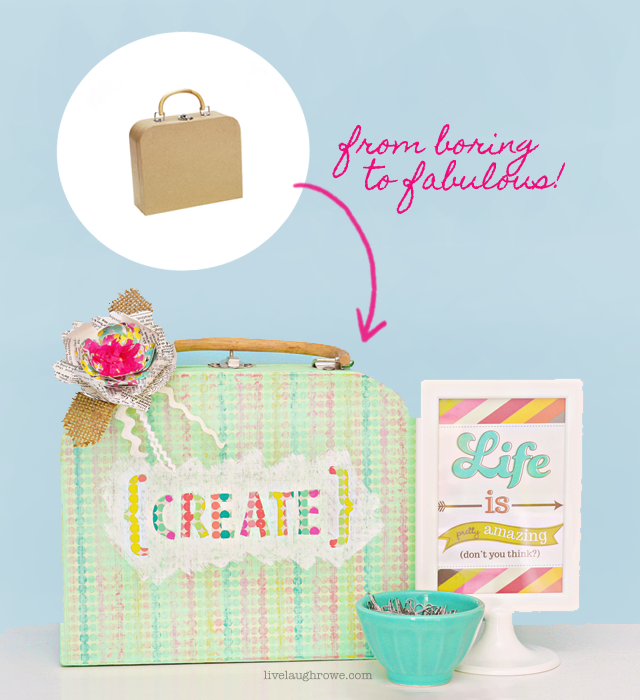
 What do you think? I love it!
happy crafting, sweets friends.
Care to stay in the loop? I’d love to have you!
Catch me snapping + sharing pictures over on Instagram.
Subscribe to Updates | Like on Facebook | Follow on Pinterest


Tommye Bell says
Great idea. Thanks for walking us through your process. Photos are great but instructions are even better for me. Slow learner!! TFS.
Kelly Rowe says
Thanks so much! Appreciate you stopping by. xo.
Pam Sohan says
Cute cute cute !!! If I had a dedicated scrappy space I would definitely be making this.
arlsmom says
What a super cute project!!!
Bryn says
I love your step by steps…I am less than crafty, but you make it seem possible 🙂
Kelly Rowe says
Thanks so much! Give it a try…it’s very possible. xo.
Lynn Richards says
Love. I have some suitcases like these I found at Good Will a number of years ago and they can use a makeover!
Kelly Rowe says
Sounds like a great idea Lynn! Have fun…and thanks for stopping by. xo.
Lynn Richards says
So cute!! I have some old suitcases like this that could use some updating…..
pam says
Really cute project & great tutorial !
Kelly Rowe says
Thanks so much! Appreciate you stopping by. xo.
twelveoeightblog says
I love the paper and accessories you used, and a suitcase this adorable?! Love it Kelly 🙂
xo, Tanya
Kelly Rowe says
Thanks so much Tanya! Enjoy the rest of your week. HUGS!
Sheila says
I really want to try these hazelandruby stencils! Thanks for the tutorial! Looks fun!
Kelly Rowe says
Sheila…they are great stencils! I think you’d love them. Try them out. 🙂 xo.
Jamie says
Very cute! More new craft to want, oh my!
Tina Walker says
What a fantastic way to use Hazel & Ruby! Love it!
Lyn Kaufmann says
Adorable little case, and kids so love little cases to haul things around in. My daughter and her Girl Scout troop might enjoy making this great case too.
Kelly Rowe says
Sounds like a great idea Lynn. 🙂 Thanks for stopping by. xo.
Patty C says
Adorable. I love that you let the tissue paper show through!
Kelly Rowe says
Thanks so much! Appreciate you stopping by. xo.
Amy B says
I love how you “diluted” the vibrancy of the paper–and create storage, too! Thanks so much for the idea!
Kelli Armanini says
This is so cute!! And p, it looks super easy to make! What a great gift to give to a friend!!
Donna Stocking says
I am loving this paper and all of the ideas. Such a cute suitcase. I’m hopping to the next blog. Thanks for sharing.
Dodie says
Pretty pretty pretty! Love the paper … so bright and cheerful. Looking forward to going to Mike’s tomorrow to check out the H&R goodies!
janetzeppa says
Thanks for the great tutorial!!
thecasualcraftlete says
How fun is this project?! I love that suitcase and paper. I am for sure going to check out Hazel & Ruby products. P.S. I need to craft with you!!!
Sandy says
This would be great to carry “crafts in progress” in! Thanks for sharing!
Stacey says
My daughters would love these to put all of their “treasures” in!
Peggy Johnson says
I think I will have to make one of these! Such a fun idea
Kelly Rowe says
Thanks for stopping by. You’ll have to give it a try…it’s too fun! xo.
JudyinhuntsvilleAL says
Love it!
JudyinHuntsvilleAL says
so fun for summer things!
Sandy Lane says
lovely papers & stencils
Kathe says
Thanks for sharing! Easy instructions. Cute outcome!
Miriam Prantner says
Wonderful transformation. I love those stencil masks!
Amy C. says
Fun idea! I love the paper!
Scrappy Manila says
Cuteness overload!!
MargieH says
Such a FUN project! Hmm…I think I might have the same suitcase in my “to be altered” pile 🙂 Thanks for the inspiration!
TidyMom says
such a cute idea Kelly!! and the step by steps were fab!!
Kelly Rowe says
Thanks, Cheryl! It was a fun project — but the products were the shining star 🙂
capturing joy with kristen duke says
Love that mini suitcase, it’s so cute!
AmberS says
Oh so very cute. I love the finished project!
Krista van Tol says
FABULOUS is right!!!! I’m swooning over here! I LOVE it!!!!!
Kelly Rowe says
Aw..thanks so much Krista! I appreciate it. Have a great weekend! 🙂 xo.
A Little Claireification says
Ok, there is just too much cuteness going on up in here. I want to make one of these and carry it around everywhere. LOVE. Pinned! xo
Wendy Orme says
What a fun, fabulous project! I love H&R!
Kelly Malacko says
Cute!
Jeanne Ann says
Adorable!
Kelly Massman says
OMgoodness! your suitcase is adorable!!! This is a great idea that could even be used on a plain box!!! i’m going to definitely try this using my Hazel & Ruby letters!!!!
Kelly Rowe says
Thanks Kelly! I’m glad to hear that you’re going to give this fun DIY a try. Have fun! xo.
jpscraps says
Beautiful little case!
Juel says
Sweet little case!
Dawnll says
Fabulous is right! Such a fun idea for a gift or even to display in a craft room.
Beth Williams says
I’ve bookmarked this blog post so i can refer back to it. No suitcase here-but lots of other paper mache that this would wonders with. Now if only my Mike’s would get their act together so I can give it a try.
Kelly Rowe says
Thanks for stopping by Beth! 🙂 Happy crafting with your paper mache! HUGS!
Gina says
This is adorable. I love how it turned out!
Rachel @{i love} my disorganized life says
I’m dying over this! LOVE!
Kelly Rowe says
Thanks so much for the love Rachel! Appreciate you stopping by. 🙂 xo.
Katie Adams says
This is so stinking cute! Thanks for linking to Create Link Inspire at The Crafty Blog Stalker. You have been featured and pinned! Thank you for sharing.
–Katie, TheCraftyBlogStalker.com
Juliana Michaels says
Such an adorable project! Thanks for the inspiration!
Linsey R says
Oh my goodness Kelly, this altered suitcase is precious! I’m in love with your super special and fabulous handmade flower! Absolutely fantastic and ultra inspiring!!! Thanks so much for being a part of the hop!!!
Ginny says
This is just too adorable! I love cute fun storage and will be making several myself. Thanks so much for sharing!
Ginny stewart says
I absolutely love this! So fun and I’m always needing additional storage so this will be perfect! Can’t wait to make a few of my own! Thanks so much for the inspiration!
Kimberly Barker says
Such a cute project!!
marylouh says
Your suitcase looks great. I have some small wooden lunch boxes that I’ve covered. This looks much easier than what I did. thanks for the detailed instructions.
Heather Thompson says
What a cool transition, very neat, love the colors!!!