
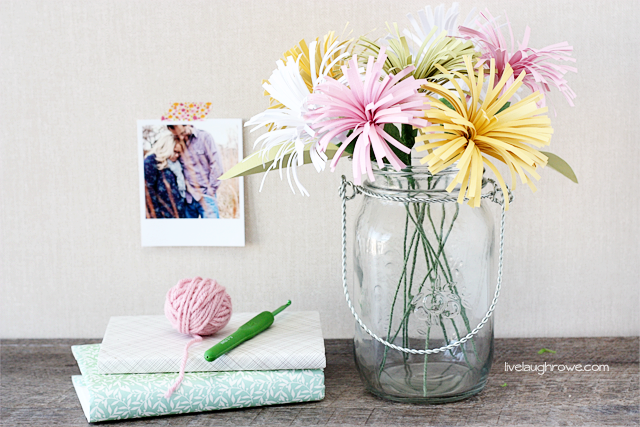
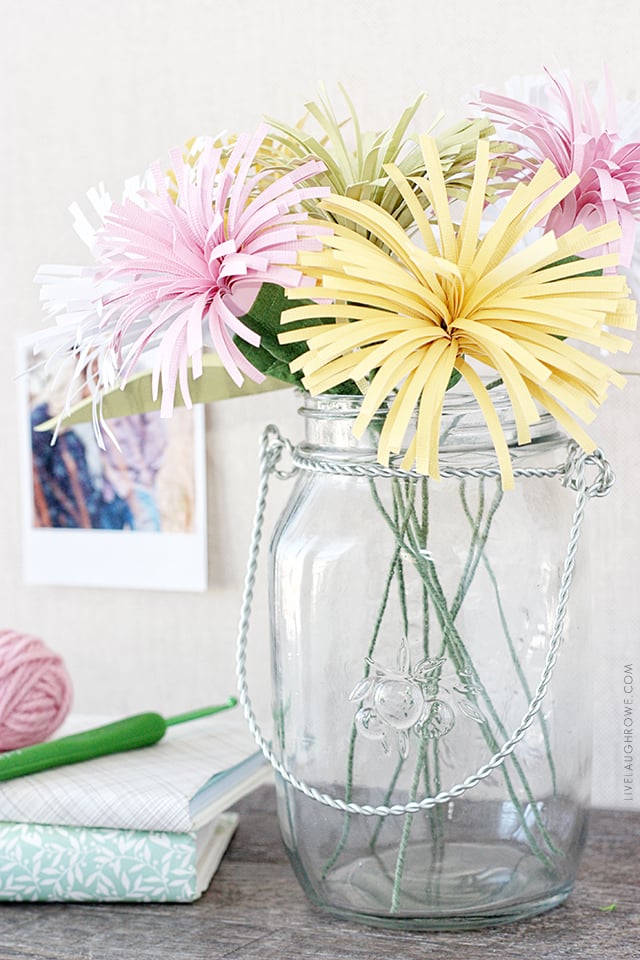
Ahh. Spring. Sweet Spring. I’m so glad you’re here! So, how about some spring inspired paper flowers?
Oh, maybe these pastel colored Paper Spider Mums.
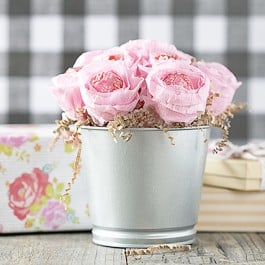
 DIY Paper Spider Mums

 DIY Paper Spider Mums
They brighten up a room. They kinda make me smile too. And guess what? They’re super easy!!
I love flowers, in general. And you see paper flowers all over the web and some of them are simply amazing! I’ve made patriotic paper flowers, but never tried my hand at any others — until now (and the crowds go wild. hee-hee). I think they turned out lovely and would make a perfect Easter or Mother’s Day bouquet. Let’s take a look at how they came together.
![]()
12×12 Card-stock Paper, in colors of choice
Fringe Scissors (or large cutting scissors)
Tape
Floral Wire Stems
Green Floral Tape
Glue or Hot Glue Gun
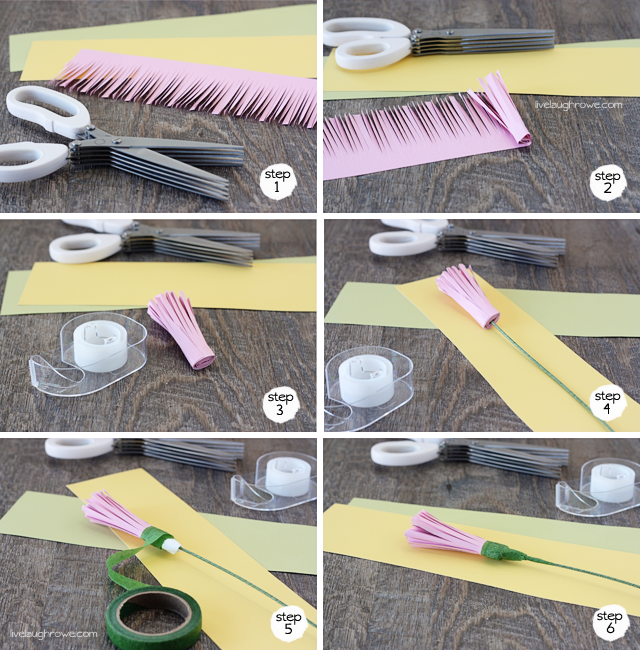
 Paper Spider Mums: Steps 1-6
 Paper Spider Mums: Steps 1-6
Step One:
Cut your paper into strips. I used 12×12 sheets and kept them to approximately 2-3″ wide. You can play with the sizes to best fit what you’re looking for. Once your strips are cut, you’ll take your fringe scissors or a large pair of scissors and cut fringes into your paper.
Step Two:
Roll your paper up to form your bud. You can place some double sided tape inside while you roll it if you’d like to prevent it from being pulled out. I didn’t do that, but it’s something you might consider if you have little ones {wink}.
Step Three:
Once you’re done rolling up your bud, tape it closed.
Step Four:
Glue your floral wire stem into the center of your bud (at the bottom).
Step Five:
Now it’s time to wrap the bud and stem together. Due to the diameter of the bud being much wider than the stem, you’ll want to use some tissue paper or something similar to fill in the gap a bit as you wrap it with your floral tape. You can see a bit of the ‘stuffing’ I used in the picture above.
Step Six:
Once you’ve completely wrapped (and merged) the bud and stem together, the flower itself is officially assembled.
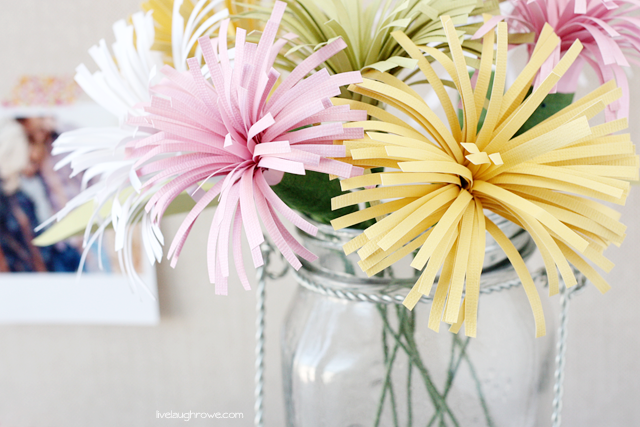
Step Seven:
Now you’ll want to take the paper strips of the bud and pull out and over. I used my thumb to create a slight curve.
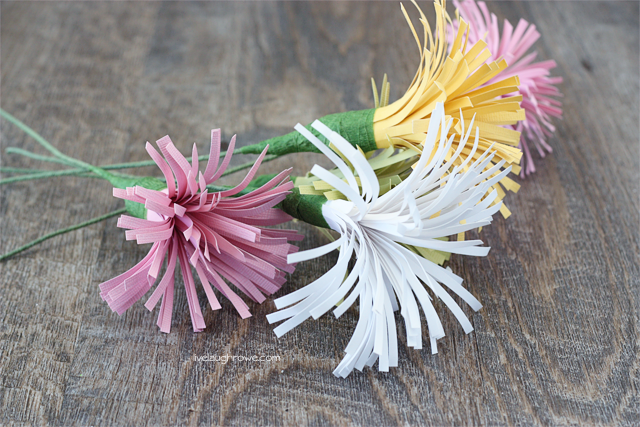
 Before you know it, you’ll have a bunch of spider mums ready for display in a vase — or mason jar (of course). I cut a couple of leaves and glued to a floral stem as well. No one will see underneath the leaf but me, righ? Perfection isn’t necessary — they’re fun and full of flair!
 What do you think? They’re a happy craft, right?
Paper Spider Mums — a bouquet that never dies!
 Paper Spider Mums — a bouquet that never dies!
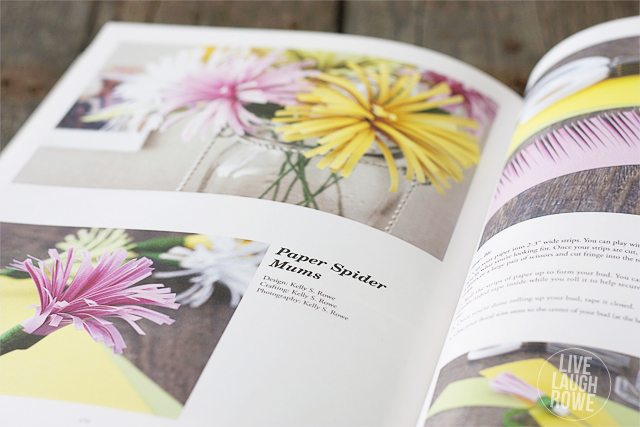
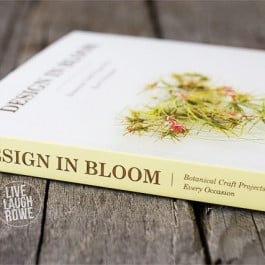
UPDATE! This paper project was featured in a book, Design in Bloom in 2015. An exciting opportunity and it’s always fun to see a project in print. Read a few more details in this post if you’d like.
 Be sure to visit with me here too:
Facebook | Instagram | Pinterest | Twitter | Google+


keri @ shaken together says
These are SO fun and perfect for Spring! Love this project, Kelly!
Kelly Rowe says
Thanks so much Keri! Hope your enjoying the weekend! 🙂 xo.
Ashley @ 3 Little Greenwoods says
Love this simple project to create Spider Mums! {they are my favorite!} Pinning and making!
Kelly Rowe says
Thanks so much Ashley! Enjoy the rest of your weekend. HUGS!
Julie @ This Gal Cooks says
LOVE these little flowers, Kelly! And those scissors are pretty neat. I’ve never seen those before! Pinned!
Kelly Rowe says
Thanks Julie! Yes…those scissors are pretty fun! Appreciate the pin as well. HUGS!
Amanda Formaro says
So pretty Kelly, love them!
Kelly Rowe says
Thanks so much Amanda! Hope you’re having a great weekend. 🙂 xo.
A Little Claireification says
Love these, Kelly! They are truly a “happy craft” and your photographs are beautiful as always. Pinned and have a great weekend!
Kelly Rowe says
Thanks friend! Always appreciate your kind words. 🙂 Trust you are enjoying the weekend. HUGS!
Kerry says
clever, clever! My oldest daughters could do this with me : )
Kelly Rowe says
Thanks so much Kerry! I bet you and your daughters would have a great time making these together. 🙂 HUGS!
paperworx4seniors2 says
Your spider mums are easiest paper flower I’ve seen on blog land. They look pretty quick also. Been wanting a pair of those fringe scissors, will have to see if I can find a pair anywhere. The flowers you made look really pretty, glad you shared this project, I’ve been looking for different kind of paper flower to make. Great tutorial also. Happy Spring days Kelly
Pinning this project.
Kelly Rowe says
Thanks so much! Appreciate you stopping by! Happy Spring days to you as well. xo.
Aniko@PlaceOfMyTaste says
Oh…these are so pretty! I have been thinking about making paper flowers for awhile and this is such an inspiration, Kelly! Pinning!
Kelly Rowe says
Thanks so much! They are fun and easy! Give them a try! You’ll love them. xo.
Chrystal says
So fun! Can’t wait to try these with kiddo! Great gift to send over to grammies!
Kelly Rowe says
Thanks so much Chrystal! Your kids will enjoy making these…and so will the Grammies! 🙂 xo.
mindfulshopper says
Hi Kelly!
These are super fun and perfect for Easter and Spring events! Love them!
Kelly Rowe says
Thanks so much! Appreciate you stopping by. HUGS.
Laurie says
Thanks for linking up to Tip Me Tuesday linky party this week Kelly. {knuckle bumps} Did you know that I can “lend” your blog posts my Google page rank for better search engine traffic? {fabulous} If you upload at least 2 images, 2 steps, and blog post URL into your Tip Junkie craft room, you’ll be in business! {wink} ~ Laurie {a.k.a. the Tip Junkie}
http://www.tipjunkie.com/post/how-to-add-a-craft-room-project-on-tip-junkie/
salvagesista says
These are so pretty! What a great project you could do with just about anyone. No matter where you live you can have spring flowers.
Kelly Rowe says
Thank you! It’s a fun and simple project and add colorful flowers for Spring! xo.
nicolesamuels says
These are adorable… and I may even be able to keep them alive! 😉 Thanks for sharing !
Kelly Rowe says
Thanks Nicole! 🙂 …and your welcome! Have a great week! HUGS!
Alyssa//Runway Chef says
Love these! So simple and pretty! I love having flowers around, but they never last long, so I’m going to have to try making some of these instead!
Kelly Rowe says
Thanks so much Alyssa! I’m sure you will love having these around ALL the time! 🙂 Mine are on my kitchen table and it’s great not to have to worry about them dying. HUGS!
Erika Buckley says
I always love a cute paper flower craft! These are so bright & cheerful xo Erika
Kelly Rowe says
Thanks so much Erika! Appreciate you stopping by! xo.
Bonnie @ The Pin Junkie says
What a great project! Thanks for sharing it at The Pin Junkie. It was included today in a spring craft and recipe roundup at http://www.thepinjunkie.com/2014/04/spring-and-easter-crafts.html
Kelly Rowe says
Thanks Bonnie! It’s always a pleasure sharing. 🙂 xo.
Amanda says
Hey kelly! Just wanted to let you know that I featured this post on my Facebook page during April and people loved it. It made it into the top 20 for the month, of which I always do a round up. So today I’ve featured you on my blog as well (link below). Thanks for such an awesome post! http://craftsbyamanda.com/2014/05/great-craft-ideas-may-2014.html
Darla says
I can’t wait to try this! I’m thinking spring!!!
Kelly Rowe says
Hi Darla 🙂 I’m excited to pull mine back out!! Happy crafting.
Desiree @The36thAvenue says
These are adorable… Pinning!
Kristi Quill says
these look so fun! i’m going to make some with my daughter this weekend!
Sarah says
This is an awesome idea since Easter comes early this year. I’m doing this project to decorate the restaurant for easter, they will be centerpieces on the beverage station for a fast food chain (McDonald’s)! The guests will love it as much as I do and it was easy to do with a disabled husband; Im very happy you had a tutorial. I thank you as well as my guests do that will be able to enjoy them.
Kelly Rowe says
What a lovely (and thoughtful) idea for your guests!! Thanks so much for letting me know — and enjoy! Cheers.
Bunny says
I’m so happy I came across these! Going to attempt to make them with comic book pages for my bouquets!!
Adele Grisham says
Pretty flowers and easy to make!! Thanks for sharing.
Natasha says
I love these, they’re so cute! I made one using your tutorial a couple of weeks ago and am featuring it on my blog tomorrow as my crafty post for the week, and have linked back to your tutorial as I loved it! – Tasha
wendyDIY says
The DIY Paper Spider Mums are so gorgeous!I love your idea!Thank you for sharing this impressive DIY paper craft tutorial!
Becky Howard says
How I love the beauty in simplicity! This is just one of those cases.
Pascal says
Beautiful idea, was searching for something like this to do with my daughters (on a slightly bigger scale) to surprise mom, and let’s just say mom LOVED it. A very nice father and daughters bonding. Thanks for sharing!