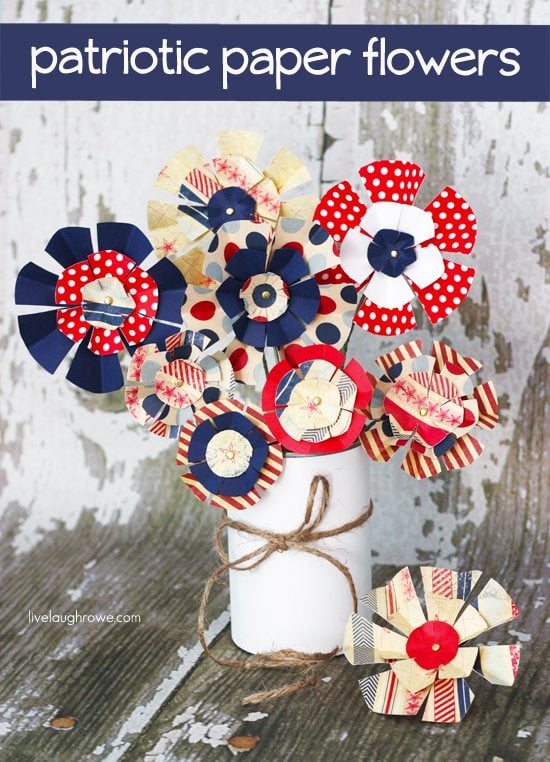
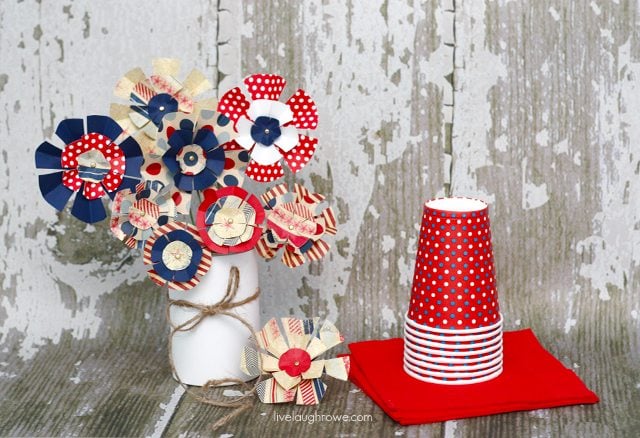
Patriotic Paper Flowers. The perfect favor or centerpiece for your holiday entertaining… with lots of festive colors too! Aren’t they the cutest?
 Patriotic Paper Flowers

I probably don’t do enough holiday crafts, but I decided to share one with you since the July 4th holiday is quickly approaching. Honestly, I really don’t do a lot of paper craft projects either, but when I do — I kinda {love} them. There are sooooo many possibilities! Did you happen to see my flower candy cups? Paper. Oh glorious scrap-booking paper!
Alrighty, without further ado, let’s make some Patriotic Paper Flowers.
Supplies for Patriotic Paper Flowers:
Scissors
Small Hole Punch
Patriotic Scrapbook Paper
Small Paper Brads
Floral Stem Wire
Red and Blue Washi Tape
Circle Stencils or different sized bowls
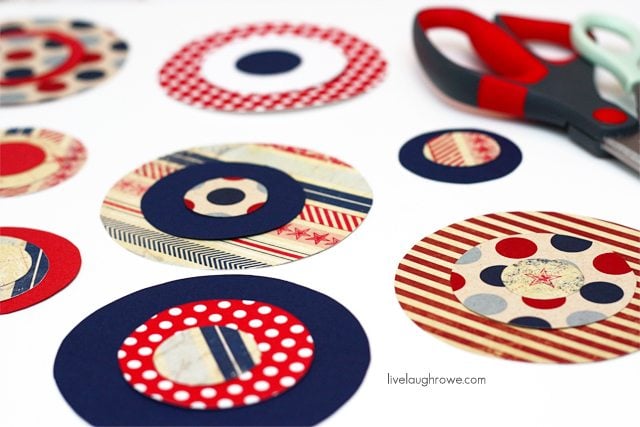
We’re ready to roll! You’ll want to start by tracing out three different size circles on your sheets of paper. For all of my flowers pictured, I used these four sizes: 1-1/8″, 1-3/4″, 2-1/4″ and 3-1/2″. After tracing you’ll cut them out.

Tip: Double or triple up your paper to save time {wink}. You’ll then want to pair up your sizes/designs/patterns/etc into what you’d like your flowers to look like.
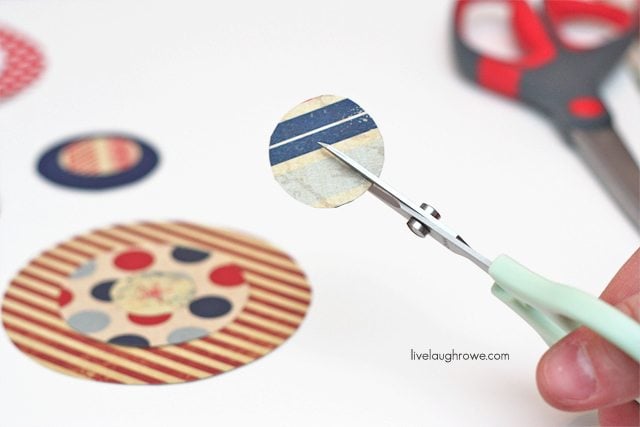
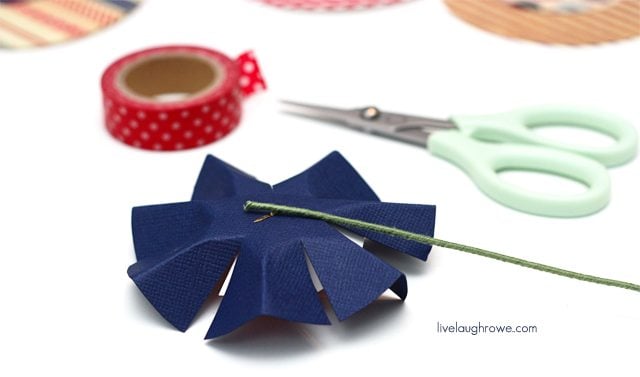
 On each circle, make 5 or 6 different cuts, stopping approximately 1/2″ from the center of your circle.
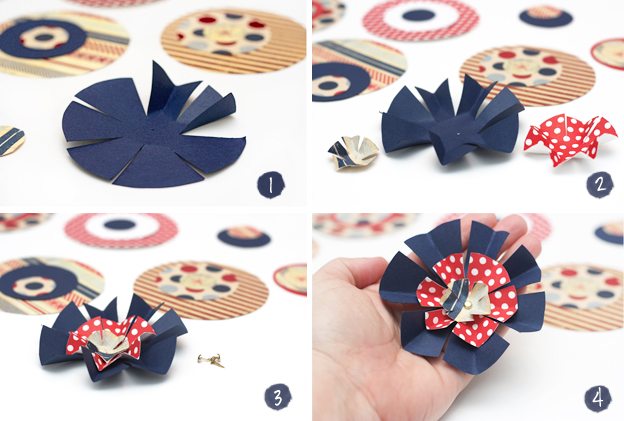
 Once all of your circles are cut — punch a hole into the center of each circle. Now you’ll fold each triangle (petal) in half lengthwise. (see below, #1)
 Step by Step Instructions for Patriotic Paper Flowers
After you’ve folded each of the triangles (petals) all three circles for your flower, you’re going to stack them from largest at the bottom to smallest at the top (see above, #3). Then insert your paper brad to keep all of your pieces held together. Your flower is completed! Now, let’s attach a stem.
 You can use pencils, skewers, thin wooden dowels or whatever else you might have on hand for the stems. The floral wire is almost to good to be true, you can manipulate the arrangement in so many ways.
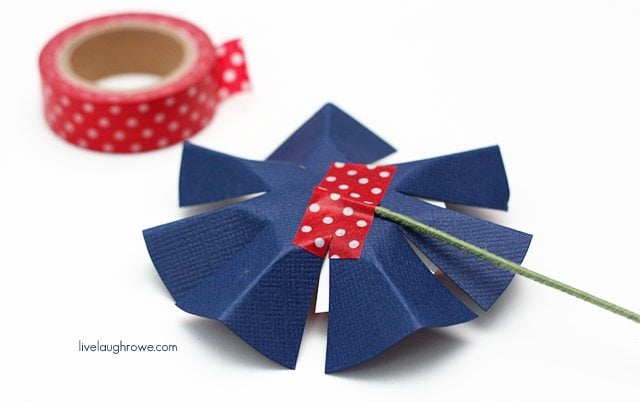
So, using your floral stem wire, cut your stem length. Place against the back of your paper flower and apply a small piece of washi tape hold it in place. You can also glue your stem to the back if you want, I like the added flair of the washi tape!
 PLUS, if you remove that washi tape and stem — you could easily recycle these patriotic flowers on a wreath next year!
You’ll do this for each of your flowers, some bigger, some smaller. Your stems will vary depending on how you choose to arrange them as well. Mission Accomplished! What do you think?
 More patriotic fun to inspire you:
Simple Rustic Patriotic Banner
Patriotic Favor Bags
Vintage Inspired Patriotic Printables
Firework S’mores
 Be sure to visit with me here too:
Facebook | Instagram | Pinterest | Twitter | Google+


Angie@Echoes of Laughter says
I love this project Kelly! It is so pretty and you did an amazing job! Love all the colours & patterns together! Have a lovely week! Angie xo
Kelly says
Thanks so much, Angie 🙂 It was a fun project. Have a lovely week as well. HUGS!
Salena Lee says
What a cute idea! Of coarse when I saw the washi tape I was like no! no one can see it back there save the washi tape!! lol! I have yet to get me some washi tape and when I do I will probably never use it because it’s so pretty I would not want to let it go. But that’s just me. =)
Kelly says
Salena! You are too funny. I use washi on all kinds of things — even packages 🙂 I can’t believe you don’t have any washi tape. WOW! Thanks so much for stopping by. Have a fabulous week. xo-Kelly
Laura says
People walk around projects..you would be surprised what they notice. It’s often the little things that really do get noticed. 🎁❤🎁
Laura says
Oh..and I love the patriotic paper flowers!
Could the holes be punched before making the cuts to help ensure you don’t cut to far into the center? Absolutely perfect!! Thanks so much for sharing, Kelly. ❤💢💙
Elisabeth Andree says
Hello Kelly!
Really nice project, I like the paper flowers. Thanks for sharing your tutorial and thank you for hosting the networking blog hop.
Hope you have a great week!
Kelly says
Hi Elisabeth! Thank you for stopping by — and for linking up to the blog hop. Have a great week as well. Hugs!
Trish @ Uncommon says
Kelly… these are great! I love the dimension of them! Have a great week!
Take care,
Trish
Kelly says
Thank so much, Trish. I was skeptical of this project — but these patriotic flowers stole my heart 🙂 They’re pretty adorable. Hope you’re having a great day!! xo-Kelly
Danni Baird says
Kelly you are so creative! Love these little pieces of festiveness!
Kelly says
THANK YOU, Danni! You’re always so sweet 🙂 Have a fabulous week… are you staying cool out on the farm?
I am LOVD says
Gosh, I love this, Kelly!!! I think you should do more paper crafts since you certainly have the creativity for it!
Kelly says
Ha Ha! Maybe I should… it was a fun project. I’m glad you like it 🙂 Thanks so much for stopping by and loving on these cuties. Hugs.
CAS says
So cute, Kelly! You did an awesome tutorial! I like to do a small seasonal-something on my kitchen island & this would be perfect.
Thanks for this great blog hop. I was having trouble putting the code into my sidebar, but I do have your blog in my blogroll. Hope that’s enough.
CAS
Kelly says
THANK YOU so much for stopping by and loving on my project — and for linking up to the hop. I hope your trouble wasn’t with the code. If you have any questions, feel free to e-mail me. Whatever your more comfortable with is what works best! I’m flattered to be in your blogroll. Have a fabulous week. xo-Kelly
Dana {crafted niche} says
Shut the front door. These are SO cute! Look at you, Ms. Clever Crafter. I’m loving these! I might have to commission you to make me something. 🙂
Kelly says
HA! You are too funny, girl 🙂 Thanks so much for loving on my project. Let’s catch up again soon! Hugs.
Pat says
Those are cute!
Love the combination of dots and stripes!
Kelly says
Thanks so much, Pat! Have a lovely week 🙂
KCoake says
Perfect! I was just thinking I needed some kind of flower to add to this little buckets for a 4th of July themed table. I am pinning these so I can make them and decorate my table. Thanks!
Kelly says
Woot! Super excited to hear you these will be the perfect addition to your themed table. Be sure to have sand or styrofoam on hand so you can arrange them a little more easily. Have a super fab day! xo-Kelly
Ashley @ Cherishedbliss says
These are so cute!! : ) I love them! I don’t usually do paper crafts, but I really enjoyed them when I did Addison’s party!
Kelly says
Thanks, Ashley! Paper projects are super fun, but I don’t seem to do them often enough either 🙂 Happy Monday!
Jennie Larsen says
SO CUTE!!! I shared this cuteness on COM-FB. P.S. can you tell me what editing you use for the titles and bars etc. I love it. jen-
Kelly says
Hi Jennie! Thanks so much for stopping by. For the title bars, captions — I add those in Adobe Photoshop. Happy Monday! xo-Kelly
Kristine says
Such a fun idea and GREAT choice of papers! Always enjoy your DIY projects. 🙂
Kelly says
Thanks, Kristine… I remember your face when I first showed you my idea. LOL! Hugs 🙂
Lindy @Itsy Bitsy Paper says
These are too cute! I love them! I hope you will link up to my Patriotic Project Parade.
http://www.itsybitsypaperblog.com/2012/06/patriotic-project-parade-linky-party.html
Kelly says
Hi Lindy! Thanks so much 🙂 I will swing by and link up, friend. Have a great week.
Bonnie and trish @ uncommon says
ADORABLE!!!!!!!
Kelly says
THANKS so much, lovely ladies. Two comments in one day! WOW. I’m feeling pretty fab.
Jelli says
That’s a pretty spin on the traditional July 4th decor. Good work, and thanks for sharing.
Kelly says
Thanks, Jelli!! Always happy to have you stop by. Have a blessed week. xo-Kelly
Jenny says
how cute! I love them!
Kelly says
Thanks so much, Jenny! Have a lovely week, friend 🙂
Leslie says
Cute and simple…my kind of craft!
Kelly says
YAY! Glad you like it, Leslie! Have a great week 🙂
Noreen says
I love the red, white, and blue! It will make a lovely centerpiece.
Kelly says
Thanks so much, Noreen 🙂
Holly @ My Sister's Suitcase says
OK, where do you find the time girl?? These flowers are absolutely ADORABLE! And loving that backdrop too. And the paper cups! Everything is too cute!
Kelly says
HI Holly! You’re too funny. Thanks for loving on my flowers and all the props 🙂 Hugs.
Laura @ House Of Joyful Noise says
Adorable!! These make me smile. I’d have a blast making them.
Hopped over from Carolyn’s Homework. : )
Kelly says
Hi Laura! Thanks for hopping over and saying hello. These paper flowers are a little ‘cheery,’ aren’t they? So glad you found a smile and some inspiration here at LLR. Hugs to you!
Steph @ Crafting in the Rain says
So pretty and fun! And these are the kind of flowers that I couldn’t kill 🙂
Kelly says
Hi Steph! Thanks for stopping by 🙂 You’re right — they’re super resilient {giggle}. Have a lovely day! xo, Kelly
Colette says
Visiting from Sugar Bee – what a cute idea! I love that I don’t need a die cut or machine to make this!
Kelly says
Hi Colette! Thanks so much for visiting with me 🙂 I never even thought about that… but you’re right, this is a diet cut/machine free project. YAY. Have a fantabulous day. Hugs, Kelly
cassidy says
Love LOVE your patriotic paper flowers!!
Kelly says
YAY! So glad you like it, Cassidy! Have a beautiful day 🙂
Kate says
Super cute! I would love for you to share this (and any other creations) at Pin It and Win It Wednesday @ http://www.cheapcraftymama.com!
Kelly says
Thanks so much, Kate. I’ll do my best to swing by and link up. Have a fabulous day. xo, Kelly
Kara says
I love how these flowers turned out. Super cute! Thanks for the quick and easy to follow tutorial!
Kelly says
Thanks so much, Kara 🙂 These tutorials are so fun to put together. Hugs.
Mandy @ Sugar Bee Crafts says
Thanks for linking to TAke-A-Look Tuesday – you were featured today!!
–Mandy, http://www.SugarBeeCrafts.com
Kelly says
YAY! Thanks so much 🙂
angie says
very pretty love the power of the red white and blue come visit us at http://shopannies.blogspot.com
Kelly says
Thanks, Angie 🙂 AMEN to the power of red, white and blue! Hugs.
Kathryn Griffin says
Those are simply divine! Thank you for sharing. Visiting from Artsy Girl. Would love it if you would share this post at my Make it Pretty Monday link party at The Dedicated House. http://thededicatedhouse.blogspot.com/2012/06/make-it-pretty-monday-week-2.html Wishing you a grand day! Toodles, Kathryn @TheDedicatedHouse
Kelly says
Thanks so much for stopping by, Kathryn. Have a lovely weekend 🙂
Trisha says
I adore those paper flowers! They turned out so cute!
Kelly says
Thanks so much, Trish 🙂 I’m kind crushing on them {giggle}. HUGS!
Brandy~GreyLaneHome says
Hi kelly. These flowers are so stinkin’ cute. Love them they would be great at any 4th of July party.
Kelly says
Hi Brandy! Thanks so much for stopping by and loving on my project 🙂 Hugs!
Amber @ Recipes We Love says
These are awesome!!!
Kelly says
Hi Amber! Thanks so much. Have a lovely weekend 🙂 xo, Kelly
Angie Ouellette-Tower says
These are beautiful!! I’m stopping by from “Days of Chalk & Chocolate” Blog hop – I am already a follower of yours.
Thanks
Angie
godsgrowinggarden.blogspot.com
Kelly says
Hi Angie! Thanks so much for stopping by 🙂 Have a lovely weekend. Hugs to you!
Jill @ Kitchen Fun With My 3 Sons says
Love this! We would love for you to share this at our Kitchen Fun and Crafty link party going on now! http://kitchenfunwithmy3sons.blogspot.com/2012/06/kitchen-fun-and-crafty-friday-link_21.html
Kelly says
Thanks, Jill. I’ll do my best to swing by and link up 🙂
Debra Kapellakis says
pretty
Kelly says
Thanks, Debra 🙂 Hugs.
TidyMom says
These are ADORABLE Kelly!!
I featured your post in my wrap up http://tidymom.net/2012/patriotic-crafts/
Have a great rest of the weekend!
Kelly says
Thanks so much, Cheryl 🙂 Hope you’re having a fabulous week!
Tristine says
Oooh! How exciting! I have all the supplies to make these!! Yay!! (I JUST got on the “craft” bandwagon, so I’m a bit slow, bear with me!)
Kelly says
Hi Tristine…. welcome to the ‘craft’ bandwagon. Beware of the slow addiction that might take over 😉 Have fun. Hugs!
Kari - the Sweetest Memory says
Gorgeous Flowers! I am sharing on FB and pinning on Pinterest! Wonderful tutorial! I have a ton of scrapbook paper, I might have to try these!
Kelly says
Thanks so much, Kari! If you have the scrapbook paper, the sky is the limit. YAY! xo.
Ashley @ Cherishedbliss says
Featuring you today sweet friend!
Kelly says
YAY! Thanks so much, Ashley! Hugs!
Taryn @ Design, Dining + DIapers says
These are beautiful! I love the paper you chose and you did a fabulous job with the arrangement. What a great centerpiece idea.
Kelly says
Hi Taryn! Thanks so much 🙂 Thanks to my local Archivers store, I was able to find such festive paper. Have a wonderful week.
Reannah@ShapedbyGrace says
So cute!! Perfect for a centerpiece or even a flower bouquet for a hostess gift! 🙂 Thanks for sharing! xoxo
Kelly says
Hi Reannah! Love the idea for a hostess gift 🙂 Thanks so much for stopping by. xo.
Susanna says
These are so cool. I love scrapbook paper but since I don’t scrapbook I don’t use it. Thanks to your awesome tutorial here I can have some scrap paper fun!
Sara says
These are ADORABLE!! Would love it if you would link this up at my trendy tuesday party!! http://www.sweetlittlegals.com/2012/06/trendy-tuesday-6.html
Kelly says
Thanks so much for loving on my project, Sara 🙂 I will do my best to swing by and link up! Happy Tuesday. xo-Kelly
Christine says
I really LOVE them Kelly!!!!
Thanks so much for sharing this at The DIY Dreamer.. From Dream To Reality! I’m looking forward to seeing you at the party this evening!
Christine says
Oh.. BTW.. your link http://www.livelaughrowe.blogspot.ca/p/linky-par-tays.html Isn’t working?
Kelly says
Well, that’s the old blogspot page anywho. You might update your browser now that I’m on WP 🙂
Christine says
CONGRATS!! You’ve been featured at The DIY Dreamer.. From Dream To Reality!
Come and grab your Featured Button.. you deserve it 🙂
http://thediydreamer.blogspot.ca/2012/06/from-dream-to-reality-linky-party-22.html
Kelly says
YAY! Thanks so much, Christine! Have a lovely week.
Emily says
LOVE!! This is one of my favorite 4th of July projects of the year!! You are amazing and have such a great eye. You stylish thing, you!
I’m pinning and FB sharing!
Kelly says
Awww! Well, thanks so much, Emily!! HUGS!!
Ginger says
Featuring YOU today!
Ginger @ gingersnapcrafts.com
http://www.gingersnapcrafts.com/2012/06/take-look-at-you-red-white-blue-edition.html
Kelly says
THANK YOU, Ginger 🙂 Super excited. Have a fabulous day.
six sisters says
Your patriotic flowers are so cute! We are so glad that you linked up to our “Strut Your Stuff Saturday”. Please come back again really soon! Thanks! -The Sisters
Kelly says
Thanks so much, ladies! I’ll be back — it’s always a good time 🙂
The Tablescaper says
Awesome job! I’d love for you to link this post to my weekly meme Seasonal Sundays. It’s right on target.
– The Tablescaper
Sherry says
I love these! I already have most if not all the supplies and cannot wait to get started!!! I really think they turned out fabulous and what a fun way to add some patriatic decor to a room. 🙂 Just pinned them.
Angie R says
Love it!!! Featuring you later today at Create & Inspire!
Angie
Claire says
Hi kelly,
Another great project, thank you for sharing at last weeks linky party!! You are featured this week !!
Hope you will join us this week
Claire x
Aimee - ItsOverflowing says
Cute…Cute…Cute! Featuring you today! Xo, Aimee
Jess says
These are so cute – I love the paper combinations you used! I am definitely going to make these with my kids!
Jessi @ Practically Functional says
These are so adorable! I love how many options you have for colors and patterns and stuff. 🙂 I featured this in my Fourth of July Roundup today, and I’m just stopping by to pin it! http://practicallyfunctional.net/2013/06/25-last-minute-fourth-of-july-ideas/
Sarah says
Cute idea and perfect for patriotic holidays.
Randi Sowders says
These are great! I love the colors and how patriotic it looks! You did a great job! I would love it if you would link up with us this week, I could totally see this being featured!
http://www.sowderingabout.com/2014/06/awesome-things-tuesday_10.html
Sarah @ 2paws Designs says
How fun and easy! Will definitely give this a try. Thanks for sharing. 🙂 #sitsgirls
Sarah says
Love these, such a great idea, thanks for the tutorial.
Cyndi says
These will look great on my summer mantle! Thanks for the idea!!
Cindy@DIYbeautify says
What a great paper project Kelly! I can get caught up in paper crafting too (and suddenly it’s 2 in the morning lol). LOVE these. Pinned 🙂
Emily says
These are so cute! We would love for you to come and link up with us at Your Designs This Time! http://elizabethjoandesigns.com/2014/06/designs-time-no-14/
Jennifer says
These are GREAT! And a canuck like me can easily change out the paper to adapt them for Canada Day 🙂
Thanks for sharing Kelly.
Renee@Two in the Kitchen says
How beautiful are these?!? They are absolutely gorgeous!!!!!
Mel the Crafty Scientist says
Love your blog and this project – so creative and festive! Just wanted to let you know I featured it in my roundup of my very favorite July 4th projects here. Feel free to check it out if you want and hope you like it! : )
-Mel the Crafty Scientist
Liz says
Hi Kelly!
These are great! I linked to them in my “Unique and Affordable Ways to Celebrate July 4th.” Really cute tutorial.
http://www.goedekers.com/blog/unique-affordable-ways-celebrate-july-4th/
Maria says
loved these! Made my own and they turned out so good! Thanks for the tutorial!
Jamie at RenoCompare says
These are too cute Kelly and we’d like to feature them in our Labor day decorations post. I’ll send you think link very soon!
Thanks Jamie
Jamie at RenoCompare says
Here it is…thanks again
http://www.renocompare.com/2015/08/labor-day-decorations/
Neha says
This is amazing! I am so impressed. I am not sure I would have the patience to make something like this, but it looks completely amazing!
Anna says
Thanks for the tutorial!I love you!
Tini says
they are absolutely gorgeous!!!!!
Anonymous says
This is so cool, I am going to use it for memorial day!
Joanna says
Love this way. Turned out so good. Awesome DIY Tutorial.
Tiara says
Love the paper flowers. I wanted a metallic multicolored fireworks looking decoration. You’ve inspired me