• Skip to primary navigation
  • Skip to main content
  • Skip to primary sidebar
  • Skip to footer
Live Laugh Rowe
  • About
    • About Me
    • Contact Me
    • The Rowes
    • In The Press
    • PR & Advertise
    • Privacy Policy
    • Resources
  • Recipes
    • Appetizers/Snacks
    • Beverages
    • Breakfast
    • Desserts
    • Main Dish
    • Side Dishes
    • Sandwiches
    • Skinny Dishes
    • Slow Cooker
    • Soups/Chilis
    • Weight Watchers
  • Crafts & DIY
    • Crafts
    • Decor
    • DIY Projects
    • Fall Projects
    • Holidays
    • Home Projects
  • Printables
  • Shop My Home
  • Facebook
  • Instagram
  • Pinterest
  • Twitter
Subscribe
Live Laugh Rowe

Live Laugh Rowe

A lifestyle blog that shares crafts, recipes, tutorials and life's moments.

  • About
    • About Me
    • Contact Me
    • The Rowes
    • In The Press
    • PR & Advertise
    • Privacy Policy
    • Resources
  • Recipes
    • Appetizers/Snacks
    • Beverages
    • Breakfast
    • Desserts
    • Main Dish
    • Side Dishes
    • Sandwiches
    • Skinny Dishes
    • Slow Cooker
    • Soups/Chilis
    • Weight Watchers
  • Crafts & DIY
    • Crafts
    • Decor
    • DIY Projects
    • Fall Projects
    • Holidays
    • Home Projects
  • Printables
  • Shop My Home
  • Facebook
  • Instagram
  • Pinterest
  • Twitter
Subscribe

Lens Bling Tutorial :: Do It Yourself

08/22/2011 · Kelly Rowe · 17 Comments

This post may contain Amazon or other affiliate links. As an Amazon Associate I earn from qualifying purchases.

Pin
Share
Tweet
Share
Back in July I posted a blog called Lens Bling :: Pow! about the Elly the Elephant, the lens bling that I made for my sister (a photographer).  Anywho, I was pleasantly surprised that some of you asked for a tutorial.  So, without further ado, here it is — Elly the Elephant (Lens Bling) Tutorial. Holla!  I’m pretty excited because this is my very first tutorial too!  To celebrate — see the giveaway below {yay!}

Lens Bling_Elephant I

Supplies:

Dark Gray Felt

White Felt Pink Felt

Black Felt (stiff)

Gray Scrunchy

Navy Blue Embroidery Floss

Embroidery Needle

Glue Gun

Now, let’s get this party started {smile}. Click here for the pattern/cutouts. Once you’ve printed them and cut them out — go ahead and trace on the appropriate felt. I always like to cut my patterns out of cardboard or card stock — paper is just too flimsy for me.  Did I mention I’m a perfectionist?  {giggle} When completed, you should have two large gray ears (hopefully you reversed the one side), two larger gray circles, two smaller white circles and the gray trunk. With the stiff black felt, you’ll now want cut out two large circles, two large black ears and a black trunk. The stiff black felt will be glued to the back of each piece to provide additional support and so that that Ellie can keep her shape. Next, we’ll go ahead and sew the white felt to the gray felt with the navy embroidery floss, then sew the pink inner ear to the gray outer ear — doing all of this with the navy blue embroidery floss as well. Now it’s time to glue. Glue each piece with it’s black felt twin.


If you can find something round and flat, you’ll want to stretch the scrunchy out as though it were on the camera lens. I used a paper weight. I guess you could use your lens if its a short one, but be careful with that glue gun. You’ll now glue each of the pieces to the scrunchy. Placement is up to you, if you want something closer, go for it. I had some visible glue on the back, but used a thin black ribbon to place over the minor imperfections that would drive a major perfectionist like myself CRAZY. {giggle}.  Here is a picture of the back view.
Lens Bling_Elephant back 


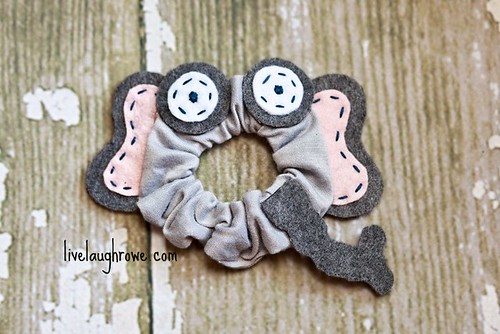
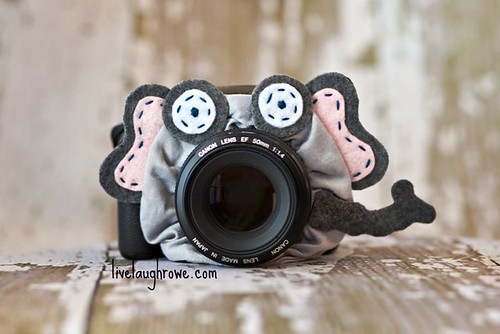
Overall, it’s pretty easy, right? I think it took me maybe 45 minutes to an hour to do mine — but that was creating the templates and figuring out what I was doing.  Aaaand here is a pic of Elly on the camera…  Voila!

Lens Bling_Elephant II
~*~*~*~*~*~*~*~*~*~*~*~*~*~*~*~*~*~*~*~*~*
So, how about a giveaway?
Yep, that’s right, I’m going to give one away!!
Here is how you can earn an entry:

1) Leave a comment here mentioning what you’ll be using Elly for (gift, personal use, etc)

2) Like my Facebook Page and leave a comment here saying you did so {smile}

3) Leave some love (a comment) on my Facebook Page and leave an additional comment saying you did so. It’s a new page for live.laugh.rowe and I’m super excited!!

The winner will be selected through random.org on Friday (8/26)!  Please be sure to check back on Friday, the winner will need to touch base with me within 24 hours to claim his/her prize.  Tell your friends and good luck!!!

{{GIVEAWAY CLOSED}}

~*~*~*~*~*~*~*~*~*~*~*~*~*~*~*~*~*~*~*~*~*

I’m linking to these fabulous linky parties today:
Making Monday Marvelous @ C.R.A.F.T
I made the world cuter today @Making the World Cuter
Just Something I Whipped Up @ The Girl Creative
Motivate Me Monday @ Keeping It Simple
Made By Your Monday @ Skip to My Lou
Pink Hipp Party @ Pinkapotamus

Throughout the week, I’ll also be linking to:
Catch a Glimpse Thursday @ A Glimpse Inside
Tip Me Tuesday @ Tip Junkie
Weekend Wrap Up Party @ Tatertots and Jello
Scrappy Saturdays @ Candace Creations

Check them out, there’s fun for everyone, Happy Monday!


keep living and laughing, friends.
Pin
Share
Tweet
Share

Related Posts

Photography 101 | Aperture Settings

Vintage lovers rejoice! 15+ Vintage Bed Spring Crafts to inspire you. From picture holders to vases, you're sure to find some inspiration. More at livelaughrowe.com

15+ Old Bed Spring Crafts for the Vintage Lover

Lens Bling :: Pow!

Lens Bling Winner :: Drum Roll Please

Self Portrait Examples

DIY Necklace with Photo or Logo Pendant

DIY Projects

Previous Post: « Blessed to be a Blessing!
Next Post: Friend vs. Date :: Top Ten Tuesday »
about kelly

ABOUT KELLY

A DIY fanatic, Kelly shares her journey through her blog, Live Laugh Rowe, where she showcases her recipes, tutorials, crafts, home projects, and all things DIY. This East Coast Girl at heart believes family is number one as she finds the perfect balance of being a daughter, wife, sister, entrepreneur, writer and woman of God. Be sure to follow along as she shares her passion for life, love and family! Read more...

Reader Interactions

Leave a Reply Cancel reply

Your email address will not be published. Required fields are marked *

Recipe Rating


Comments

  1. AmieAnn says

    08/22/2011 at 5:26 am

    This is sooo stinkin adorable.. what kid wouldn't want to smile for that cute little elephant.. and what a great tutorial! Thanks so much for sharing with the Pink Hippo party.. can't wait to see what you share next!

    Reply
  2. Wendy says

    08/22/2011 at 6:51 am

    So, so very cute!! Love it!!!!

    Reply
  3. Sarah @ This Crazy Blessed Life says

    08/22/2011 at 6:59 am

    Look at that! So cute!

    Reply
  4. Krissy says

    08/22/2011 at 6:14 pm

    LOVE IT!!! I can think off so many ways to put a cute lens bling to use! 🙂

    Reply
  5. Sharon Kuert says

    08/22/2011 at 8:01 pm

    This is sooo adorable! I can see little smiling at it when they get their pic taken! What a creative awesome idea! Love, love, love it!

    Yo Momma!

    Reply
  6. Candace @ Candace Creations says

    08/22/2011 at 11:30 pm

    That is a genius idea and so cute!!!1

    Thanks for linking up to Scrappy Saturdays, hope to see you back next weekend!

    Reply
  7. Candace @ Candace Creations says

    08/22/2011 at 11:32 pm

    I would use Elly for personal use…my kids almost never look into the lens!

    Reply
  8. Candace @ Candace Creations says

    08/22/2011 at 11:32 pm

    I liked you FB page

    Reply
  9. Jennifer @ PigskinsandPigtails says

    08/23/2011 at 6:34 am

    How cute! I love to take pictures but my kids refuse to look at the camera. Maybe this would get them to smile for a picture!

    Reply
  10. Ginger says

    08/23/2011 at 9:39 pm

    So cute! I would give it to my sister. She's a photographer & would love this. 🙂

    Reply
  11. Courtney O'Dell says

    08/26/2011 at 10:33 am

    So adorable! I featured your lovely post on my {friday finds} today!

    Come and check it out:
    http://sweetcsdesigns.com/archives/2243

    Reply
  12. Jennifer says

    08/28/2011 at 10:24 pm

    This is so stinkin' clever and cute!! Love it!
    (Found you on the Candace Creations linky!)

    Reply
  13. Candace @ Candace Creations says

    09/01/2011 at 10:40 pm

    I LOVE this so much! Thanks for linking up to scrappy saturdays! See you back next weekend 🙂

    Reply
  14. virginiamae says

    09/27/2011 at 9:14 am

    That is brilliant and adorable! Love the idea =) found my way from Tip Junkie.

    Reply
  15. Heather says

    09/28/2011 at 12:29 am

    What a great idea… thanks for the tutorial!

    Reply
  16. abby says

    01/07/2012 at 1:51 pm

    I've seen this on Etsy. Looking forward to trying it on my own! Thanks for the tutorial.

    Reply
  17. Julie says

    12/03/2012 at 5:23 pm

    Where did you find your scrunchy?!?

    Reply

Primary Sidebar

Looking for something?

Hey there! I’m Kelly.

I’m the author, creator, cook, and photographer behind the blog. I am so glad you’re here!  I’m passionate about life, family, and my faith. If there’s one thing I’ve learned in my journey, life is hard, but God is good.  Read More

Popular on Pinterest

Valentine Favors with cones and candy.

Footer

  • Facebook
  • Instagram
  • Pinterest
  • Twitter
  • YouTube

Looking for something?

Copyright © Live Laugh Rowe, LLC • Privacy Policy • Log in