This post is sponsored by The Home Depot. See full disclosure below regarding DIH Workshop.*
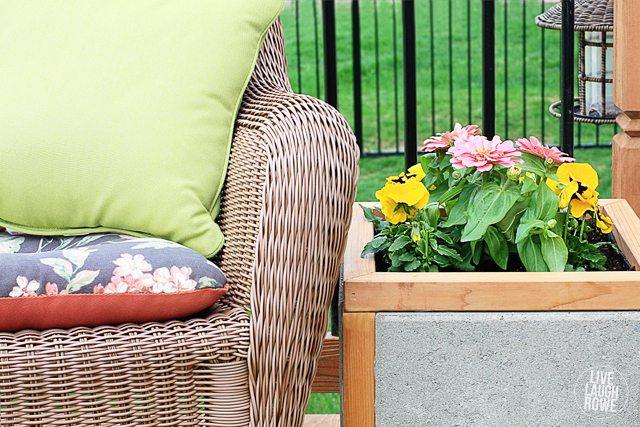
Happy Monday! Today is “thee” day — for what, you ask? Well, I’m sharing my first #DIHWorkshop project of 2015. Yahoo!! A DIY Paver Planter Box that can showcase your flowers on your porch deck or even on either side of your garage door. It’s perfectly versatile — and customizable as well. Ready for a little DIY?
AND, don’t forget that you can sign up to see an in-person demonstration at your local Home Depot store for this Thursday, April 16th. Grab a girlfriend or two and sign up today!
 Let’s grab a few supplies before we get started:
Tools:
Circular Saw
Power Drill and Bits
Caulking Gun
Sand Paper or Block
Rags
Large Clamps (or Bungee Cords)
Tape Measure
Pencil
Gloves
Safety Goggles
Materials:
Four 12×12 pavers, any color
Three 8 foot 2×2’s (I used cedar)
Large Bag of Moisture Control Soil
Landscape Fabric
Wood Glue
Box of 3″ Exterior Deck Screws
Polyurethane
Newspaper or Drop Drop Cloth
Alrighty, now that we have our supplies, let’s do this! Here’s another inspirational pic…

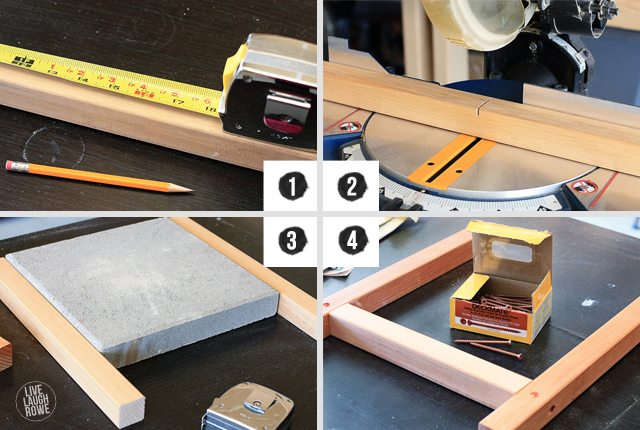 STEP ONE:
Start by measuring (see photo 1) and cutting your wood (see photo 2) into four 16″ pieces (for the legs) and eight 12″ pieces (for framing and bottom). Use your paver as a reference for measurement (see photo 3), as you’ll quickly learn that not all pavers are made equally (giggle). Be sure you have approximately 4″ from the bottom of leg to the bottom of the paver.
STEP TWO:
Once all of your pieces are cut, you can pre-drill and countersink the 2×2 pieces together, with the 16″ pieces forming the legs, and the 12″ pieces form the support between the legs. (see photo 4)
Apply some wood glue, and then screw in the 12″ support pieces into the leg (approximately 12-12-1/2″ down the leg from top), so that the frame is flush around the entire top.
 STEP THREE:
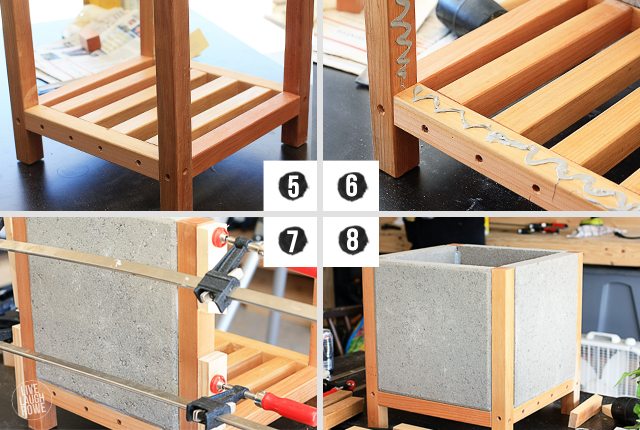
Next, we’ll create the bottom support of the planter. Grab your remaining four 12″ 2×2’s, pre-drill, apply some wood glue and space them evenly across the bottom and screw them into the frame. (see photo 5)
STEP FOUR:
We’re ready to glue our pavers into place! Place a thick bead (or squiggles) along the inside edges of the frame (see photo 6). Gently place each paver into place and avoid getting the adhesive on the front of the pavers or on the outsid frame (Warning: this is much easier said than done. I learned that it was best to put the pavers in from the front so that if there was any oozing, it would be on the inside).
You’re now going to secure your pavers for drying using bungee or clamps. Because I chose to use clamps (instead of bungee cord), we attached the pavers in stages (we only had four clamps, so we did two sides at a time). I just wanted to be sure the sides were clamped together as tightly as possible and didn’t think bungee would allow for that (in my humble opinion).
Let the glue set overnight (or per adhesive instructions) to ensure a strong bond.
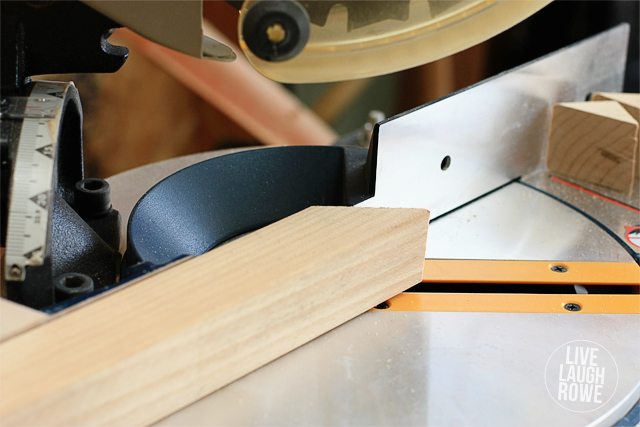
STEP FIVE: (optional)
I decided to frame in the top of my paver planter, but that is completely optional. You’ll need four 14-3/4 pieces of 2×2 cut at a 45˙ angle.
 I used a nail gun to tack the sides together and used the additional adhesive to adhere the frame to the top. To ensure it adhere, I placed a couple of planks of wood on top and used the bag of potting soil to weigh it down (all kinds of fancy going on there).
STEP SIX:
Paint, Stain and/or Poly your paver planter. Since I used cedar, I chose to simply put a couple coats of polyurethane on mine using a rag. Easy breezy and I loved how the color matched our deck so well!

STEP SEVEN:
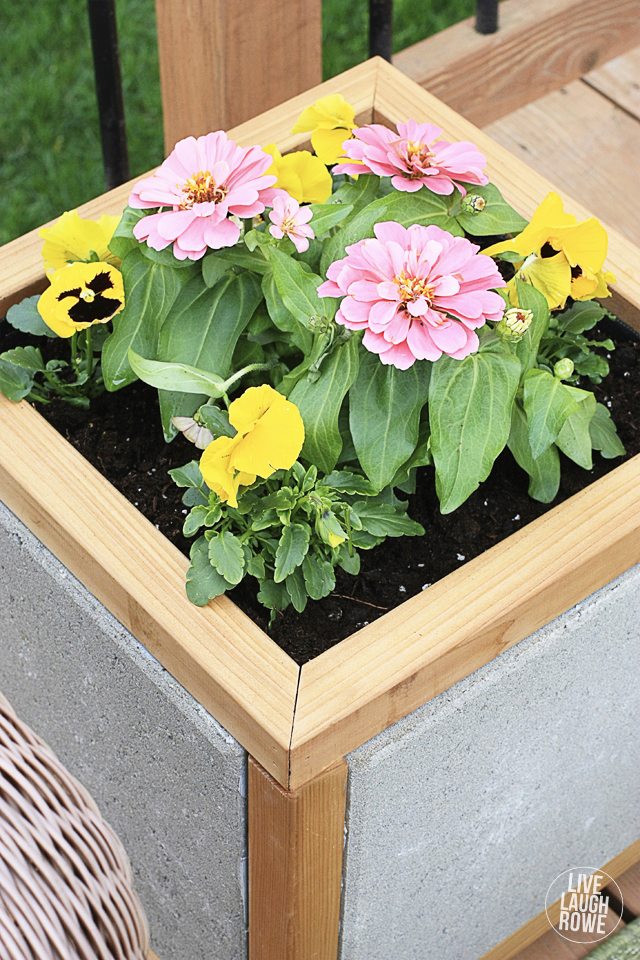
Planting time! Line the planter box with landscape fabric (see photo 9). I stapled mine into place (see photo 10)– yes, the perfectionist in me said this was necessary (hee-hee). Add planting soil and plants or flowers to your little hearts desire!
 Join the Home Depot this Thursday, April 16th
for the DIH Workshop and see an hands-on demonstration!
Happy Creating, friends! xo
Care to stay in the loop? I’d love to have you!
Catch me snapping + sharing pictures over on Instagram.
Subscribe to Updates | Like on Facebook | Follow on Pinterest

https://betweennapsontheporch.net/


Ashley says
I love it Kelly! I have so much work to do to our yard this year and I need some planters, will definitely be making pair of these!
Kelly Rowe says
Appreciate it Ashley! It’s such a sturdy planter…and blends in well with any porch furniture and such! Happy flowering! 🙂 xo.
Liz says
You are so talented! Thanks for sharing this terrific project! I’d love a few of these on my patio.
Kelly Rowe says
Aw, you are too kind Liz! I appreciate it. 🙂 You should give one a try. It would make a great addition. HUGS!
Maryann @ Domestically Speaking says
I love how your’s turned out with the cedar and the top edging… so cute!
Kelly Rowe says
Thanks so much Maryann! Appreciate it. Have a wonderful day. xo.
LZ Cathcart says
This tutorial definitely caught my eye! I love the different textures going on in the project. Not to mention, it looks very unique and durable. LOVE IT! 🙂
Kelly Rowe says
Thanks so much! Appreciate you stopping by. 🙂 It’s a great prooject and would make a wonderful addition to any porch, deck or patio. Consider making one…you won’t regret it. xo.
Amy says
I love how yours turned out, especially the wood trim around the top! Great touch. Here are the ones that I made:
http://modpodgerocksblog.com/2015/04/how-to-build-a-paver-planter.html
xo
Kelly Rowe says
Thanks Amy! Appreciate it. I’ll be sure to go check yours out. Have a wonderful day. xo.
Danielle@TheSummeryUmbrella says
I love this, absolutely gorgeous!
Kelly Rowe says
Thanks so much Danielle! Appreciate it. Have a great day. HUGS.
Kendra @ www.joyinourhome.com says
Love these soo much! These would make fabulous Mothers Day gifts… for myself! 😉 Thx for sharing! Xo
Kelly Rowe says
Thanks Kendra! They are a wonderful addition to any outdoor space. I think it would be a wonderful Mothers Day gift for you!! 😉 Have a great weekend. HUGS!
the cape on the corner says
i LOVE that you used the wood, and gave it legs. so nice!
b
Kelly Rowe says
Thanks so much! I apprciate it. It’s a great piece and can work in just about any outdoor space. You should give it a try. 🙂 Have a great Wednesday. xo.
Marilyn says
We love your gardening project & we featured it at The Project Stash! Stop by, pick up your featured button and share your latest creations! 😀
Jessi @ Practically Functional says
OMG Kelly, this is GORGEOUS! I absolutely love it; I totally want some on my front porch! I’m definitely pinning this, and I’m just stopping by to let you know this project was my pick for Rockstar of the week over at the Creativity Unleashed link party. Voting is now open for the MEGA Rockstar of the week, so stop by and vote, and tell your friends and readers to vote for you too. I hope you win this week! http://www.practicallyfunctional.com/creativity-unleashed-link-party/
Joel says
These look fantastic, all the different variations i have seen are impressive… making a set of my own next weekend… wondering, do you just line the bottom with fabric and nothing to make it more solid? Will the fabric eventually wear our or weaken and the dirt fall out? On all of the instructions I have seen, nothing is mentioned about the bottom other than 4 cross bars, which are spaced out, quite a bit…
Kelly Rowe says
Hi Joel 🙂 Thanks so much for stopping by. I only used the landscape fabric, as it allows air and water to pass through the fabric. I’m afraid a solid bottom will not allow that. Hope that helps a bit! Be sure to swing by and share your final project — we’d love to see it!
Zara King says
I just love this, I had a whole box of 18″X18″ ceramic tile left over from my floor so with a slight variation as the larger tiles are so heavy I am almost finished with my 1st one. Thank you for a great idea. I too love woodworking!
caryna says
Love love love these so much! I love the different textures going on in the project. Not to mention, it looks very unique and durable. Thanks for sharing
Lauren says
I absolutely love this! What is the total cost to make one of these? Thanks!