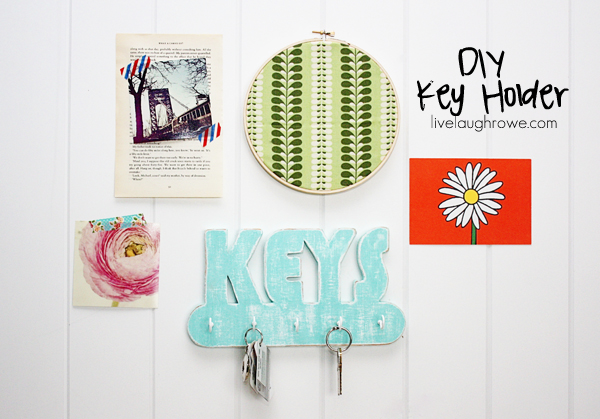
I recently got a new toy! The Dremel Moto-Saw. It’s the perfect tool for a crafter/DIYer like myself. I love that it has two saws in one too — a stationary saw and a detachable handheld coping saw. Score! Dremel recently reached out and challenged me to make a fun project to share with all of you. Of course I was up for the challenge. I decided to make a super cute DIY Key Holder. Keys are always laying around, so having one central location with a little extra cuteness is a win-win!
Let’s grab a few supplies: Dremel MotoSaw, 1/2″ 2×2 Birch Plywood, Template of Project, Drill, 7/8″ Cup Hooks, Sand Paper, Paint and Paint Brush.
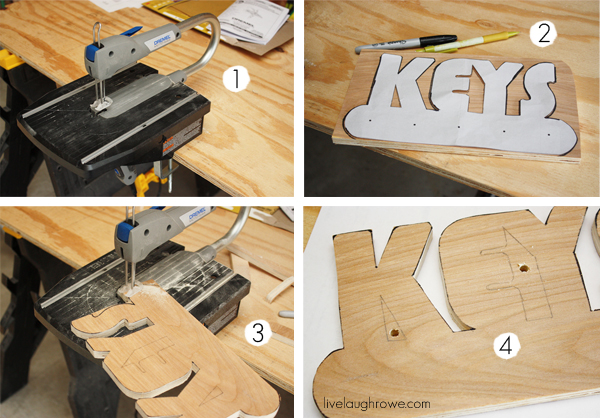
2.) Print and cut your template. I found mine at Free Scroll Saw Patterns. You’ll want to trace it onto your wood. I used a black marker for exterior lines and a pencil for interior lines.
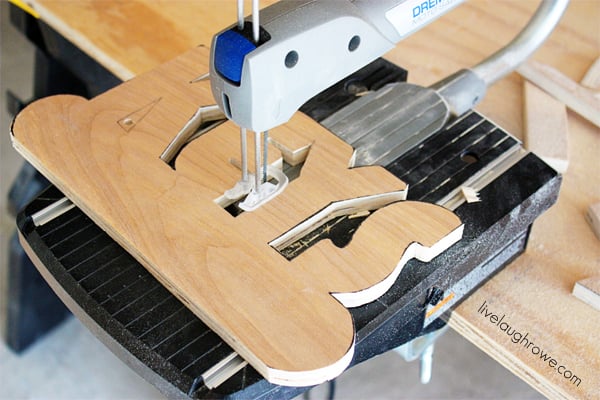
3.) Cut out your design. I started with all of my exterior cuts first, then moved into the interior ones, saving the tedious work for last {giggle}.
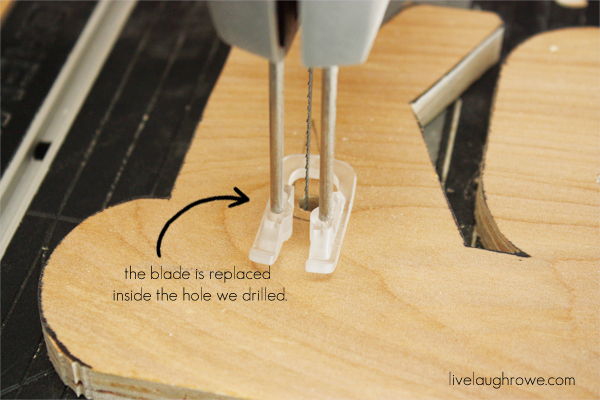
4.) You’ll need to drill a hole into the interior spaces, ensuring that the blade will fit through it. You’ll remove the blade from the saw and replace it inside the wood, allowing you to make the appropriate cuts.
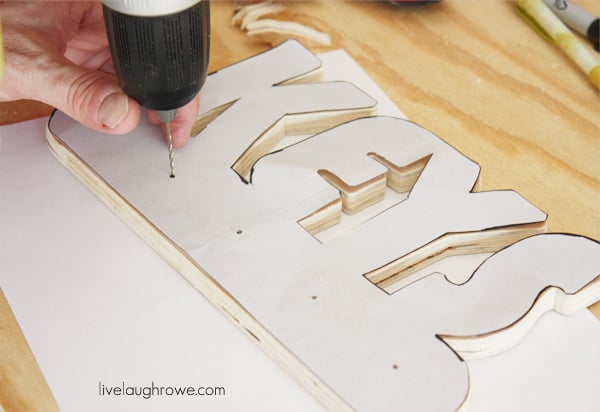
6.) Now it’s time to paint. I painted mine with two coats of of white paint and two coats of a Robin’s Egg blue color. I used your basic acrylic paint. Then it was time to sand again because I wanted it to have the look of a little wear and tear. Once your done sanding, attach your cup hooks and your done! Voila!
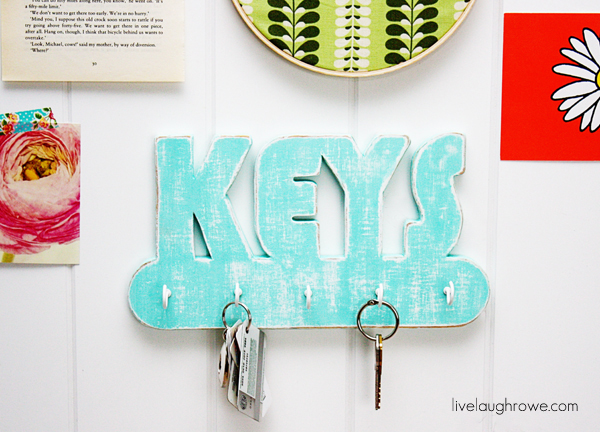
Are you thinking about all the projects you could do?
The possibilities are endless, right? Guess what?
I’m giving one away to ONE lucky reader!
a Rafflecopter giveaway
Be sure to swing by Dremel for more information about the Moto-Saw.
Happy Crafting, friends!
I’ll be partying {here and here}.
Subscribe to Updates | Like on Facebook | Follow on Pinterest




Andrea Wright says
I would love to use the scroll saw patterns I’ve ben collecting for years. So many holiday and home projects to be made.
TidyMom says
oh what a fun tool Kelly!! I LOVE your KEYS sign!
amber says
Oh my gosh, the possibilities are endless!
Therese @ Fresh Idea Studio says
Kelly, that is an awesome tool! Love, love, love your Keys project.. Very cool!
Cheers to you and yours,
Therese
Meagan @ A Zesty Bite says
I love the key sign! I would need to start with something simple.
Jennifer Ciniello says
I think the first thing I would make is your cool keys sign, we could definitely use that! But I’m sure my husband could come up with a ton of projects!
Angela Peters says
I would totally be a copy cat and make the exact same thing you did! Super cute! Thanks for the giveaway!
Margaret Opalka says
I would definately make the key sign but also have a ton of other projects in mind, ornaments for all the new babies in the family as well as personalized hair clip holders~
Laura Kelly says
I would make wooden cutouts of my designs…lots of them. FUN!!!
Jen Evans says
We’re moving into a new house soon and I would love to add some personal details {and get my diy hands dirty!} You make it look so easy!
Kelly Rowe says
Hi Jen! It is easy… super easy! I did it all on my own (minus the drilling of the holes). YAY!! Good luck.
cori says
I’ve been looking for the perfect shelf to hang in my daughter’s room. I would make one if I had this fabulous tool!
paige says
There are probably too many projects to just pick one but, I think I’d start with Christmas ornaments, then a fancy edged cornice for my daughter’s bedroom window, then a hat rack similar to your keys sign for my son’s room.
SarahO says
I just love the key holder you made! If I won, I would make a wall mounted coat rack.
Gracie Lathrop says
I am starting my own business and am looking for any way I can to build it with out over doing the budget. I’m hoping to turn a little thrift shop in to a refurbished furniture/DIY junkteque 🙂
Chelsea @ Making Home Base says
Love it Kelly! Your KEYS sign is awesome! I think I’d make a monogram for my daughter’s room 🙂
Adam says
This would be great for making durable stencils.
Nicole W says
I’d like to try some MDF designs to sit around the house for holidays!!
Shannon says
The possibilities are endless! Would definitely make the key holder, but I would make the kids names for their door too. Also I would find a way to make wood jewelry with it.
I’m now having all these ideas going through my head. hahaha!
now keeping my fingers crossed
Danielle says
This turned out so great! I love the you sanded it down so it looks a little bit more rustic!
Kathe says
My brain is going crazy with all I could create with this handy tool Kelly! Garden signs, home decor! The possibilities are endless. I will not uncross my fingers until the very end 🙂
Tiffany Brady says
What a great project! Love the way you distressed it too!
kelley @ Miss Information says
Kelly that is so cute I am in dire need of a key holder! Is it hard to maneuver? I would be afraid I would have it going too fast and cut the sign right in half.
Deb Clem-Buckert says
Very cool. I can go crazy with a glue gun but I’m not sure I can saw. Worth a try though.
Melissa says
I need this tool in my life. haha! I would definitely make some wooden holiday wreaths for sure.
xoxo,
Melissa
DesignedByBH says
I love it! That looks like a super handy tool! Is it as easy to use as it looks???
DesignedByBH says
Oh–and I would make ALL KINDS of home décor for my blog and for our new house if I were to win!
Steph @ Crafting in the Rain says
I’d make some lacing shapes for my nieces and nephews
Courtney Margot says
I would make wooden door wreaths!
Jennifer S says
I would love to get my hands on this power tool! Oh the things I could do…. 😀
Lesley says
I wanna make things out of pallets! Like furniture!
Angelina-JoJo and Eloise says
I LOVE your sign.. The color is so PERFECT!! 🙂
Chrissy says
Personalized letters for my picture wall!
Cindy Eikenberg says
Kelly, your key holder is so cute and it looks easy to do with this great tool – which I would love to have! 🙂 Thanks so much for sharing your project and for the giveaway! Have a wonderful week!
Kelly Rowe says
Thank you for being so kind, Cindy! It’s a super-fun tool. Fingers are crossed for you 😉
Liz says
The key holder is a wonderful idea. Thanks Kelly – nice giveaway.
Claire @ A Little Claireification says
Such a fun project!! I definitely need this tool in my life. Hubs has been searching for dremel tools for me too – entering this and showing him your post!! Pinned! xoxo
Maggie Wallace says
So many endless things to make with this! I love your idea. I would start with the key holder idea!
Jamie says
This would be so cool to have, the ideas are running around in my head like crazy! Thanks for the chance to win!
Martha Dehne says
Wow! That’s a generous giveaway! I’d love to win! Your key holder is so cute! P.s. Your directions are very good…clear…for a beginner like me! 🙂
Amy Chadbourne says
I would love this now to help with all the touchups I’m putting on my house to sell. Then, I’d use it to make decorations for my new home after I move in. 🙂
Kara says
Gah, I love that!
Annette Crain says
Wow, talk about a “cool tool”. This would be an ultimate tool to have handy for quick and unique projects.
Great giveaway!
Terry says
*SIGH *. Sure would like to have one of those Dremel Moto Saws. Oh, the fun I would have………
Shaina says
What a fun tool! My husband would love this, as he’s the project guy here, but I have a few home projects I would love to try it out on, too!
Brenda Young says
Wow….looks like such a nifty little tool! My mind is reeling with ideas….your keyholder reminds me of the one we had when I was a kid, cute!
Brenda Young says
What a nifty tool, my mind is reeling with ideas. .your keyholder remimds me of the one we had when I was a kid, cute!
Heather says
I want to make a cut out (inspired by those hello signs I see all over the web) to display in our entry. This tool looks awesome!
Sandi Allen says
I could so use this. My scroll saw just went to heck and I have a stack of snowman ornaments to cut out. Thanks for the chance!
Christine Cunningham says
wall signs for a nursery
Nancy Y says
I’d use this scroll saw to make some home décor and holiday items! Love your Fabulous key sign!!!
Leslie Moore says
A “coffee” sign for my new coffee bar!
Ambrielle Bender says
This is SOOOO COOL! I have so many projects I have wanted to do but because I do not have the tools The have been axed off the list! IF I won the first project on my list would be a cross for my Mother in Law who collects them!
Shawn B! says
Maybe a key holder
Dee says
I believe the more appropriate question is what wouldn’t I do w/that awesome gizmo! ohhhh the possibilities! (think I could make new bling collars for my pups??)
Julianne Johnson says
I would love to make signs!
jeanette says
I NEED one of those!!!
Emily says
This is so cool! I have been dreaming about owning one of these Dremel Moto Saws. I have so many little home projects I would love to make as well as crafts I want to tackle. My kids are also sure they could have the winning cars at their Boy Scout Pinewood Derby!
Mary Beth @ Cupcakes and Crinoline says
I would make a limb shelf for my craft room ~ and some picture frames ~ and some art for my boy’s bedrooms…and, and, and….oh my word what a great giveaway!
Jen W says
OMG. I have been wanting one of these. I would probably start with my kids names or our last name! Love it!
brianna peterson says
I would make our last name for the entry way. Key holder for mudroom and so much more! I really hope I win.
Laurel H says
The first thing I’d make would be a wooden monogram that I could paint and hang.
debi m says
I would make a house number sign, just to get me started, then the sky is the limit!
Lois says
I would make my own letters for bow organizers!
cabinofbows.blogspot.com
jill Wilhelm says
Love your key holder Kelly! What a cool took! If make a sign for my 2 girls room
Angela says
I would make everything….I have been waiting for something like this to come into my life..I would start with a shelf for spices like a spice rack..but detailed. then christmas decorations. then all kinds of stuff on pinterest i have saved up. i am telling you now that i no longer can work…long story…i craft…luckily i can take my time…that’s what i have time on my hands..lol sometimes my projects take a lil time, but that is what keeps me going…hehe yes i would make EVERYTHING.,:)
Emily Ayeres says
Um … I could actually do some of the projects in my DIY magazine that I usually dismiss because I have no tools!
Ashley Conder says
I think that’s so neat.. I would make E A T for my kitchen!!
Melanie Butler says
I love that and would love to win the tool 🙂
Amber Stewart says
Would love this tool, so many wonderful uses, for me and my husband!
Amber Stewart says
Would love this tool, so many wonderful uses, for me and my husband! Would make some signs for my craft room.
Nikki w says
What a cute sign. I would make one because I am always forgetting where I put my keys.
Janet says
Love the color you chose Kelly, perfect project! The Dremel can do so much more than a jigsaw. I would love, love to add it to my workshop!
Tina Buenzow says
Oh you have stirred the pot of imagination! MDF board comes to mind…for making my own wreaths and maybe some Christmas yard art too!
Stephanie says
I would make my own puzzles!!
Heather says
Love the color and the distressed finish too Kelly! Pinned!
Brandi Price says
I can’t think of anything right off but I am sure I could find something to do with this thing! 😉
Cori says
First of all, how rad is it that you’re giving away a saw! Love it. I’d make wedding signs!
Leslie Stewart @ House on the Way says
I’m not sure, but I start gathering ideas asap!
Tanya says
I love this tool, I think I would probably work on some DIY pictures frames first!
xo, Tanya
Virginia says
I would make wooden monograms.
Amanda Small says
I make jewelry, so I would use it in my jewelry making, a very cool tool!! thanks for the giveaway!!
Sarah Tackett says
I’d make a new sign for my house.
Shelly says
I have been drooling over those adorable hello signs and I’d love to make one of those!
Jennifer Dawn says
What a fun project! I’d love to have you stop by this week’s link party and link these up. Hope to see you there! http://thelifeofjenniferdawn.blogspot.com/2013/07/a-little-bird-told-me-link-party-50.html
Georgia says
Would love to get this in my hands!
Marina Jones says
I would <3 this!!!
Marina Jones says
Oh I would make cool band name signs and glitter them up for my girls rooms and make pot holders with awesome designs! oooohhh and a key holder, I’m always loosing mine and omg there is so much I could do with this!!!
Randi - Dukes and Duchesses says
I SO want to win that … I’ve been wanting to do some fun monogram projects and this would be perfect.
Jenn says
Oh my gosh pick me, pick me! This is like the greatest alternative ever to a huge scroll saw! Love it and love the project!
Jenn says
Oh, and what would I make? Let’s just say that basically everything in my house would be labeled with wood 😉
Stephanie Adams says
OH MY GOSH MY HONEY AND I WOULD BE SO BUSY MAKING HALLOWEEN DANCING WITCH ORNAMENTS AND SWEET CANDY CANE ORNAMENTS, PLUS FOLK ART USA FLAG PUZZLES AND THE LIST AND ENJOYMENT WOULD GO ON FOREVER, GOD BLESS AND THANKS ROBERT AND STEPHANIE ADAMS, PLUS THIS WOULD BE AN EXCELLANT ADDITIONAL TO OUR DREMEL TOOLS
Towhid, Reciprocating Saws says
I would also like amazing this saw! i think its a funny project for my.Actually i wait for it and i love it very much. Thanks!
D@TheShadyPorch says
I’ve wanted to do wood projects for ages but don’t like the tools hubby has…too scary. I could use these…much less intimidating! Fingers crossed. Blessings, D@TheShadyPorch
Kristye says
Seeing this made my mind race with ideas; home items, gifts, pets, I could go on and on!
Logan says
This is such a neat tool! I use power tools all the time to build robots 🙂 but this saw is so much more practical for crafty uses. I would love to make a huge name sign for my room.
Becca Hill says
Stars and various shapes to decorate with! My goodness that is one fun looking tool. NEED THIS!
Jessica w says
some custom wooden art for our walls
Meagan says
With all the house projects on our old house – we need it to retro fit replacements. Nothing is square in the house
Sarah W says
so great to have thanks
Gina says
This looks like such a fun machine! So many ideas running through my head!! Thanks for the giveaway!
Nancy K says
signs, signs and more signs!
Lisa says
Cool giveaway
Wanda Eash says
Very cool project! Thanks for sharing!
suburbsmama says
Love this key holder, the color is beautiful.
Kennedy says
I love this! It is so simple looking. I am definitely pinning.
Leslie Stewart @ House on the Way says
Love your key holder! Stop by House on the Way tomorrow to see it featured at my Twirl & Take a Bow Party. Have a great week.
Leslie
Jory says
Hey there! Great blog! I got a motosaw for my birthday and would love to see some more ideas for what to use it for. Thanks!