Who doesn’t love the story of Frosty the Snowman? He was such a jolly happy soul!
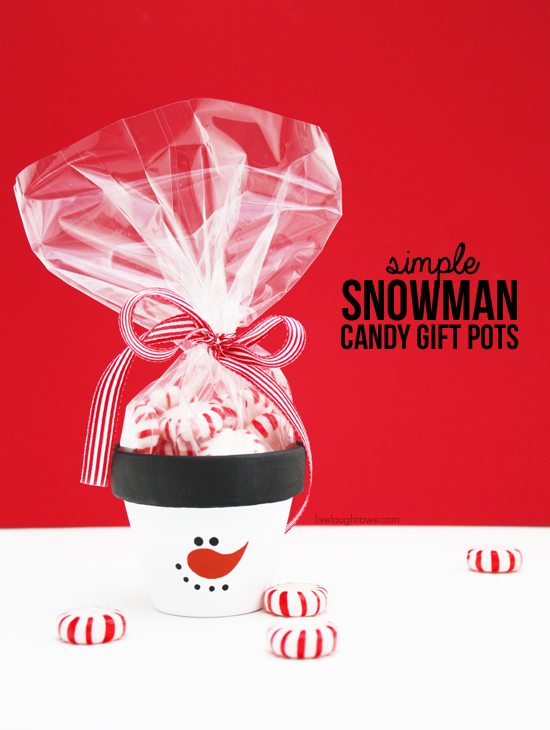
I have many fond childhood memories of watching Frosty the Snowman, building snowmen, and watching my mom collect hundreds of them. Most snowmen just make me smile! Last year (when I think I had three readers, hee-hee), I shared a DIY Snowman Can. So, how about an easy DIY Frosty the Snowman candy gift pot? A great gift for teachers, co-workers, friends, neighbors, and maybe even your bloggy friends!
For Halloween, I did these Fabulous & Easy Candy Corn Pots. Do you remember those? Well, the steps for this fun project are very similar so I won’t bore you with all the same details. Jump on over to the candy corn pots for more specifics if necessary. Deal?
 Oh my goodness, cute! RIGHT?
He totally makes you smile! Admit it.
.Supplies:
Terra Cotta Pots (@ 2.75″ x 2.75″)
Red, White, and Black Acrylic Paint
Paint Brushes
Starlight Candies (Dollar Store)
Clear Treat Bags
Ribbon
Step One: Paint your pots. White on the bottom, black on the rim/lip.
Step Two: Sketch your snowman’s face with a pencil onto your pot. This way you can easily erase and correct any boo-boos.
 Step Three: Paint over your pencil sketch. Use a thin/fine paintbrush that is intended for details. I used Martha Stewarts — they worked perfectly! Here’s a tip. I use the opposite end of the paintbrush to make my dots. Dab it into the paint and test on paper to ensure how light/hard you will need to press. This makes thee perfect dot!
Once you’ve painted your snowman faces, you’re ready to fill your treat bags with starlight candies (or other candy of choice), tie with ribbon, and gift! It’s fun, sweet, and easy!
 Are you tempted to bust out in song?
Frosty the Snowman, was a jolly happy soul.
With a corncob pipe and a button nose…
Happy Everything, friends!


Bettina says
What an excellent idea! Aren’t you just too clever!?
Kelly says
Thanks so much, Bettina 🙂 Glad you liked these cuties.
Sandra L. says
Oh my these are too cute! My grandkids would love these..must get busy. Thanks for sharing this neat idea.
Kelly says
YAY! So glad you like them, Sandra. You’ll have to let me know what the grandkids think. MERRY CHRISTMAS.
Angie @ Big Bear's Wife says
Adorable!! These will make great office gifts!
Kelly says
Thanks so much, Angie…. I know I would be tickled silly to get one of these cuties 🙂
Holly and Nat @ My Sister's Suitcase says
Darling Kelly!!! I love the snowman’s nose 🙂 What a great gift idea!
Kelly says
THANK YOU, ladies 🙂 Merry Christmas. HUGS!
Leslie Stewart @ House on the Way says
This is an adorable project! Great gift idea!
Kelly says
Thanks so much, Leslie 🙂 Are you ready for Christmas?
nest of posies says
how darling is this! cute cute!
Kelly says
🙂 THANK YOU, sweet friend!
shoprubyjean says
Super Cute!!! I am thinking I need to be on your gift giving list 😉
Angelina
Kelly says
THANKS… I will gladly add you to my gift giving list, sweet friend. Have a great end to your week. xo
Lucy Beliveau says
Your snow men pots are precious!! I have been looking for something to help my Grandchildren make for their Mom and Dads for Christmas! I think you just Mueller me find the answer!!!! Thanks! Happy Happy Christmas! I love your blog!!
Kelly says
Lucy… I’m afraid I might be bombarding your Inbox with all my comment replies 🙂 I’m tickled silly that these cute little pots might be what your grandkids make for their parents. Happy Christmas to you as well. I’m so happy to hear that you enjoy stopping by my little corner of bloggy land. Be blessed!
Lucy Beliveau says
Muellerme?!!! I typed help!!
Gina says
How cute- I would love to do this for my neighbors
Kelly says
Thank you, Gina!! I’m sure the new neighbors would love them {wink} Happy Christmas.
Ladyfée says
C’est extra et original ! trop rigolo ! j’aime beaucoup ! voilà un emballage qui peut se recycler ! à bientôt ! Ladyfée
Kelly says
Thank you so much, Ladyfee!
Brenda @ a farmgirl's dabbles says
Super duper cute!!!
Kelly says
Thanks so much, Brenda! Wishing you a Happy Christmas 🙂
Shaina says
I am thinking these might year ‘s this year’s teacher gifts.
Kelly says
Yay! Excellent idea, Shaina. Thanks so much for stopping by 🙂 Have a great weekend.
Debbie says
These are so perfect for my grandsons! They are so cute, I love them! I collect snowmen too, might have to save a few for myself.
Debbie 🙂
Kelly says
Woo Hoo!! Gifts and fun decor 🙂 My mom collects snowmen too…. they just make you smile!
Maranda says
These are so perfect!
Kelly says
Thanks so much, Maranda! Merry Christmas.
kristine says
ADORABLE! GREAT DIY POST!! Nicely done.
Kelly says
Thank you so much, Kristine. I think they’re pretty cute 🙂
Bonnie and Trish @ Uncommon says
This is so adorable Kelly!!
Kelly says
Thanks a million, ladies 🙂 They make you feel a little jolly, right? HUGS!
Desiree says
Oh my cuteness! I am featuring you tomorrow… this is adorable Kelly!
Kelly says
SMILES! Thanks so much, Desiree — for loving on my project and for the feature 🙂 Merry Christmas!!
Christina at I Gotta Create! says
Oh my Goodness… It doesn’t get any cuter!!!
Thanks so much for sharing at the party,
<3 Christina @ I Gotta Create!
Kelly says
Thanks so much, Christina. MERRY CHRISTMAS!!
Cindy deRosier says
I’m the Editorial Assistant for Fun Family Crafts and I wanted to let you know that we featured your ADORABLE snowman candy pot! You can see it here:
http://funfamilycrafts.com/snowman-candy-pots/
If you have other kid friendly crafts, we’d love it if you would submit them. If you would like to display a featured button on your site, you can grab one from the right side bar of your post above.
Kelly says
THANKS so much, Cindy 🙂 I’m always tickled silly for a feature — and will be sure to submit other projects. Happy Holidays!
Kelly says
oh man, snow man! I wish I had seen these last week!
They are so adorable!
Kelly
Vickie says
Just found your site yesterday. Love it!!!
Went to Walmart this morning~can’t wait to paint.
Thanks!
Kelly Rowe says
Hi Vickie!! Thanks so much for your kind words and stopping by!! Happy crafting. xo
Diane says
I pinned these and love your instructions as I was a little intimidate trying the nose. I am doing these for next year for the guys. My theme is red/white/snowman. So I did my tops red, and need a second coat on the white and then I will be doing the face. I picked up the terra cotta pots at the Dollar Tree and I was wondering what I would do with them, but I just knew it would be something I would use and couldn’t pass them up. Now I wish I had gotten 4 more. Oh well I will find them this spring again or Michael’s. Thank you for sharing and I like that they are the directions that pots go and not upside down.
Kim says
Adorable! Did you paint the inside of the pot?
Kelly Rowe says
Hi Kim. No, I did not paint the inside of the pot 🙂 Hope that helps. Cheers!
Ashley ~ 3 Little Greenwoods says
This is such a fun winter time activity for my three kiddos! Thanks so much for the inspiration.
I can’t wait for us to make this for little gifts!
{BIG hugs}
~ Ashley
Kelly Rowe says
Hi Ashley! I’m so happy to hear that you and the kiddos will be making these — they make great little gifts for sure. HNY! Hugs.