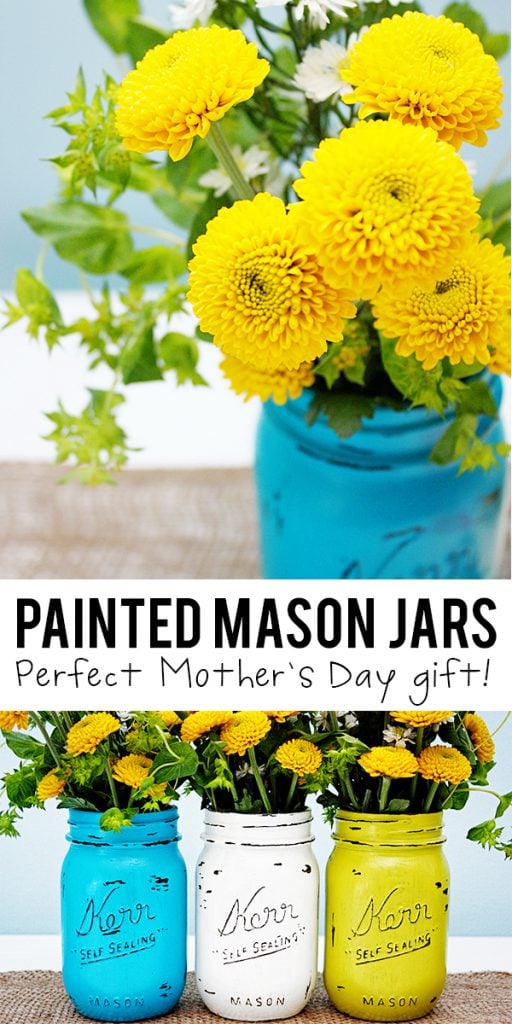
Vintage Inspired Painted Mason Jars
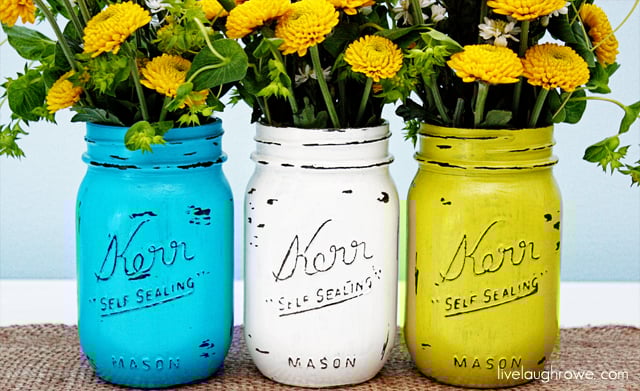
I have a fabulous project to share with you today! These sweet vintage inspired Painted Mason Jars. I saw some of them being sold on Etsy and had to give them a try. They are super easy and a fabulous handmade piece that you could easily gift to your mom on Mother’s Day.
Be sure to sign up for my email to get new
recipes and creative ideas sent right to your inbox!
 There aren’t any step by step pictures, as it really is a very simple project. Wouldn’t it be fun to invite some friends over and make these for gifts or to display a lovely bouquet for guests?
Supplies for Painted Mason Jars:
Mason Jars
Acrylic Paint
Paint Brushes
Nail Files, Sealer
Bouquet of flowers (of course).

Painted Mason Jars Tutorial:
Step One:
Grab your supplies and be sure that your jars are clean and ready for painting.
Step Two:
Paint two coats of paint on the outside of your jar. Allow appropriate time to dry.
Step Three:
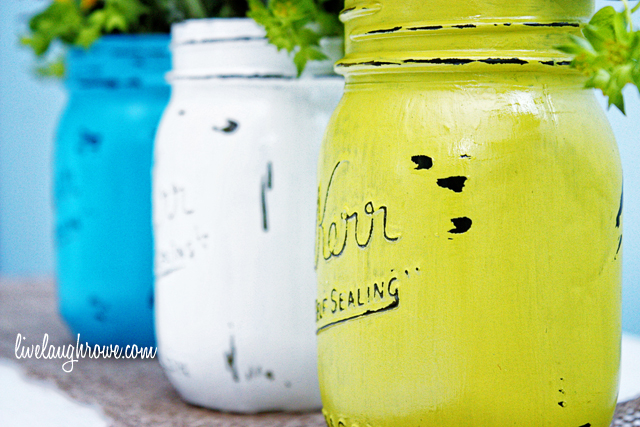
Sand the raised letters and spots around the jar for an aged/vintage look with a nail file.
Step Four:
Seal. Paint one or two coats of sealer on your jar.
Step Five:
Arrange flowers for display or gifting.
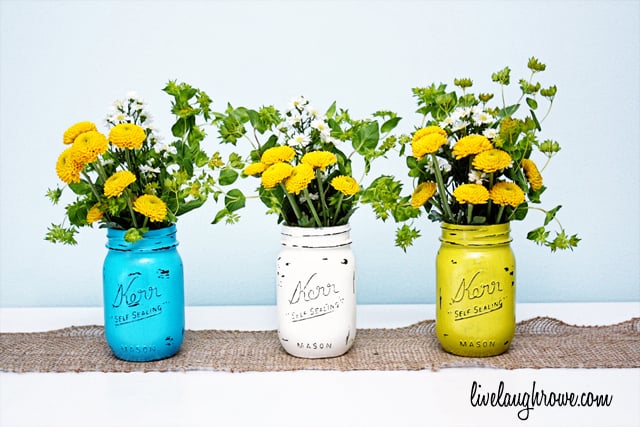
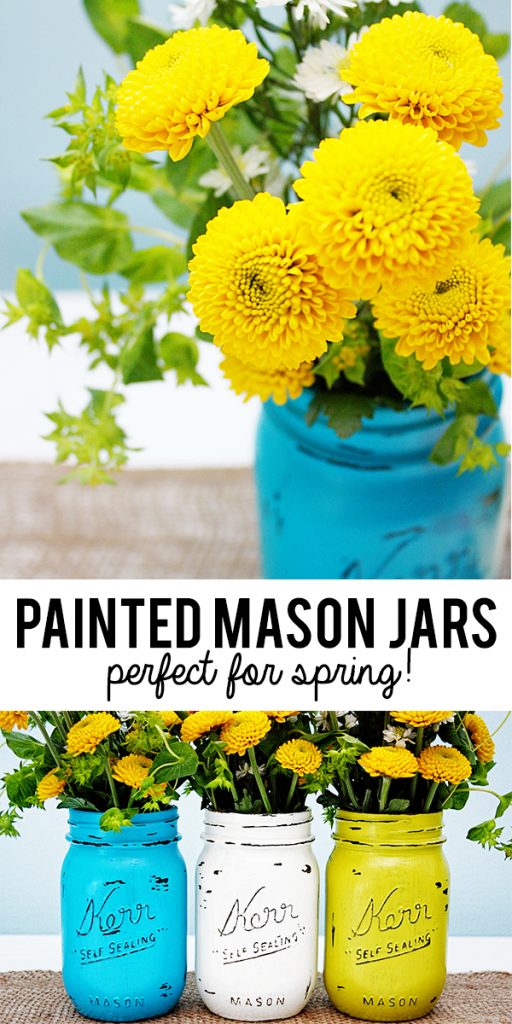
Additional details: The colors I used for the painted mason jars were Citron, Turquoise and Vanilla by craft smart (purchased at Michael’s).
I used pint-sized jars (however, any shape and size would work). The sealer allows you to be able to wipe the jars with a damp wet cloth for cleaning purposes; however, you cannot submerge or soak these in water.
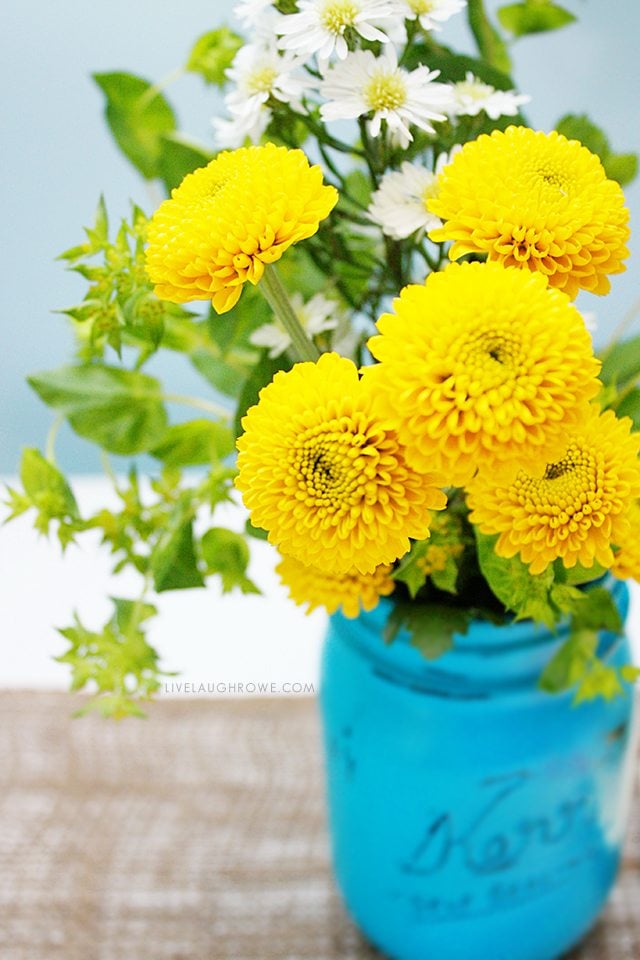
 In the picture below I used a vintage action for fun. I’m madly in love with these jars! I may even add a few to my shop, for those who don’t want to hassle with the DIY part. If your mom likes flowers, why not make a fun mason jar vase to pair with them? I’m willing to bet you’ll make a few for yourself too.
 Running short on time and unable to do the painting? Check out this tip on the easiest way to tint mason jars blue. Crazy easy!
Soooo, happy crafting! What are you waiting for? Let’s get making some painted mason jars!
 Be sure to visit with me here too:
Facebook | Instagram | Pinterest | Twitter |Google+


Claire @ A Little Claireification says
Ohhhh Kelly I just adore these! They turned out beautifully! And I still have plenty of jam jars left after my mercury glass post so I am thinking end of year teacher gifts! I love them {and you MUST come link them up!!} So excited for this series!
xoxo
Kelly Rowe says
Thanks so much, Claire! I’m kind of in love with them myself. xo
Angela says
LOVE! Is it just me or do they look black under your coat of paint? Can’t wait to start on these! I was going to take the lazy route and order from Etsy but then saw it was $47 CDN to ship to me! So, I’ll give it a shot here and hope for the best! Thanks so much for sharing.
Kelly Rowe says
Hi Angela! When you add the water and flowers, I think it creates a darker interior causing it too look like a black coat of paint. I can assure you, no black paint 🙂 Happy creating!! Hugs.
Chelsea @ Making Home Base says
BEAUTIFUL! I love those colors Kelly. I know my mom would be thrilled to get some of these even without flowers!! LOVE!!
Kelly Rowe says
Thank you, Chelsea! They’re versatility is a very attractive feature 😉 Can’t wait to see your post this week. xo
Natalie@NorthShore Days says
Kelly these are gorgeous. I do all mine with the paint on the inside. But I think my next batch (yes batch – dont judge me!) will be painted on the outside – although I think my husband is secretly throwing my stash of jars out with the recycling! I may already have too many lol. Pinning these gorgeous jars xx Nat
Kelly Rowe says
Hi Natalie 🙂 Thanks for the chuckle…. and I {love} that you make them in batches!! Have a great week. xo
abbey says
I love these Kelly!!! So pretty. Pinning 🙂 Hope you’re well, hugs!
Kelly Rowe says
Thanks so much, Abbey!! I’m finally feel like I’m back in the saddle 😉 MISS YOU!! xo
Melissa B says
These look awesome! =)
Kelly Rowe says
You are too kind, Melissa! Thanks. xo
Leslie Stewart @ House on the Way says
These jars are great! I love the look and the colors you used are too perfect!
Leslie
Kelly Rowe says
I’m so glad you like them, Leslie! I’m kinda crushing on the colors myself {giggle}. Hugs!
Rebecca @ My Girlish Whims says
Ohhh how cute!!!!! love this idea. I think i shall try it out in pink 🙂
Kelly Rowe says
Rebecca! I think the pink sounds fabulous. Happy crafting! xo
Capturing Joy with Kristen Duke says
I love this so much, and so excited about this series!
Kelly Rowe says
Thanks so much, Kristen! I’m excited about this fabulous series too… can’t wait to see everyone’s projects. Hugs!!
TidyMom says
oh Kelly I LOVE how these turned out! Those colors are perfect for my kitchen!
Kelly Rowe says
Glad you like them, Cheryl! I have mine spread out throughout the house 🙂
Gina says
Super cute Kelly- love the colors. Can’t wait to see what you have coming up.
Kelly Rowe says
Thanks, Gina! The rest of the fabulous-ness is happening on everyone else’s blogs, so be sure to check them out. Talk soon. xo
Crystelle Boutique says
what a fun idea for Mother’s day…I love mason jars used as vases… !!
Have a happy Monday…. 🙂
hugs x
Crystelle
Crystelle Boutique
Kelly Rowe says
Hi Crystelle! Thanks so much for loving on my project — mason jars kinda rock {wink}. Have a fantastic week. xo
kristi@ishouldbemoppingthefloor says
Gorgeous colors and I LOVE that it uses a nail file…no heavy duty stuff!! They turned out beautiful.
Kelly Rowe says
Thank you, sweet friend!! Easy breezy with a touch of fabulous…. hee-hee. HUGS!
Lindy says
Absolutely gorgeous!!!!! What type of sealer did you use or can you use any type?
Kelly Rowe says
Hi Lindy! Yikes… the sealer I used just said sealer. I think any sealer will work, but you might read the uses before purchasing. Mine was the craft smart brand from Micheal’s, if that helps. Thanks. xo
The Pinterest Housewife says
That’s crazy! I was in the process of making these! I saw them on Pinterest. Currently have some Mason jars drying out on the countertop now before I prime and paint!!
Kelly Rowe says
Wha?? That is crazy!! Aren’t they fabulous? Enjoy your colorful mason jars.. xo
Trish @ Uncommon says
Kelly… these are just beautiful! Great job!
Take care,
Trish
Kelly Rowe says
Thanks so much, Trish! Hugs.
Kerry says
Love Love Love!!! I want ALL those colors, too! Has anyone tried spray painting these?
Kelly Rowe says
Hi Kerry! Thanks so much for loving on my project. I’m not sure on the spray paint…. If you give it a try, let us know! Hugs.
Eva Scott says
These are SO gorgeous!!
Kelly Rowe says
Thanks so much, Eva!! xo
Shellene says
Your jars are adorable. Love the vintage vibe! Did you paint black on them first to get the dark look where you sanded?
Kelly Rowe says
Hi Shellene! There is no dark paint underneath. That is how it will look at the paint doesn’t allow light into the inside, so it appears dark 🙂 Pretty fantastic, right?
Rachel (Lines Across) says
These are really beautiful. I love the tip about sanding the raised parts with a nail file. That touch really makes all the difference.
Kelly Rowe says
YAY! So glad you like them, Rachel. They’re scattered throughout my house, I just love the pop of color. Hugs.
Kathy, Petticoat Junktion says
I absolutely love these. Have to try this soon!
Kelly Rowe says
Thanks so much, Kathy!! You’ll love them 🙂
Krista @thehappyhousie says
These are totally fabulous Kelly! Thanks for this great tutorial too, I might make some tomorrow!!
Krista
Kelly Rowe says
Thanks so much, Krista! I kinda love the pop of color they add around the house 🙂 If you make some, be sure to link up a picture on the Facebook page — I’d love to see them!! xo
Brooke says
LOVE these- the colors, the flowers, everything about them! I’ve never really wanted to try painting mason jars until I saw these. Thanks so much for sharing. Have a great day!
Kelly Rowe says
WOW! I’m so flattered that these may just be the inspiration for you to pain mason jars!! How exciting. Have a fantastic end to your week. xo
julie says
I just found you from the Southern Lovely link party! I LOVE THESE! Thank you so much for sharing this beautiful and easy project. I will be sure to check back daily for your other gift ideas for Mom!
Thanks!
Julie
Kelly Rowe says
So glad you like them, Julie! All of the other gift ideas are being shared on the contributors blogs, so be sure to check them out here. Have a fantastic day! xo
Diana says
I am SOOO making these! Ive been looking for a great tutorial on how to make mason jars this and and I found it!! Thanks for sharing!
Diana @decoratemediana
Kelly Rowe says
YAY! I’m so glad you like them and will be making some!! I’d love to see how yours turn out, so be sure to link up a picture on the LLR Facebook page 🙂 Happy Mason Jar Crafting. xo
Cheryl @ That's What Che Said... says
Love these Kelly! I’m thinking I need a few for my mantle to fill with flowers! I’ll tell the hubs he is in charge of the flower part 😉
Kelly Rowe says
Thanks, Cheryl!! Yes, you definitely need a few — and the hubs is definitely in charge of picking up the flowers 😉 HUGS!!
kristine says
What’s not to love about this post? What a FANTASTIC idea….and it seems pretty simple. 🙂 The colors, the flowers…everything – just beautiful! Thanks for sharing….and GREAT job!
Kelly Rowe says
Thanks a million, Kristine!! xo
Taylor says
LOVE these!! and amazing pictures too 🙂
Kelly Rowe says
YAY! So glad you like them, Taylor. Thanks so much for stopping by! xo
Amanda says
Such a fun and pretty project!
Kelly Rowe says
Thanks so much, Amanda! I think the pops of color are to die for 😉 Have a fantastic end to your week. xo
Heather says
Love, love, love this idea! My sister is getting married next summer and is having a rustic/romantic theme. These would be perfect for her centerpieces! Thanks for sharing, and for linking up to Moonlight & Mason Jars Monday.
Kelly Rowe says
Heather, your sisters wedding theme sounds amazing!! Please share pictures if she uses these, I’d love to see them!! Thanks so much for stopping by. Hugs.
Heather says
Will do!
Samantha says
First, these are fabulous. Second, you made my day by linking to my party! Thanks for joining The Scoop my friend! xo
Kelly Rowe says
Awww. Thanks Samantha! It was my pleasure to link up to the party, sweet pea. Have a fantastic weekend. xo
Lolly Jane says
Soooooo cute Kelly! Excited to see you featured at tonight’s par-tay! xoxooxo
Kelly Rowe says
YAY!! Thanks so much, ladies. xo
Helle says
The jars are just so beautiful. Planning to try a little project this weekend. Cheers for a great tutorial.
Kelly Rowe says
YAY! Thanks for stopping by and loving on my project. Happy crafting this weekend. xo
Vanessa Barker says
LOVING these!!!
Kelly Rowe says
Thanks so much, Vanessa! They’re hard not to love, right? Have a fabulous weekend. xo
Allyson @ All Our Days says
These turned out perfectly! My mom would love a set for Mother’s Day…I wouldn’t mind one either 🙂
We’ve love for you to show your posts with our readers at our Finished Friday Link-up.
Kelly Rowe says
Thanks, Allyson! I’m thinking a weekend paint project might in the works for you and your mom {wink}. Have a fantastic day. xo
Carrie @ My Favorite Finds says
I.love.these! So super cute! I NEVER thought to use a nail file for distressing! Love! I hope you will come and share these at our Pinworthy Projects party later this morning!
Kelly Rowe says
Thanks so much for loving on my project, Carrie! The nail file really did make it so much easier. Have a great weekend! Hugs.
Jennifer says
Visiting from Monday Funday. I’d like to invite you to my Friday Flash Blog, where you can share your best blog entry of the week! The party goes on ALL weekend at The Jenny Evolution. And who knows, you may just get featured next week.
Jennifer
Trish @ Uncommon says
What a beautiful set of mason jars! Thanks so much for linking up to last week’s Monday Funday link party… we will be featuring you tomorrow!
Take care,
Trish
Bonnie says
These are so, so adorable!! I’m visiting from Sundae Scoop.. hope you’ll stop by and say hello!
-Bonnie @ Revolutionaries
Jenn says
These look fabulous Kelly! I have always wanted to try these – thanks so much for the tutorial. I’ll be featuring these tomorrow over at Clean and Scentsible and I can’t wait to try them. Hope you have a wonderful Sunday!
Jenn 🙂
Sarah @ Alderberry Hill says
So so pretty Kelly and perfect for Mother’s Day. I have a couple of vintage milk vases that I painted a couple of weeks ago…I love any painted glass!
Sarah @ Alderberry Hill says
Thanks so much for linking to Make the Scene Monday @ Alderberry Hill Kelly. You are being featured this morning!
I hope you are having a wonderful weekend, and join me tomorrow evening for Make the Scene Monday #73!
Shelley says
Great idea. I bought a few mason jars to use as pencils holders for my sons DIY desk. I’m still working on it, but I can whip these babies up in short order. Think I’ll do so today.
Kelly Rowe says
YAY! Sounds like a fabulous idea, Shelley! Happy Crafting… xo
nancy says
Ohhh, a nail file! How clever!
Nancy
http://www.dosmallthingswithlove.com
Sam M. | Atkinson Drive says
These are gorgeous! I would love for you to link them, and any of your other projects, to the Pinworthy Projects link party!
Kelly Rowe says
Thanks for loving on my jars, Sam! xo
Sam - DIY Huntress says
I am OBSESSED with this project! Love it so much! I can’t wait to try myself! Your blog is absolutely adorable! Can’t wait to keep following!
<3 Sam, DIYhuntress.com
Lori @ http://jasminebrook.blogspot.com says
BEAUTIFUL! I love the colors! They make me HAPPY just to look at it!
Holly says
Your photos are amazing. I have yet to paint my jars but this post makes me want to give them a pop of color. Beautiful!
Christine says
CONGRATS! You have been featured at The DIY Dreamer! Come on over and grab your featured button, you deserve it!
http://thediydreamer.com/from-dream-to-reality/features-65/
Don’t forget to come over again this evening to link up your latest creations 🙂
Holly @HollyPop Designs says
Just stopping over from Whipperberry! This is definitely on my to do list! I want to FILL my house with Mason Jars.! They just look so beautiful, especially once they are painted!
Christina @ The DIY Mommy says
These are gorgeous! I love the sanding at the end to give them that perfect bit of distressed look.
Debbie @ Deliciously Inspired says
Love these. I shared on my facebook page this morning. Can’t wait to make.
Debbie
Deliciously Inspired
Bev says
What type of paint do you use acrylic craft paint?
Kelly Rowe says
Hi Bev! Yes, I used a basic acrylic craft paint. Thanks for stopping by!
Kim~madeinaday says
I featured your jars on my Mother’s Day Round-up today! Thanks so much for linking up!
Kim
Kelly Rowe says
Thanks so much, Kim! Have a fabulous weekend. xo
Kim: Too Much Time says
LOVE these beauties, Kelly! Thanks a bunch for sharing and for inspiring me to make a few tomorrow!
Robyn (Mrs D) says
Ooooh I just love these. They will be perfect on my kitchen window sill. Just one quick (perhaps silly question) but is it ok to have water inside the jars for the flowers or should I use silk flowers??
Kelly Rowe says
Hi Robyn! By all means use water inside the jars 🙂 I’ve only used fresh flowers. Enjoy!
Mackenzie says
Beautiful! I love these! The colors turned out fantastic too! 🙂
Keren says
I just adore these!! ♥♥♥
xo!
Keren
free pretty things for you
Felie says
I love to collect empty glass jars and reuse them anyway I can.. I just love these and the distressed vintage look they give off! I can’t wait to make my own set!
Adrienne says
Omg love these! How do you get the paint so even. What kind of brush did you use. Ive tried using Acrylic paint on jars before and it had big lines. Any suggestions? thanks
Kelly Rowe says
Hi Adrienne! It doesn’t go on perfectly, but a couple of coats allows for much more even coverage. I used medium sized crafting brushes. Hope that helps. Cheers!
Sami says
Cant wait to try this! I love mason jars so this will be a nice new addition to my apartment!
Cindy says
I’m curious to know how the distressing you did made it look black underneath. Did you apply a coat of black under the citrus yellow?
Kelly Rowe says
Hi Cindy! There isn’t any paint. With the flowers and water, it just provides shadows that creates that black look 🙂
Emily @ Love, Pasta and a Tool Belt says
I love these! Pinning to try them out. I’ve been wanting to do this for awhile. I’d love for you to link these up at The Wednesday Round Up starting Tuesday at 11 pm CT.
Jyoti says
This is a great project. I have a mason jar sitting next to my kitchen window that would be perfect for this. Now I just need to get to crafting it. Thanks for sharing the tutorial!
Brittany says
I can’t wait to try this! You made it look super easy.
Heather @ French Press says
totally in love with these
Elizabeth says
These are great!! I thought you must have painted inside black, but it was much simpler than that!! Thank you for a great vintage idea!
Kelly Rowe says
Thanks so much, Elizabeth! I know the shadows create an illusion of black. These jars are some of my all time favorites. Have a lovely weekend. Hugs!
Kristin says
I love these! I am making them for the center pieces for my wedding reception and putting big burlap flowers in them. I’ve made one for a trial one and I love it! So excited! Thanks for the easy directions!
Kelly Rowe says
Hi Kristin! Yay, I’m so excited that you love them and will be using them at your upcoming wedding. Thanks so much for stopping by. Cheers.
Kiley says
What kind of sealer did you use?
Kelly Rowe says
Hi Kiley! I used Dura Clear Varnish, here’s a link to see what it looks like 🙂 http://amzn.to/1re3X3j
Alice Davey says
Is it all right if I don’t use sealer
Kelly Rowe says
Absolutely! However, keep in mind that the paint will wipe off a bit when wet. The sealer allows it to get wet and it can be wiped with a damp cloth without that happening. Happy creating!
Aubrey Gillespie says
I’m working on these right now and have let the first coat dry for about 45 minutes and when I put the second coat on it’s pulling off the first coat of paint!!! Is there a way to prevent this? My jar was squeaky clean and dry when I started! Am I doing something wrong?
Kelly Rowe says
Hi Aubrey! The paint is pulling off? Are you using a bristle brush? Try a sponge brush. That is odd. There may be some spots that the paint removes, but that should be minimal. I’m sorry you’re having this problem. Let me know.
Aubrey Gillespie says
I was using a bristle brush, just tried using a sponge and it’s doing the same thing! Maybe I have crappy paint (I was using Apple Barrel brand from Wal-Mart)? Or could it that I’m using Ball jars instead of Kerr? I might try chalk paint and see if that adheres. I really need these in my life!!! 🙂
Sheri says
Aubrey-
I finished this project a few days ago and I had this same problem.
I started w/a sponge brush then went to a bristled one. What I found I was doing was wiping too much with the brush and there also wasn’t enough paint on the jar. Dump a good sized puddle onto the jar & spread it out quickly and don’t keep going over the same area w/the brush because that’s when I found the paint would start to pull off in spots.
I hope you were successful w/your jars! If not, try again. They are worth it! Too cute!
One thing I’ll try to improve on is I used a spray on clear coat. I noticed when they were dry that I had thin spots that I know weren’t there after the 2coats of paint.
Looks like the clear coat caused the paint to streak a bit. Not bad though. Just something I’ll watch next time. I may have had the spray can too close to the jars.
☺
Gina says
These are so cute. I tied some taffeta around mine. Thanks.
Anonymous says
so cute! And they would make perfect gifts! :)They look amazing! You’re so creative!!!!
Bonnie says
Can you tell me approx. how much acrylic paint per 3 jars?
divya sharma says
Flowers are really beautiful.I love them.
Marianne says
Flower bouquets are my passion!! 🙂 I really like this idea!!
JP says
What type of sealer do you use?
meng says
I love these Kelly!!! So pretty. Pinning 🙂 Hope you’re well, hugs!