It’s hard to believe that we are already at the end of this series! Time sure does fly…doesn’t it? Today we’ll cover the final and fourth edition of the Photography 101 Series! The last time we covered Shutter Speed settings. How did you do? I’m hoping that with this series you’ve had a chance to get to know your camera a little better and challenge yourself more. So, are you ready to start shooting in Manual Mode?
 Let me start with the basics of shooting in Manual by stating that shooting in manual mode gives you ultimate control over the exposure. When learning how to shoot in manual mode you need to know and understand the “exposure triangle”. This is made up of your aperture, shutter speed, and ISO. You use these three components to get your light meter to be at zero. To find your light meter look through your view finder. Be sure your camera is set to Manual Mode as well. {smile}
It should be that little line graph at the bottom that looks a little like this:
– 2 . . . 1 . . . 0 . . . 1 . . . 2 +
(there should be a little flashing vertical line or “ticker” underneath the graph, this is what you are adjusting)
The light meter may vary from based on the brand, so note which side the + and – signs are on. The example above is for Canons. Nikons look like this:
+ 2 . . . 1 . . . 0 . . . 1 . . . 2 –
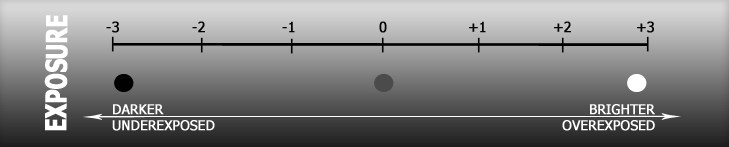
Below are the steps to take in ensuring perfect exposure…or the exposure type you are wanting. I’m not sure there is specific order that your need to do these in. I typically set my aperture and the ISO and the meter accordingly for shutter speed, but everyone does this differently. Below I’ve also included an exposure chart that may help visually….just keep in mind that this chart reflects Canon cameras exposure/meter. Basically Nikon is the opposite as shown above.
1. Set your aperture – this way you’ll have control over the blur in the background.
2. Set your shutter speed – remember try not to go below 1/125; if the “meter” is not where you want it after adjusting these two, then….
3. Change your ISO – do this one last just so that your ISO can stay at the lowest number possible. Typically, you can get the exposure you want by just changing my aperture and shutter speed. HOWEVER, there is no right or wrong on the order or what you adjust/set first. It’s what you find works for you….the most important thing to keep in mind is that the end goal is to get the right exposure.
These three components provide countless exposure combinations. As you shoot and become more comfortable with the components and your own personal creativity, you will develop your own style.
Don’t be intimidated. I promise that after some practice…and sticking with it, eventually you will wonder why you didn’t always shoot in Manual Mode. HAVE FUN & HAPPY SHOOTING!


Jenny says
thanks, this helped me understand what I was doing a little more 🙂 gonna have to go back and read the rest of the posts 😛
Jess says
Thank you so much for these helpful lessons. I just read them all and it makes so much sense! I can’t wait until tomorrow to try out some of my new skills! Thanks!
Andi @ The Weary Chef says
Thanks so much for this, Kristine! I’m new here and actually read this post before the rest of the series. I’ll go back and read them in order. I have to say that I’m usually in the 1/50, f4, ISO 200 range for photos in midday sun. Most of my photos are taken very late in the day around dusk, and those are more like 1/25, f4, ISO 1600. I haven’t been checking my light meter but will start. It may be that my camera, lens, and light are less than ideal, which is why I’m way below 1/125. Thank you again for helping this total beginner!
James says
These three components of the exposure triangle were what I spent so much time on when I got my first DSLR.
Now I shoot paid event photography, I have become more familiar with the camera settings and I rarely shoot in Manual mode. Manual is great for getting to know how the camera works, and forcing yourself to use Manual is a great learning curve. After many years I have come to understand that for my type of photography, shooting with Auto ISO is best. Some prefer to put it in Aperture Priority and let ISO and Shutter Speed both get set by the camera, but I suppose it depends on your style – most of the time Aperture is wide open for me, so I am just adjusting shutter speed to control motion blur (and to some extent the Auto ISO).