
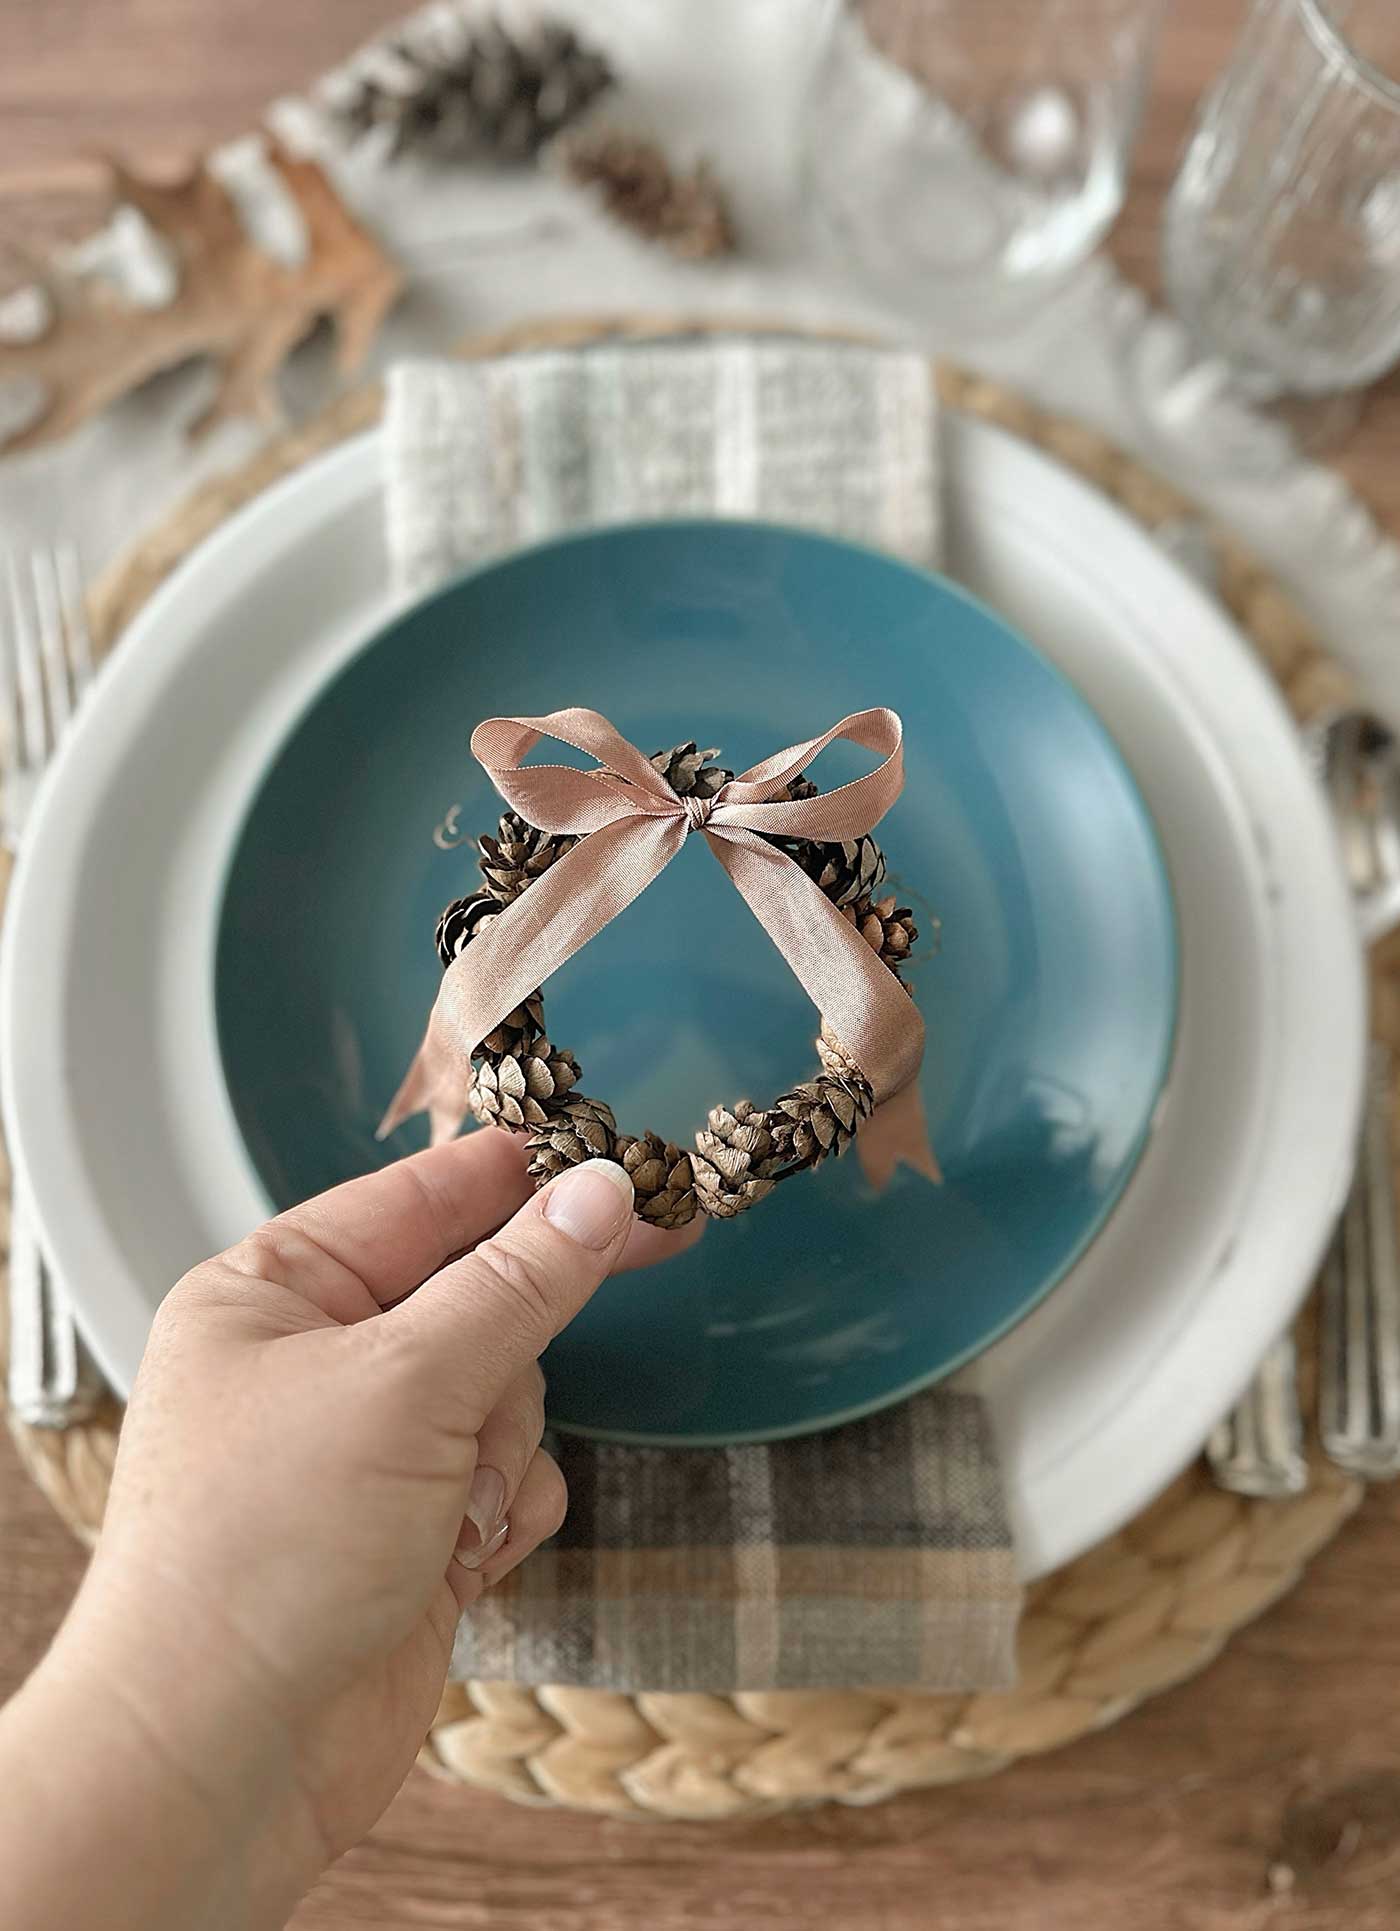
Are you looking for a fun, cozy craft to spruce up your table settings? Whether it’s a holiday dinner, a special event, or adding charm to your everyday meals, learning how to make a pinecone wreath for place card holders is a great idea.
These adorable little creations are easy to make, customizable, and give off those woodsy, cabin-in-the-woods vibes. And hey, they’re super functional, too! Guests will appreciate your creative touch as they find their seats.
Also, guess what time it is? It’s time for another round of the Hand Crafted Society (and the crowds go wild). We’re a group of talented bloggers who meet monthly to create projects using a shared medium or theme. This month, we are using foraged supplies. When you reach the end of the post, click on the image or blog name to view the full post of other participants.
Miniature Pinecones
In case you haven’t figured it out, my foraged supply is miniature pinecones. Several years ago, when we moved to the Springfield area, we stayed in an Airbnb for a couple of months. I believe the large tree in front of the house was a Hemlock tree. Hundreds (or more) of these mini pinecones were on the tree and ground.
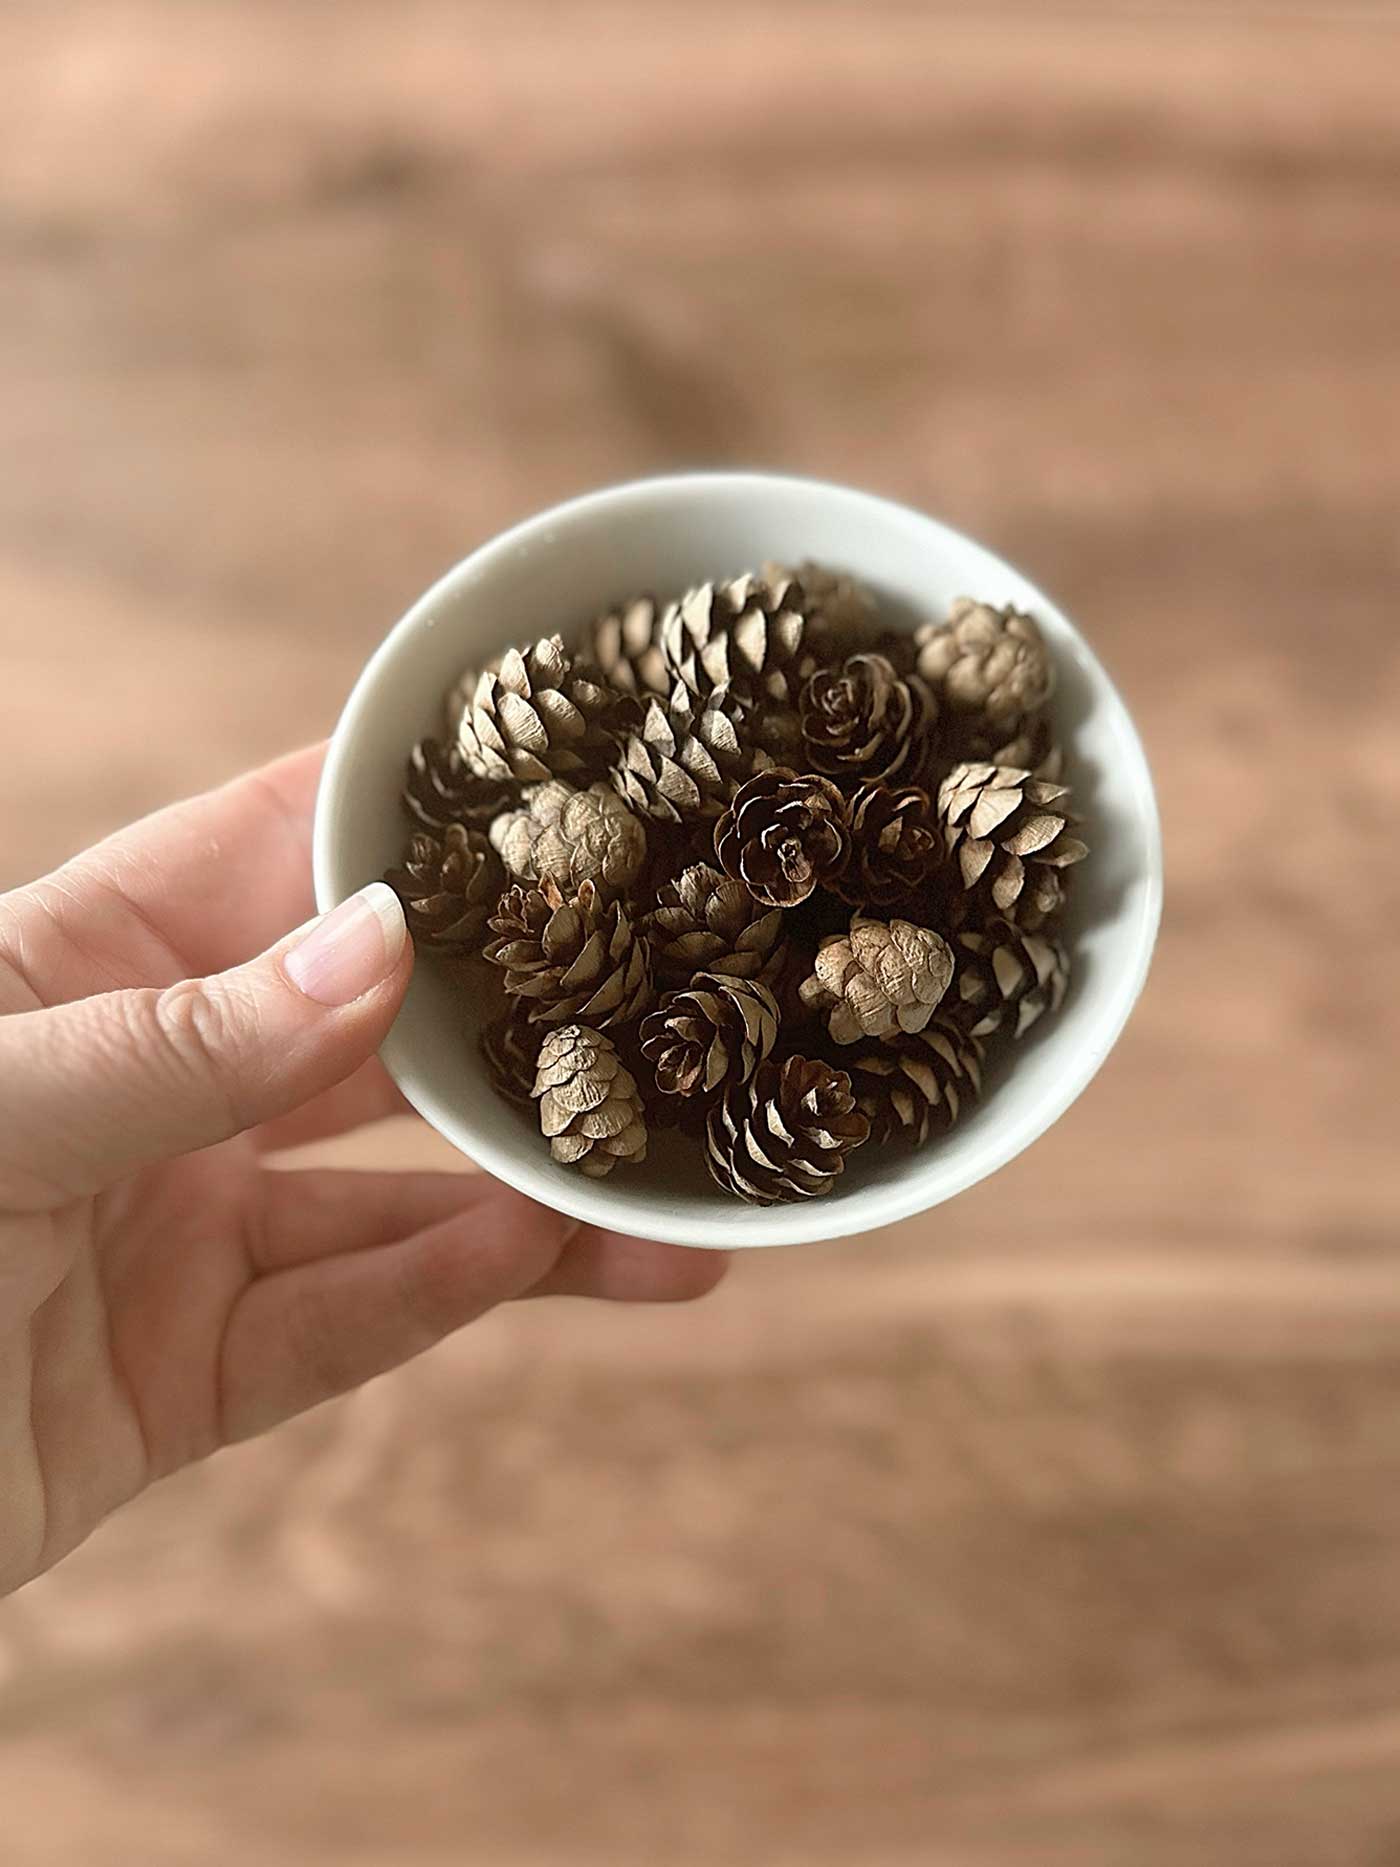
I ‘foraged’ several bags of them and was sure to bake off any insects in the oven. Nevertheless, I’ve stored them amongst many other pine cones (in all shapes and sizes) I’ve gathered over the years. I was pretty darn excited to put them to good use for this project.
So, let’s grab a cup of coffee and maybe light a festive candle. It’s time to learn how to make these pinecone wreath place card holders. Ready? Let’s go!
How to Make a Pinecone Wreath for Place Card Holders
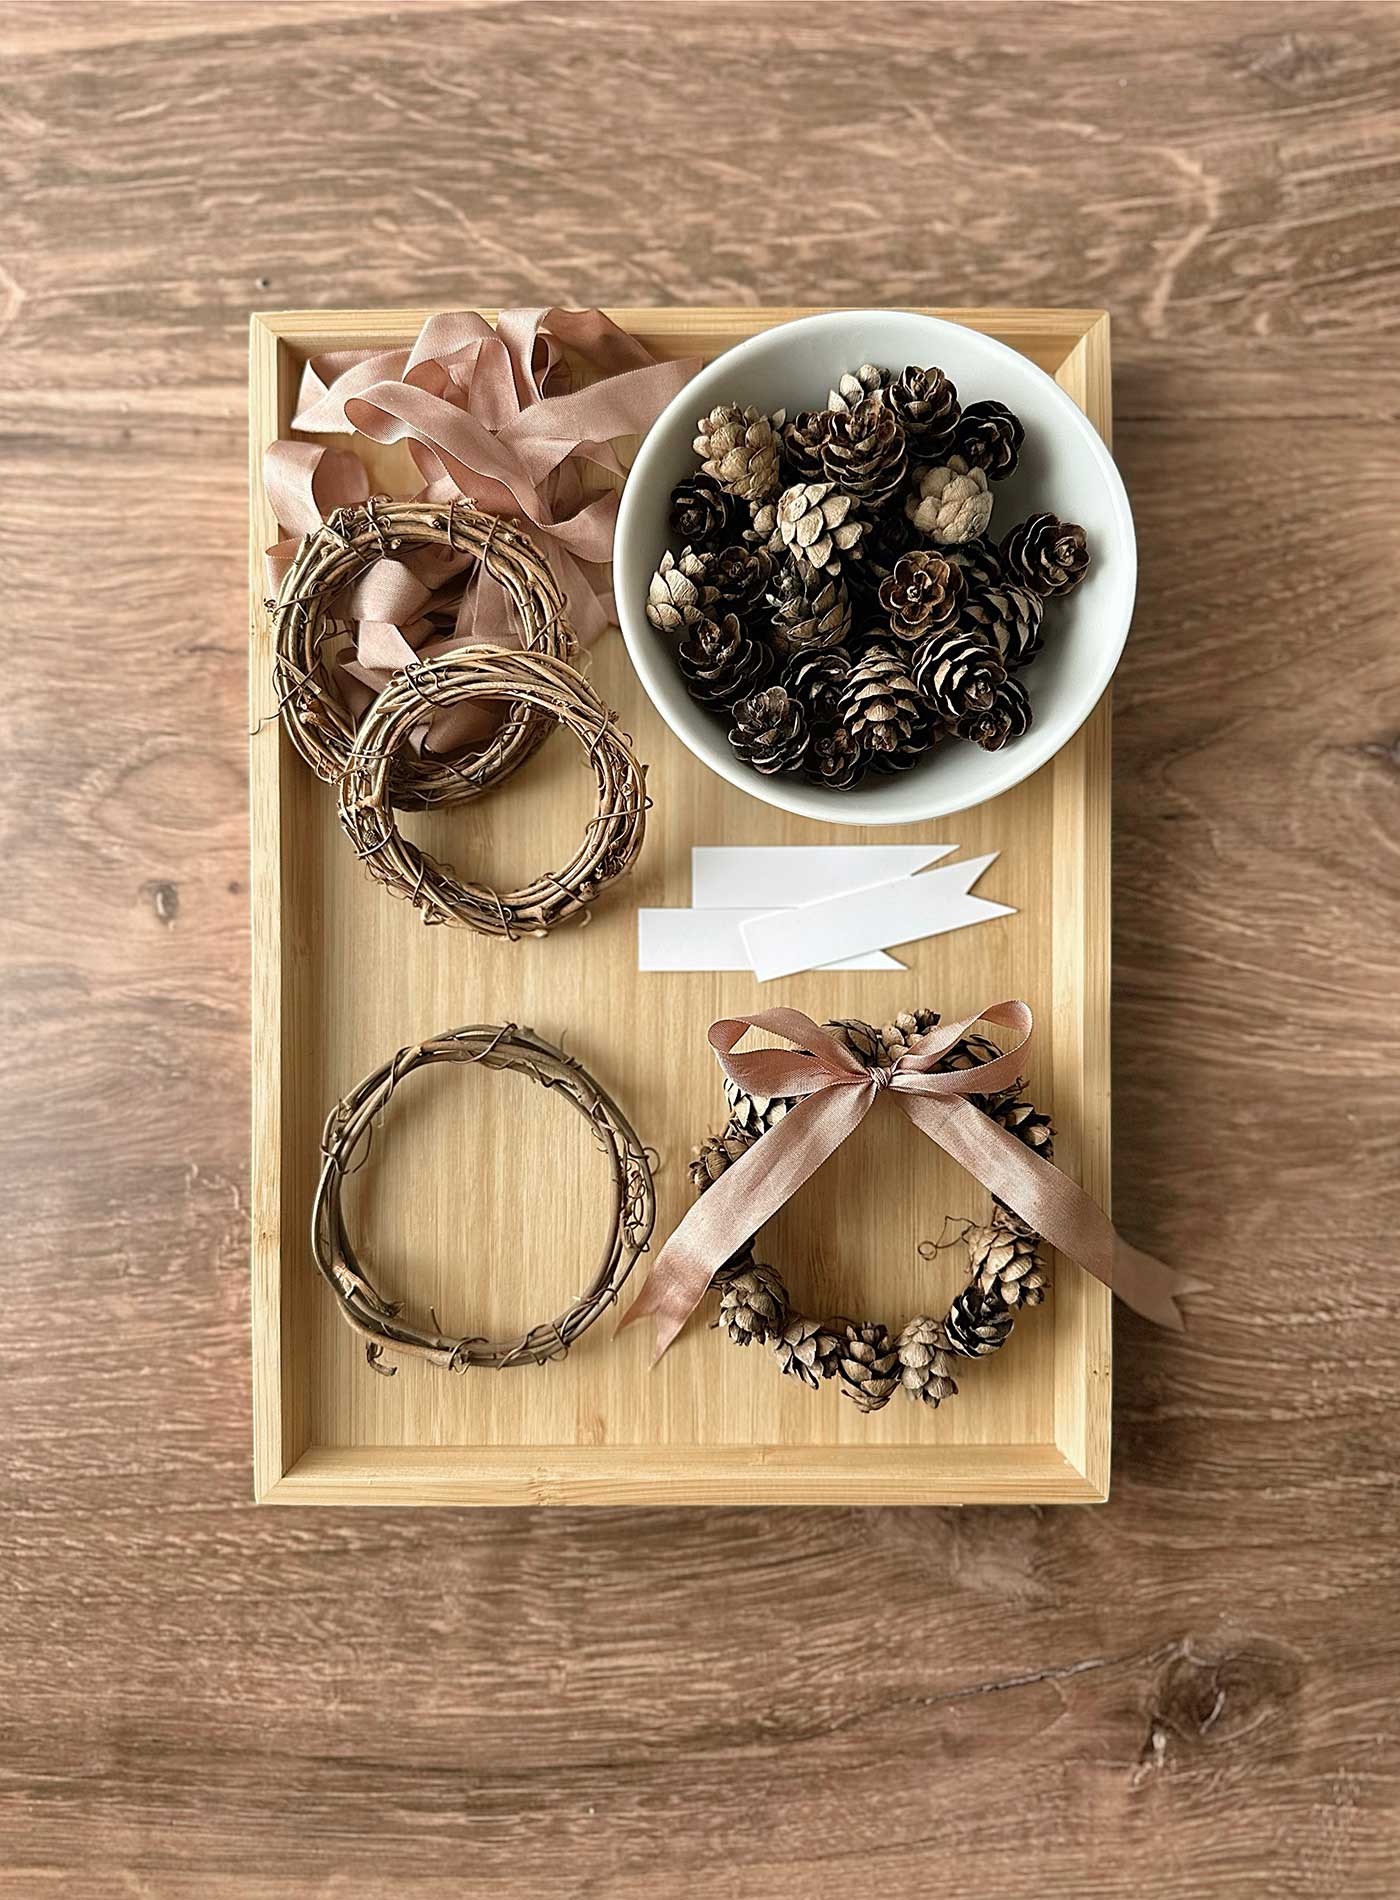
Supplies for Pinecone Wreath:
Before we jump into crafting, let’s gather all our materials. Here’s what you’ll need:
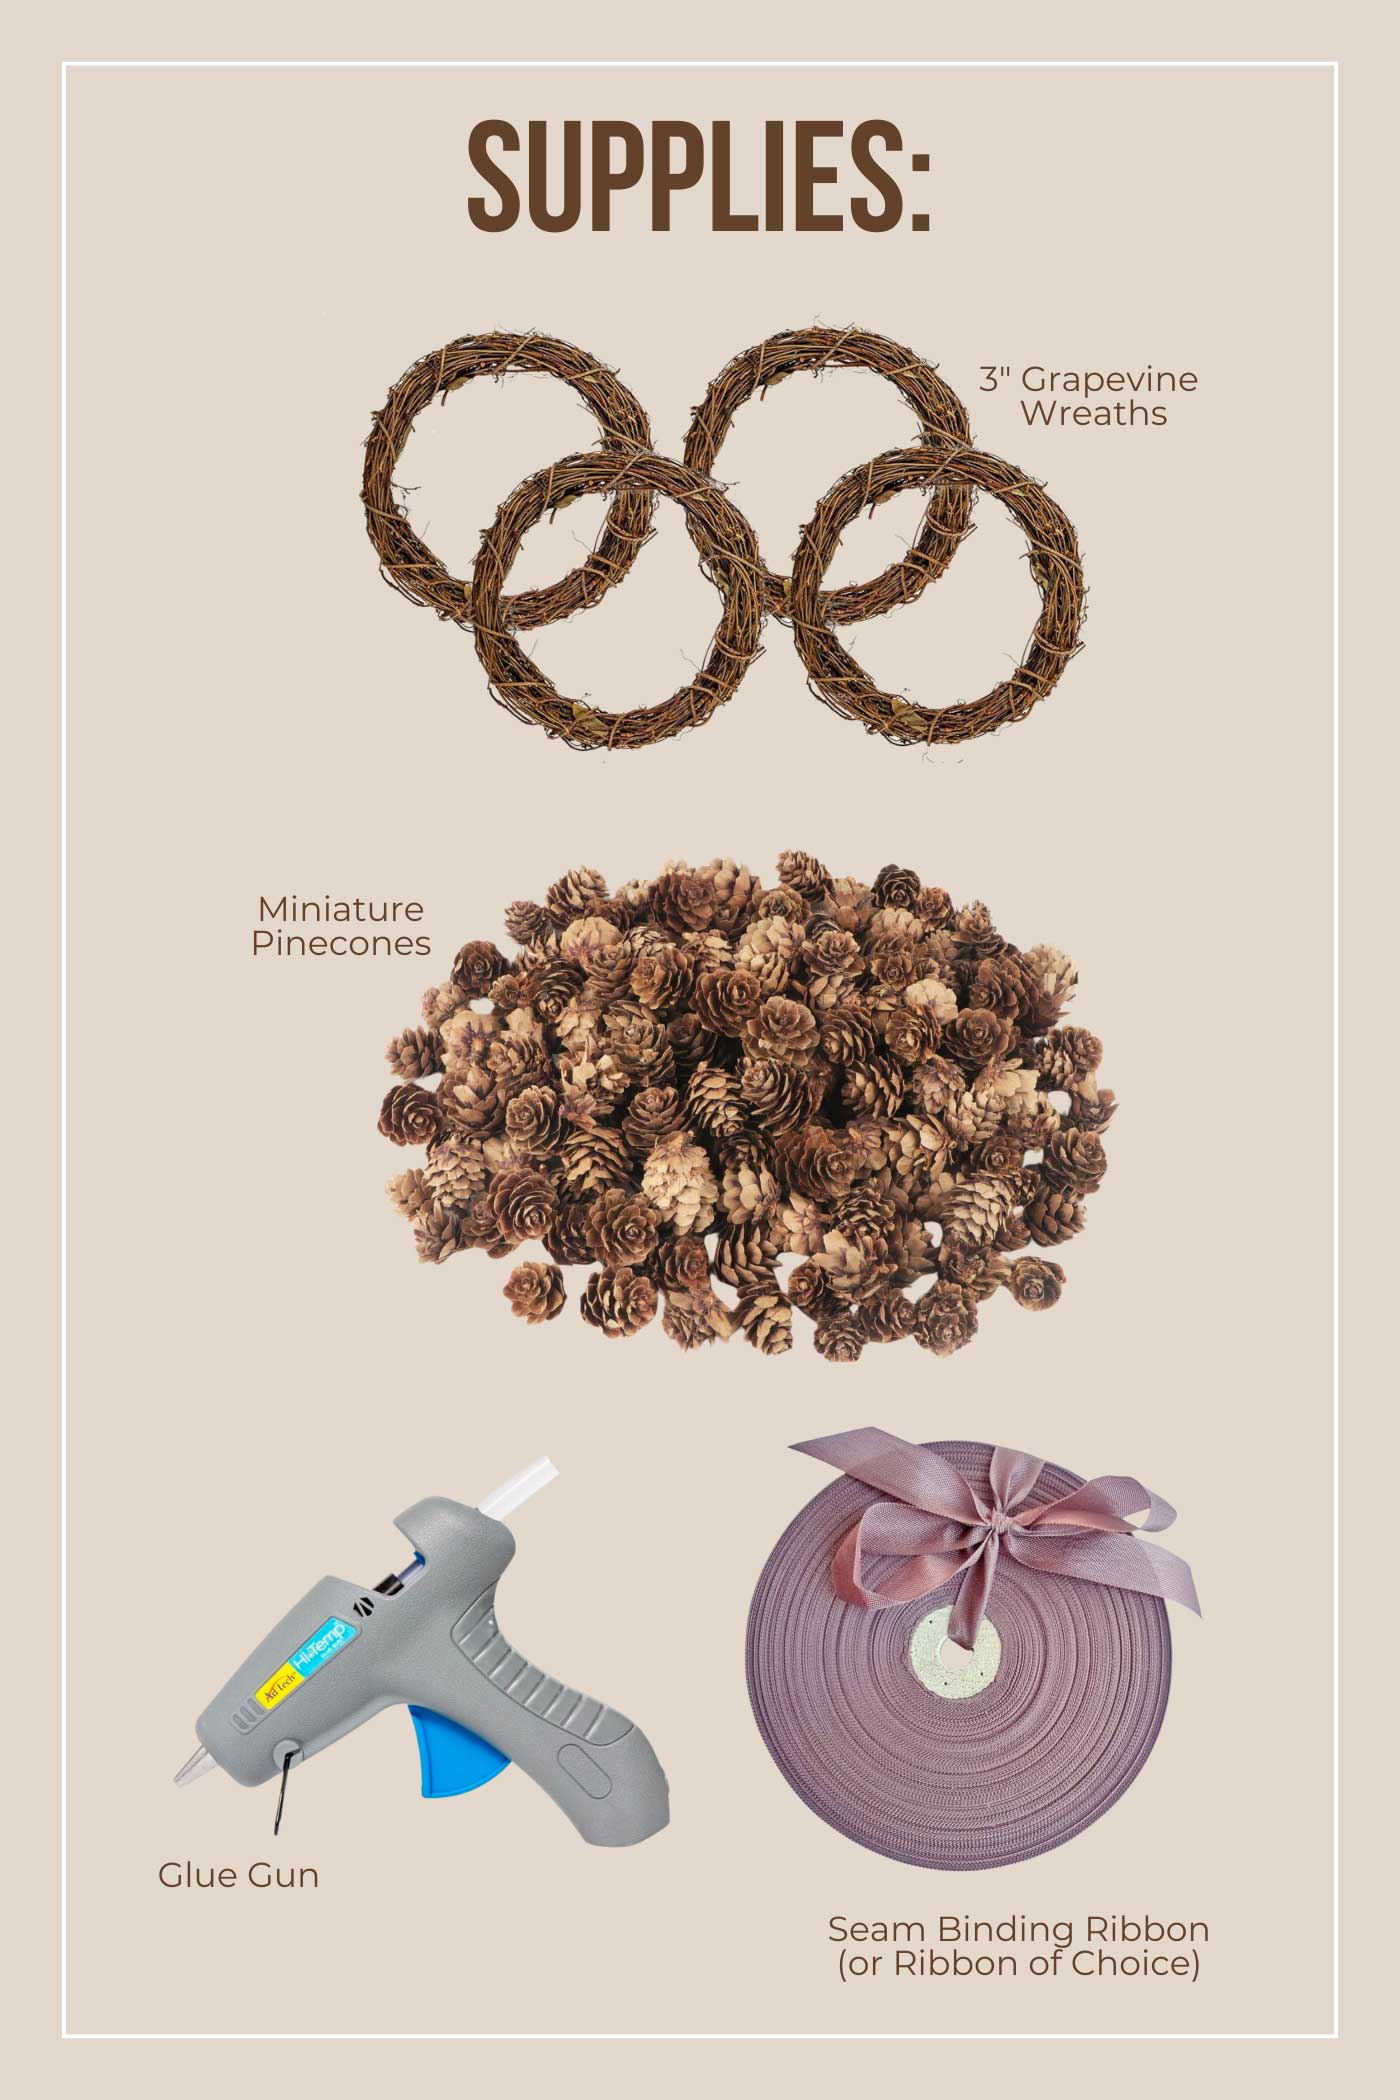
- Small Grapevine Wreaths (about 3 inches in diameter): These are the base for your project. You can usually find them at a craft store or online.
- Mini Pinecones: These tiny pinecones are the star of the show! You can collect them from nature (bonus points for going on a nature walk) or purchase a pack from the store.
- Hot Glue Gun: A crafting staple! This will help you secure the pinecones to the grapevine wreath.
- Ribbon: Here’s where you can get creative! Choose a ribbon that matches your event’s theme, or go for a seam binding ribbon (additional seam binding ribbon options) for a more vintage, rustic look.
- Place Cards (not pictured): Simple cardstock works or pre-printed place cards if you’re feeling fancy.
Prepare Your Workspace to Craft a Pinecone Wreath Place Card Holder
First things first—set up your workspace! Hot glue guns can get a little messy, and we want to keep things smooth and easy. Lay down some parchment paper or a crafting mat to protect your table from glue drips. Ensure your glue gun is plugged in and heating up while organizing your materials.
If you plan on making a bunch of these little pinecone wreaths, setting up a mini assembly line will make the process more efficient and fun. Put on some music or a favorite show in the background, and you’re ready to go!
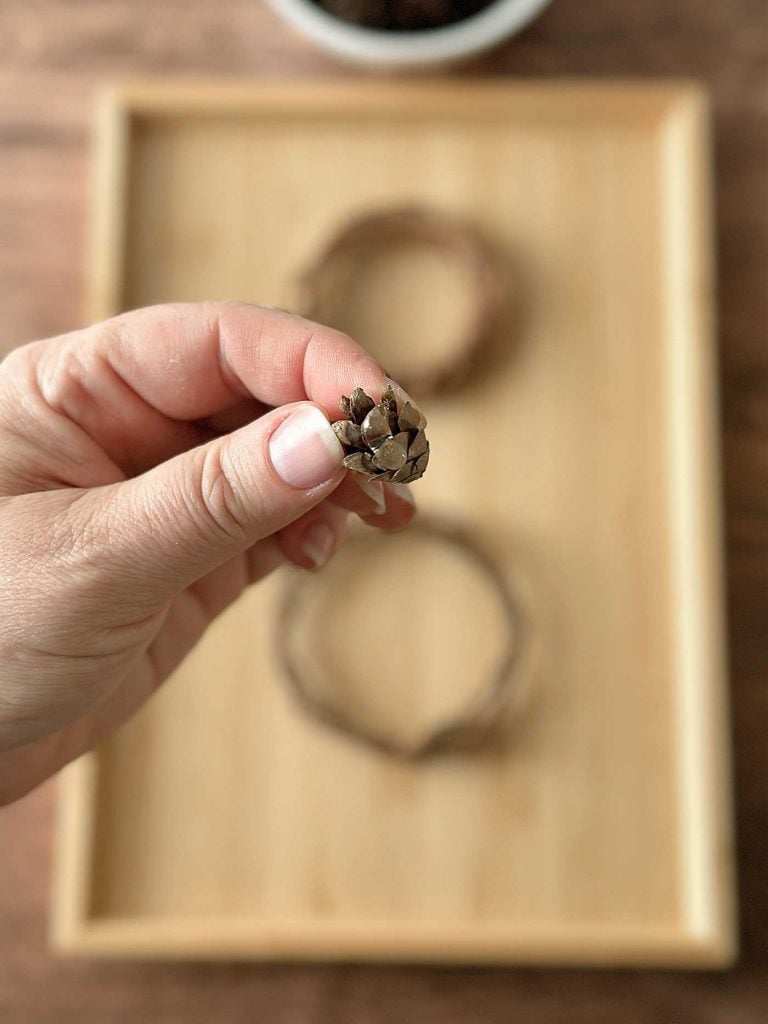
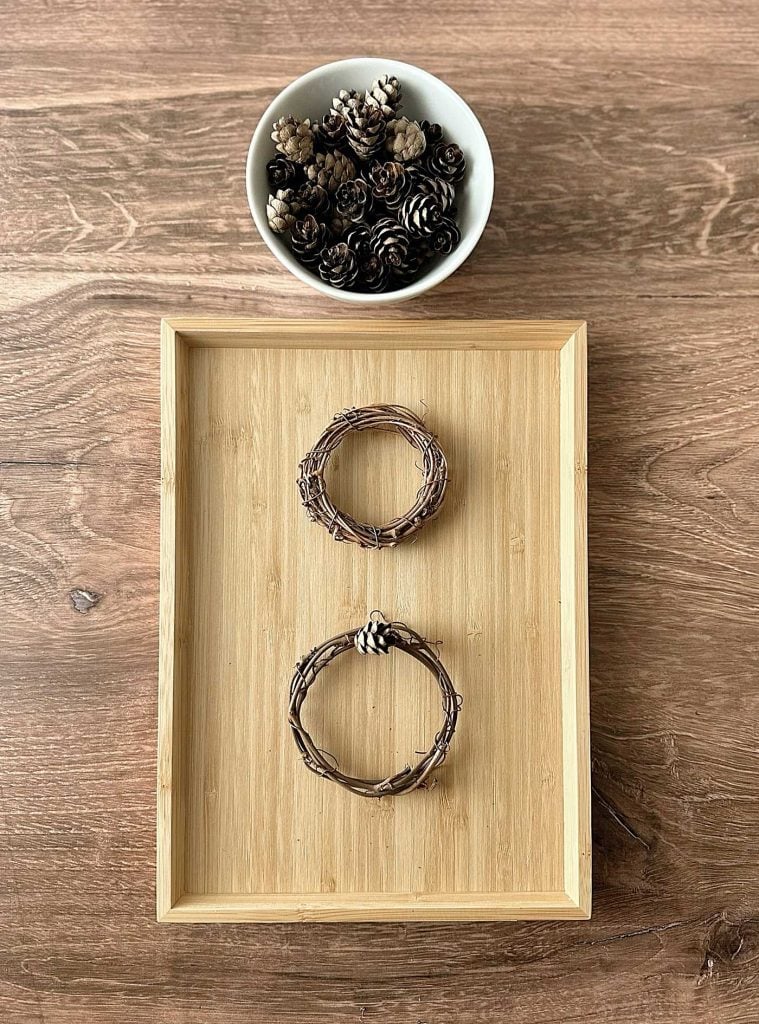
Step 1: Thin out the Grapevine Wreath
I found that using the grapevine wreath as is and adding the pinecones made it look a little too bulky/thick. So, I took the small grapevine wreath and created two wreaths from one.
Remove the wire holding the wreath together and split it into two parts. Once you’ve separated it into two sections, shape it into a similar 3″ wreath, adjusting the vines until you get a similar rounded form.
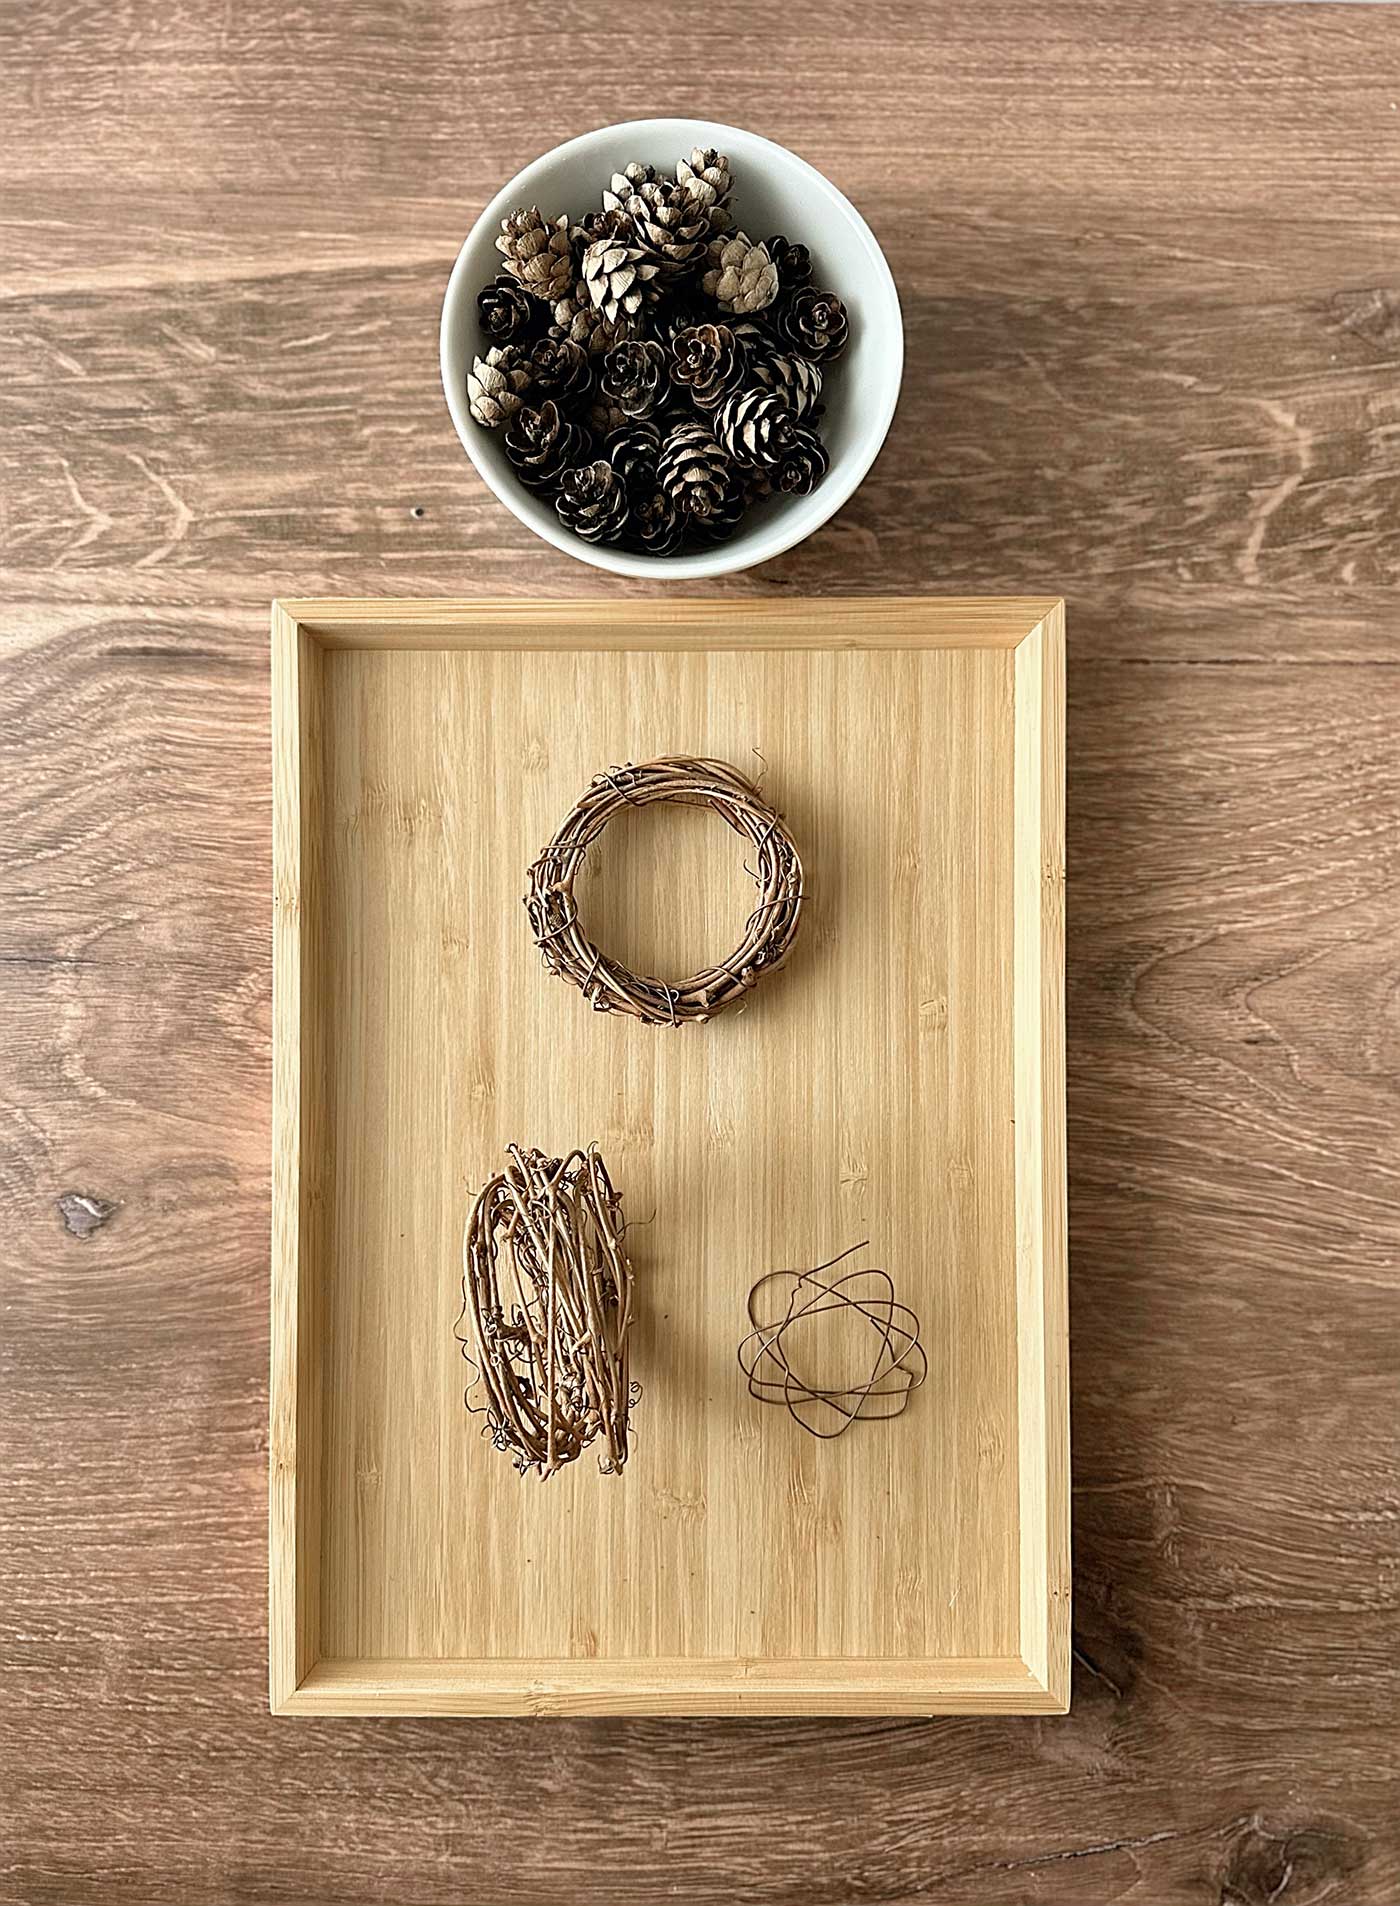
Cut the wire you removed into two pieces. To hold the grapevine together, use one piece for each of your new wreaths.
Step 2: Adhere Pinecones to Your Grapevine Base
Once your supplies and workspace are ready, it’s time to grab your mini pinecones. Start thinking about how you want to arrange them on your wreath. There’s no right or wrong way to do this—just let your creativity flow!
A few ideas:
- Minimalist Look: Just a few pinecones spaced evenly around the wreath.
- Full and Festive: Cover the entire wreath in pinecones for a lush, woodland-inspired vibe.
- Asymmetrical Design: Group the pinecones on one side of the wreath for a more modern, artistic flair.
No matter the design, placing your pinecones on the wreath without glue is always a good idea. This way, you can rearrange them until you’re happy with the look.
Now comes the fun part—gluing the pinecones to your wreath! Carefully pick up each pinecone, add a small dab of hot glue to the bottom, and press it firmly onto the grapevine wreath. Hold it for a few seconds until the glue cools and hardens.
Hot glue dries fast, so you can work pretty quickly. Keep adding pinecones according to your design, taking breaks if your glue gun needs to reheat.
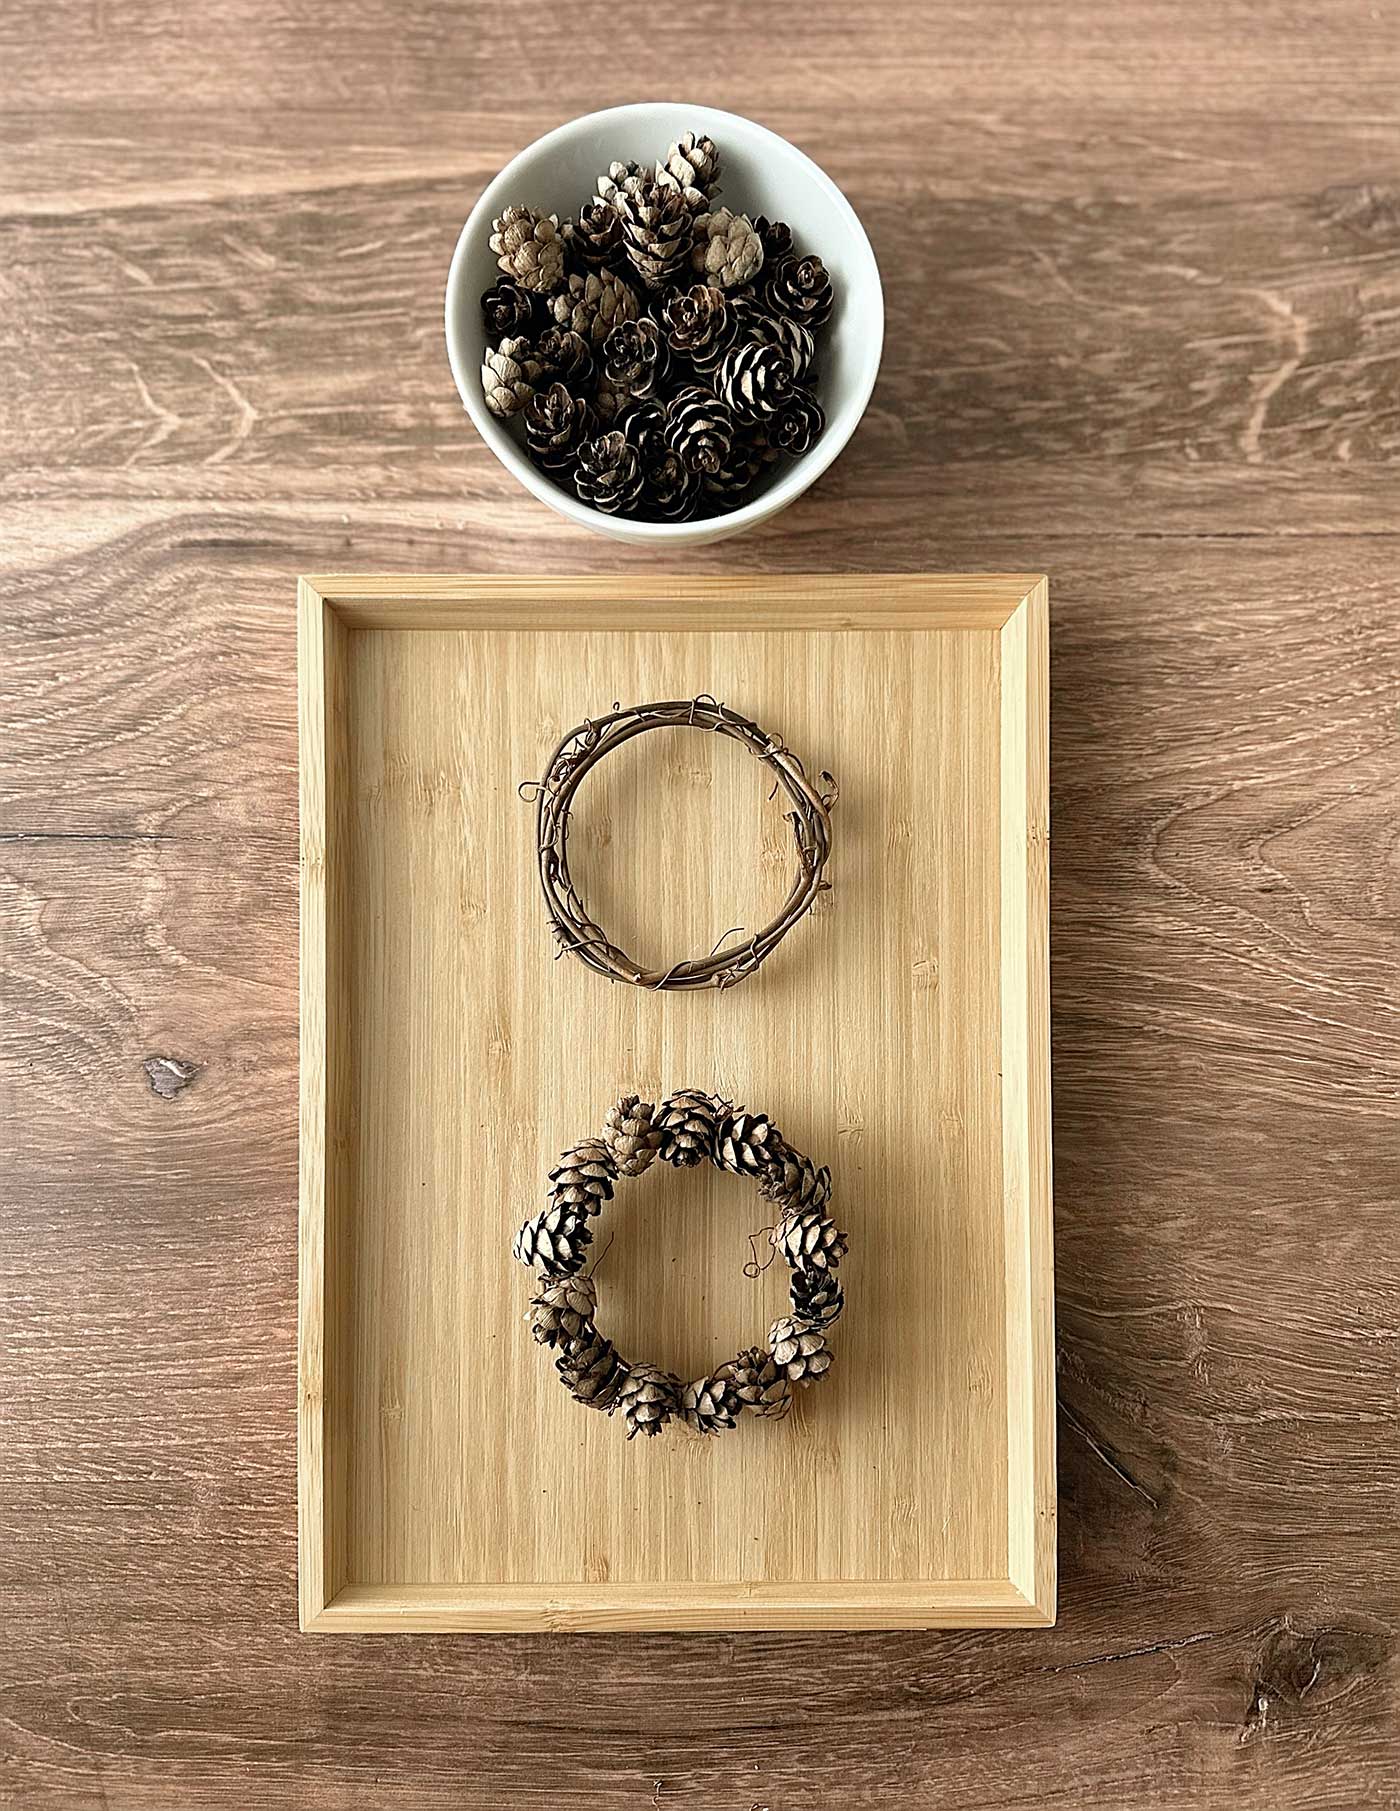
A little tip here: Be mindful of the orientation of your pinecones. You want them to look nice and neat from the front view, especially since they’ll be holding place cards for all to see.
Step 3: Add a Ribbon or Bow to the Pinecone Wreath
The ribbon is like the finishing touch on a perfectly wrapped present. It adds a pop of color, texture, and personality to your pinecone wreath. Here are a few ways you can incorporate ribbon into your design:
- Wrap it around the Wreath: Tie the ribbon around the base of the wreath, creating a little bow on the top or side. This is simple but oh-so-charming.
- Create a Ribbon Loop: For added detail, create a loop with your ribbon and hot glue it to the back of the wreath. You can use this loop to hang the wreath on the back of a chair or as a cute extra touch.
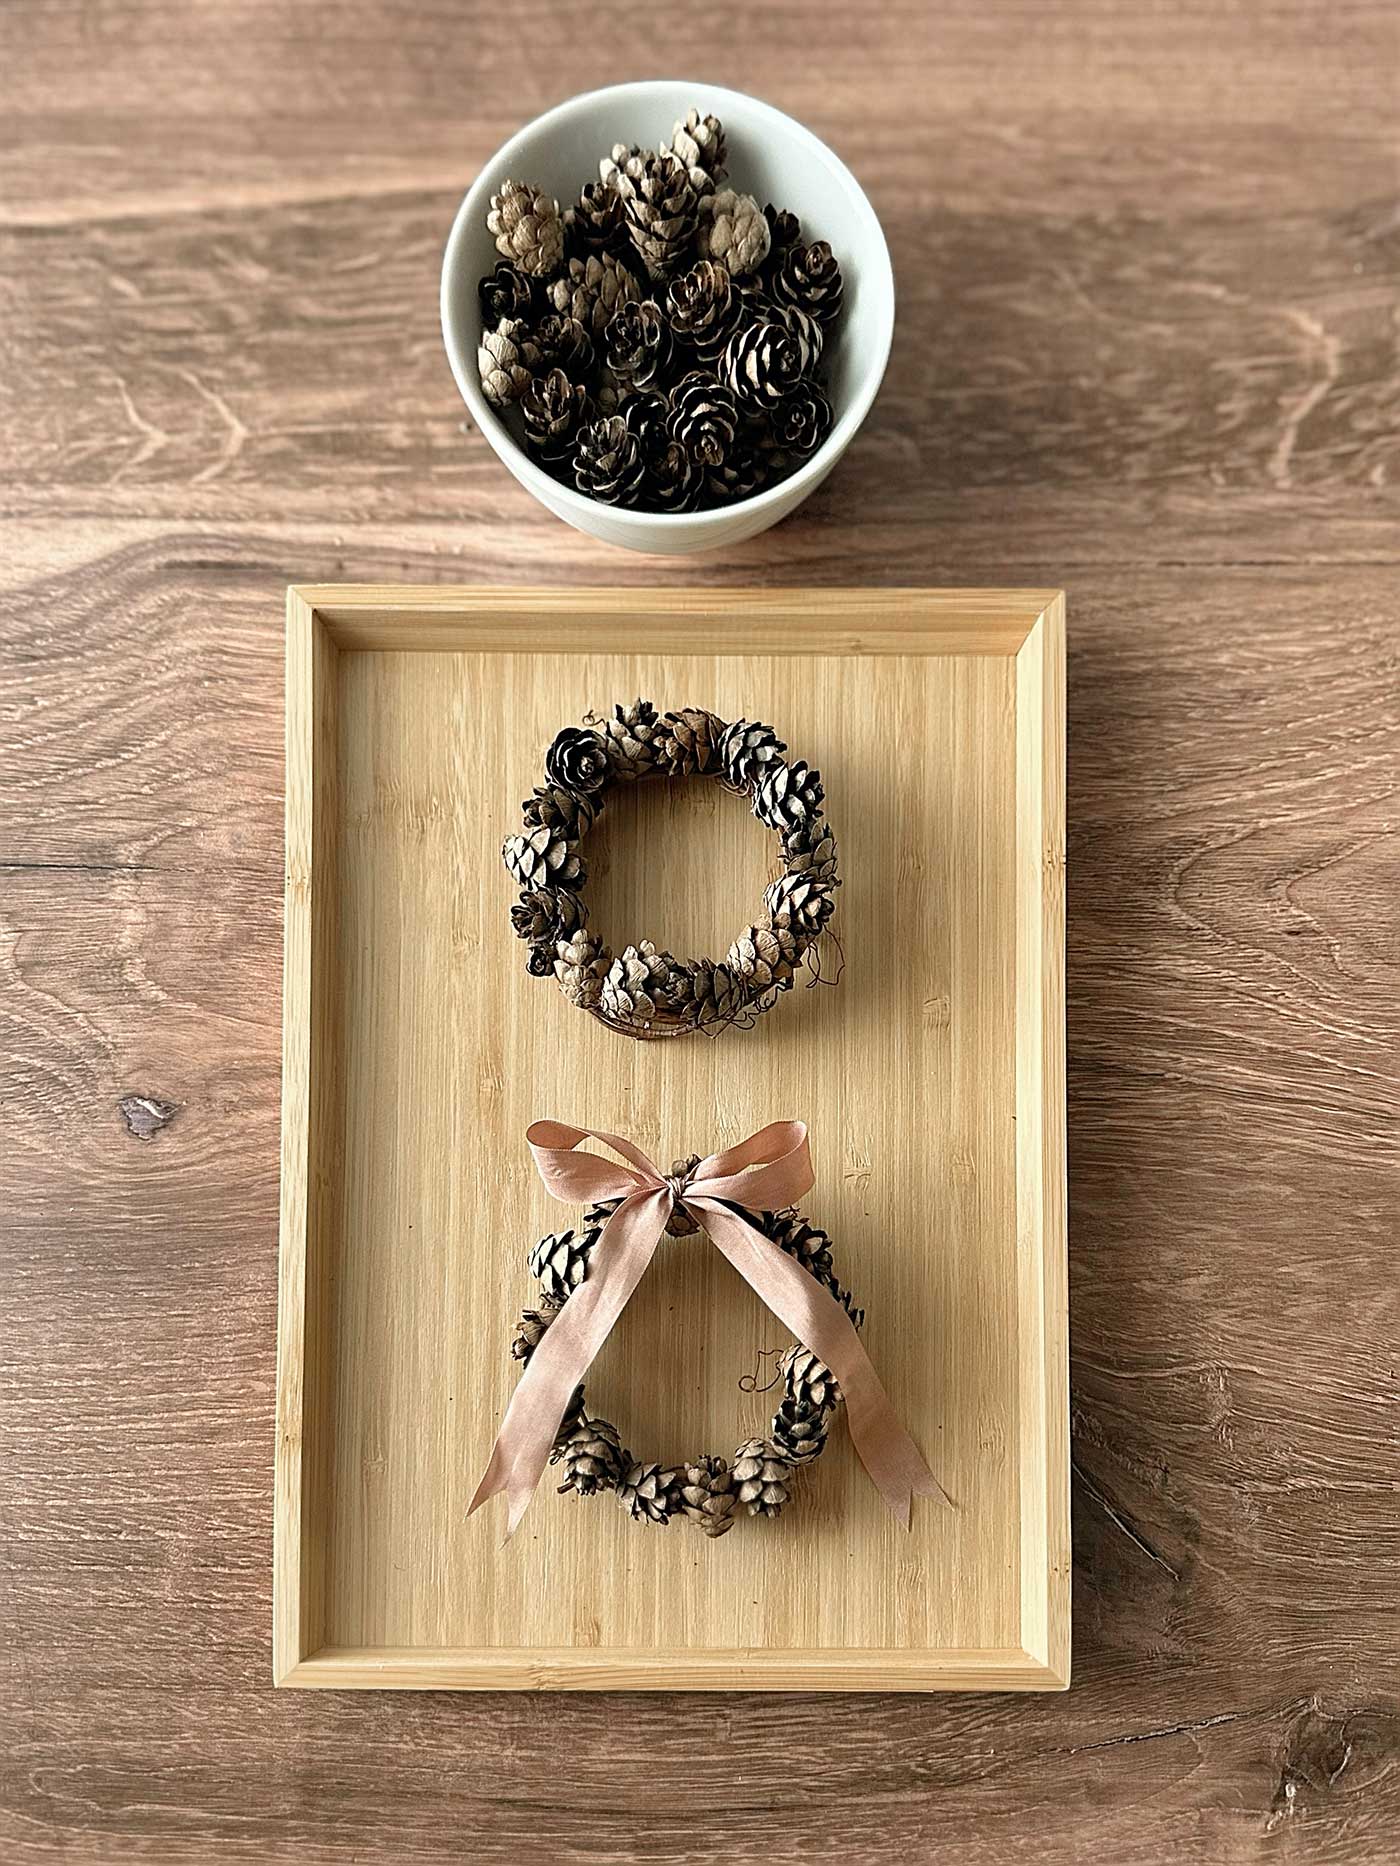
Whatever style you choose, make sure the ribbon doesn’t overwhelm the pinecones. You want it to complement, not overshadow, the natural beauty of the wreath.
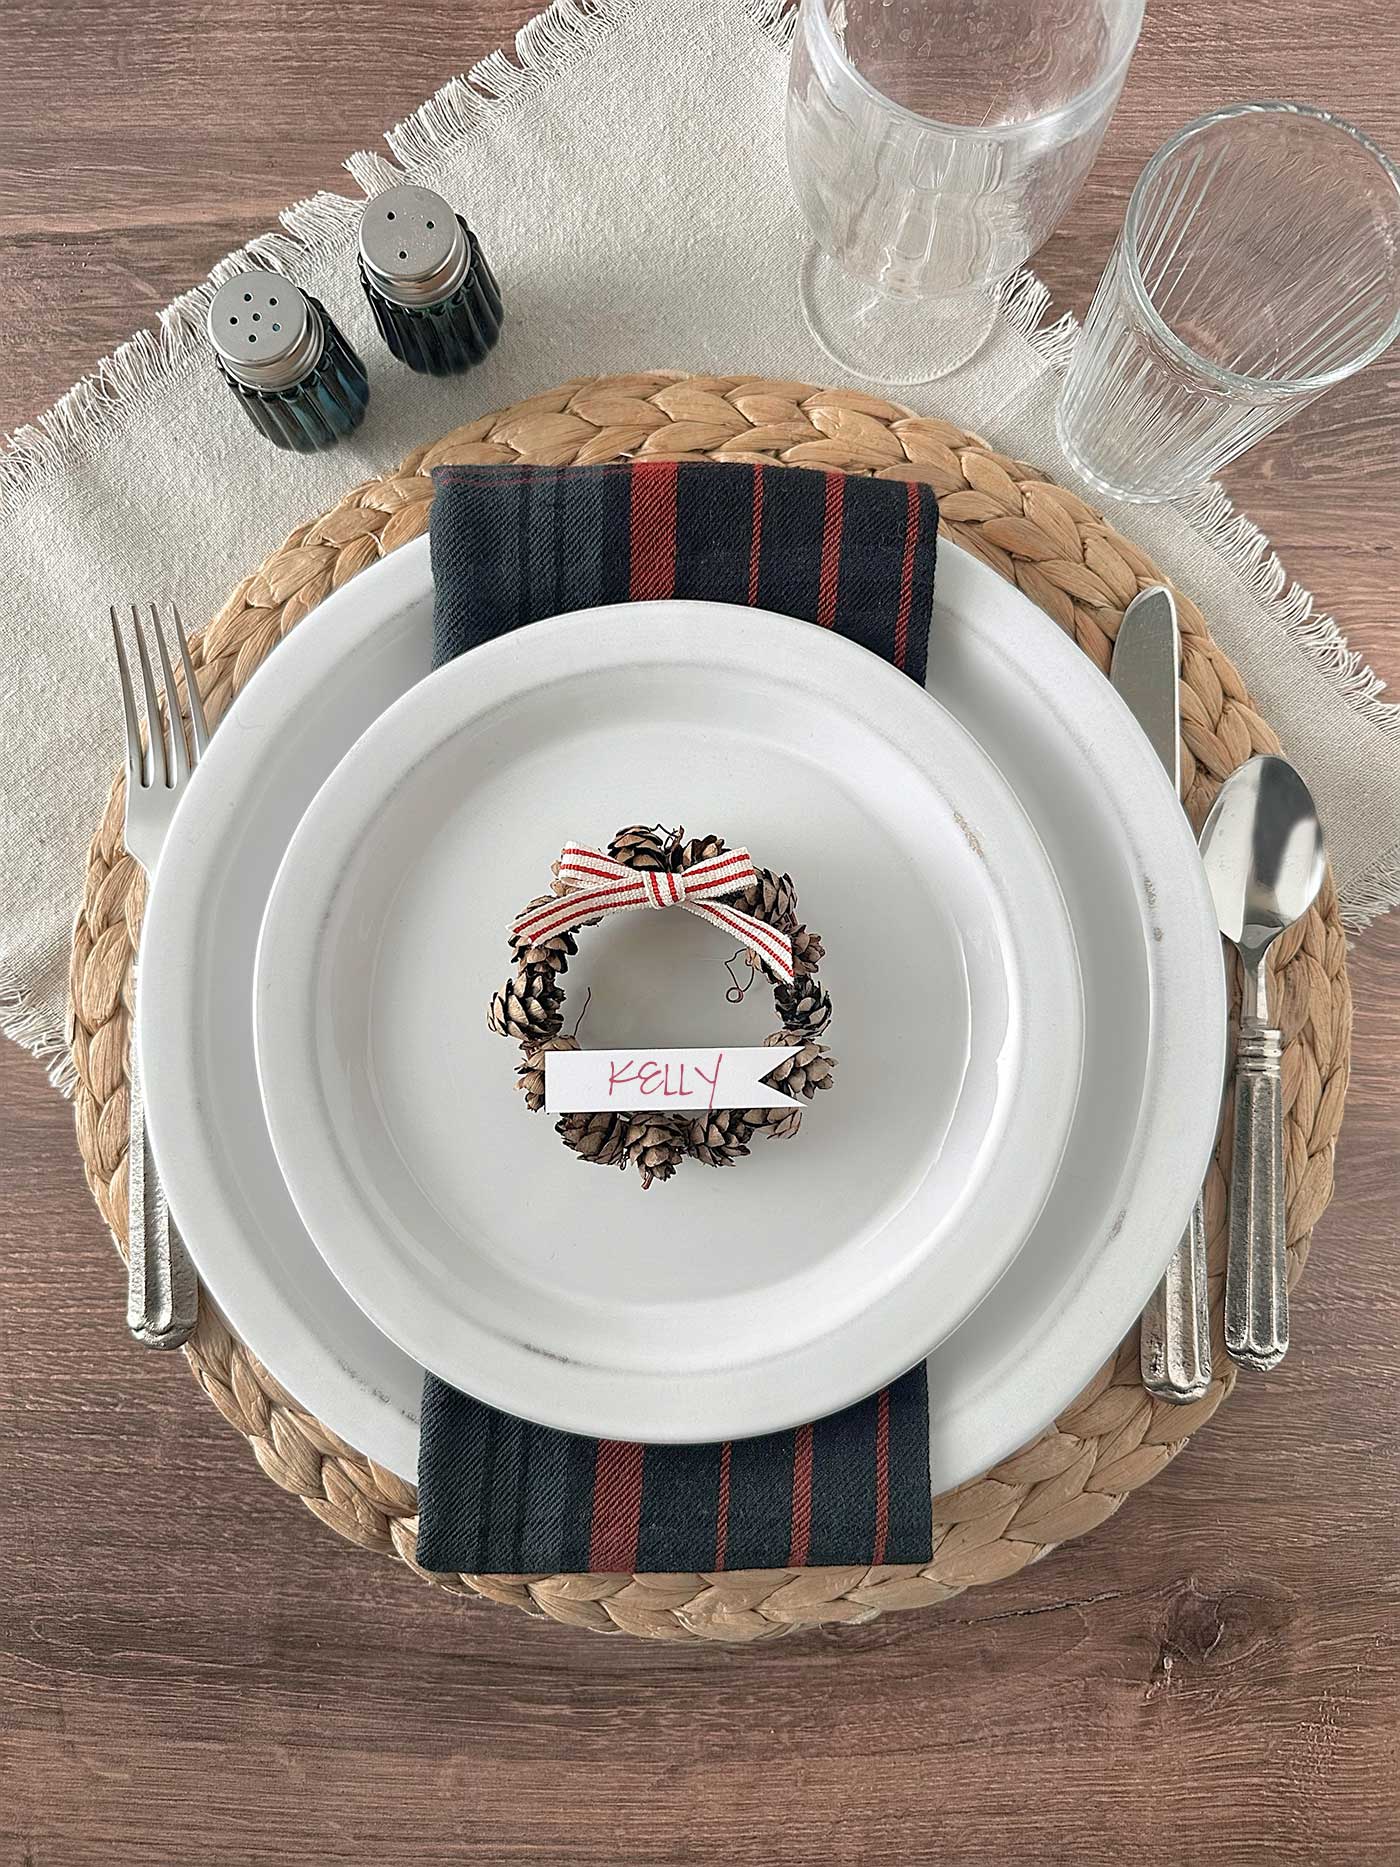
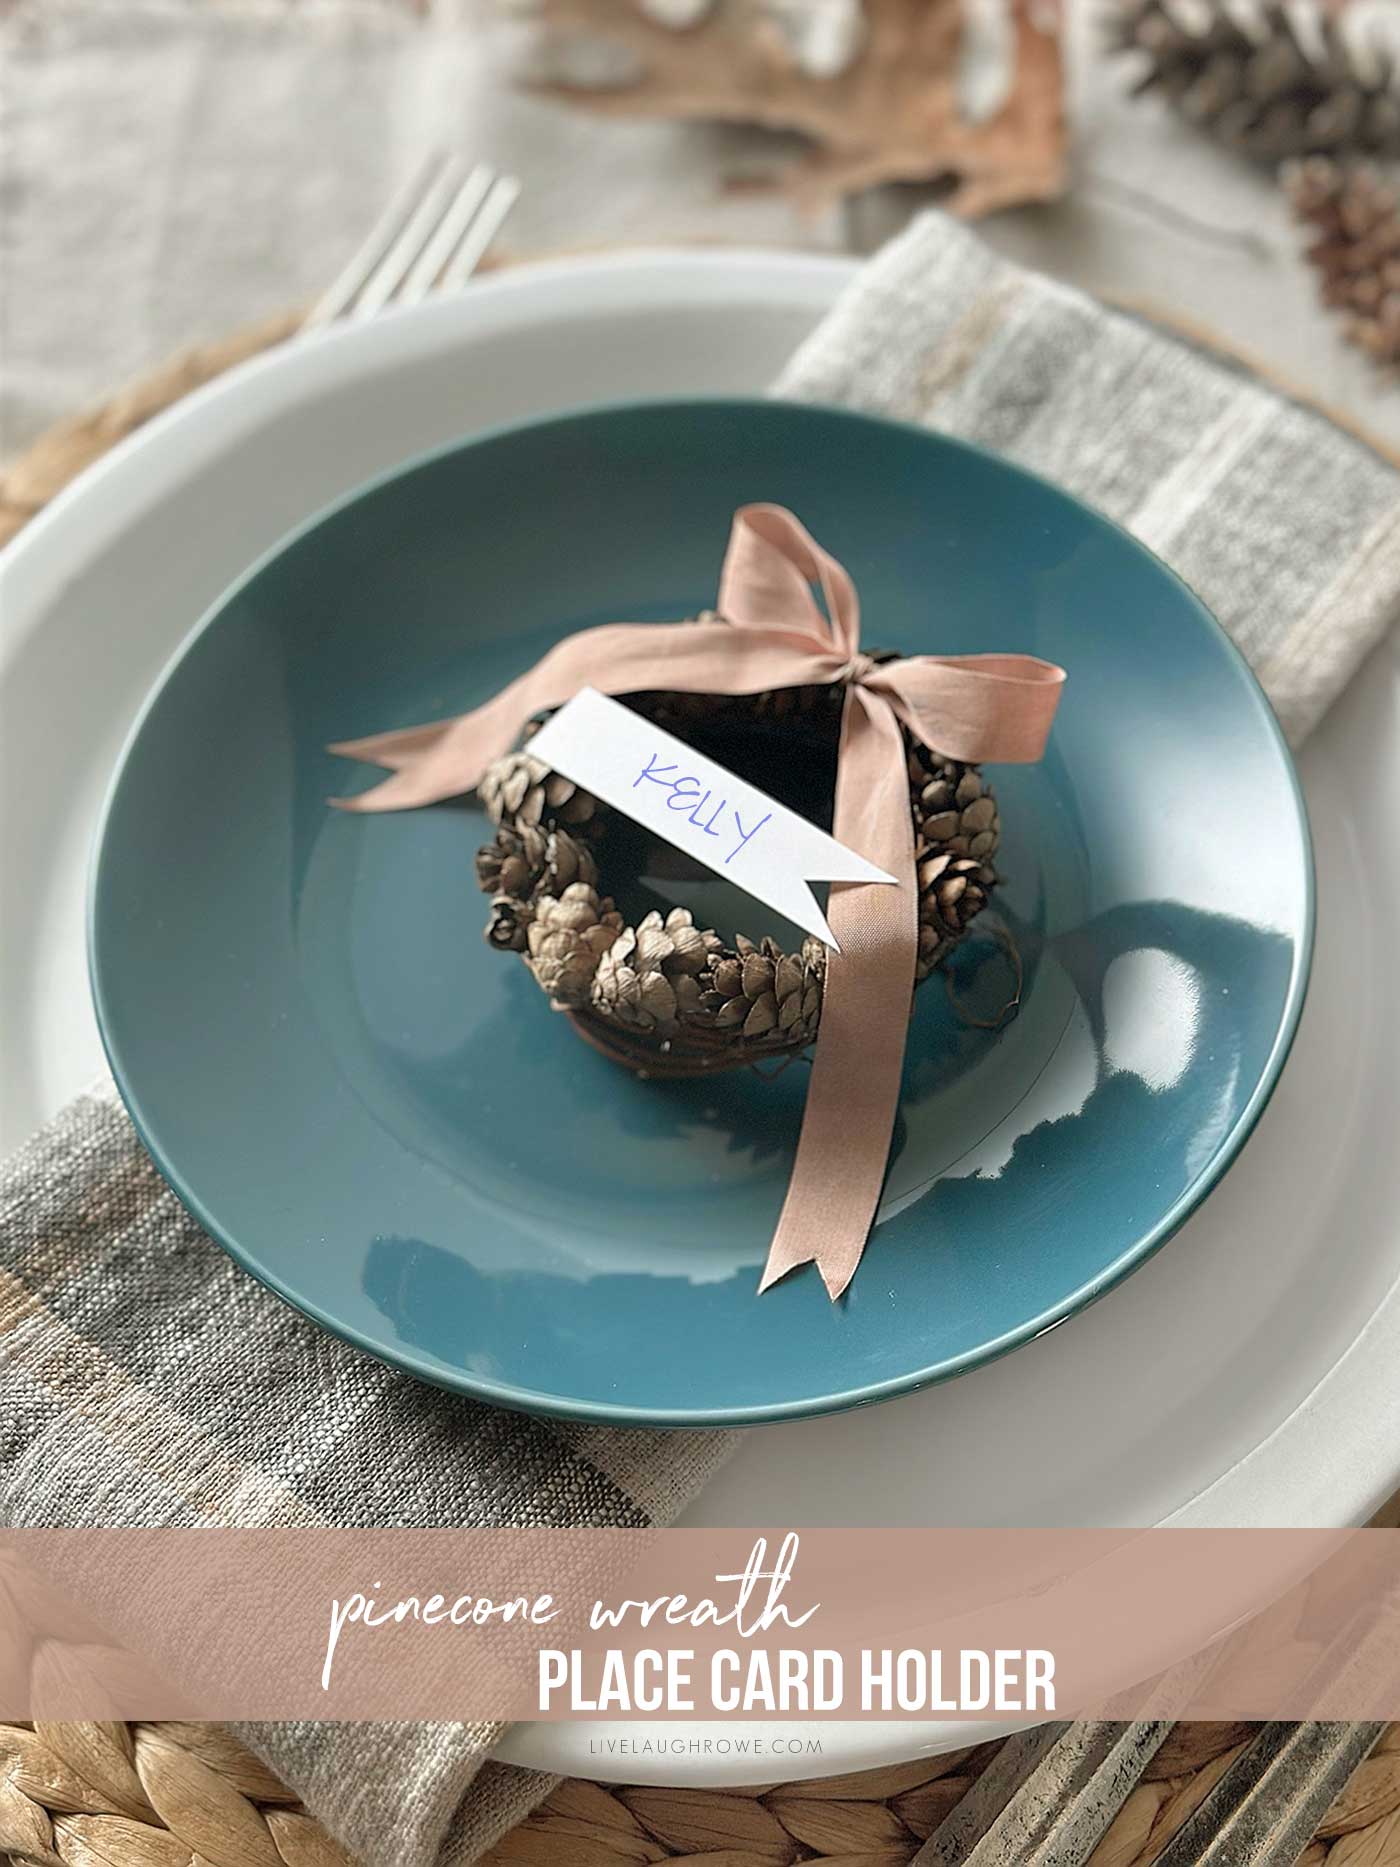
Step 4: Add Name Card to Complete the Look
Now for the final step—adding the place cards! This is where your pinecone wreaths turn into functional place card holders. Place a small piece of cardstock with your guest’s name on top of the wreath, positioning it wherever you feel it looks best. This placement allows the wreath to be used without the name at a later time.
You could also use a tiny dab of hot glue on the back of the card to stick it directly to the wreath. Depending on how much glue is used and where it is placed on the wreath, this option makes the place card a little more permanent.

And voilà! You’ve made an adorable pinecone wreath that doubles as a place card holder. Your table is about to look amazing!
Customizing the Pine Cone Wreaths
The beauty of these pinecone wreaths is that they’re super easy to customize for any occasion. Here are a few ideas for taking them to the next level:
- Seasonal Twist: For a holiday dinner, add a few sprigs of greenery or berries for a festive ribbon. For a spring event, try adding tiny faux flowers or pastel-colored pinecones.
- Personalize the Cards: Instead of plain place cards, get crafty with your card designs. Hand-lettering names, using patterned paper, or even stamping small designs on the corners can give your cards a personalized touch.
- Play with Colors: While pinecones and grapevine wreaths are naturally rustic, you can experiment with different ribbon colors to match the theme of your event.
- Scented Pinecones: Want to take your wreaths up a notch? Try scenting your pinecones with cinnamon or essential oils! Just spritz some of the oil on your pinecones before gluing them on, and your whole table will smell amazing.
Why Pinecone Wreaths?
Pinecone wreaths aren’t just fun and easy to make – they’re incredibly versatile, too. Here’s why they’re the perfect craft for your next DIY project:
Quick and Easy: You can pull this off even if you’re not the most experienced crafter. The process is simple; you can finish one wreath in less than 15 minutes.
Budget-Friendly: You don’t need many expensive materials to make these cute little wreaths. Many of the items you need can be found in nature or bought in bulk for cheap.
Customizable: Whether you want something simple and rustic or elegant and detailed, you can adapt the design to suit your style.
Eco-Friendly: If you’re all about sustainability, pinecone wreaths are a fantastic option! Using natural materials like grapevine and pinecones reduces your crafting waste, and if you gather your pinecones outdoors, you’re essentially getting free supplies.
Making a pinecone wreath for place card holders is a creative, relaxing craft that adds a handmade touch to your table decor. Combining mini pinecones, grapevine wreaths, and ribbon creates a charming and functional decoration that your guests will love.
Get Crafting!
So, the next time you’re hosting a dinner party or want to add a little DIY flair to your home, try this project! It’s the perfect way to make your guests feel special and give your table a cozy, rustic vibe.
Now that you know how to make a pinecone wreath, gather your supplies, grab a hot cup of tea (or warm cider), and get crafting!
Additional Projects from the Handcrafted Society


Pssst. Are you enjoying the content? Buying me a coffee or two occasionally is a fabulous way to support all my hard work and the content I provide. Thank you!


Nancy says
Hi Kelly – Thank you for such a great and simple project. These could also be used as a gift tag on Christmas presents or strung together with small bells hanging in the center and hung from a fireplace mantle. I love when a small project can be used in many different ways. It is even better when it is inexpensive to boot!
CoCo says
These are so gorgeous, Kelly! I love how they have both a rustic and an elegant feel to them. It’s nice that they can be used in different ways and in multiple seasons as well. I can’t wait to try them too. They’re really beautiful! Big hugs, CoCo
Renae says
These are absolutely darling! I can’t wait to make some.
Tammy says
Kelly, these mini pinecone wreaths are so pretty. I love that you have tiny pinecones in your yard. They are perfect for the fall and Christmas season. Love it!
Michelle | Thistle Key Lane says
Your pinecone wreaths are so darn cute Kelly, and very elegant with the ribbon! Excellent tip on dismantling the wreaths to make two for the price of one! I love these brilliant ideas!
Donna says
Kelly, these miniature wreaths are so adorable, I just love them! I’ve never seen small pinecones in nature but I bought some at Hobby Lobby. These would look so fabulous on a Christmas tree! Thanks for the inspiration, I see DIY ornaments in my future!
Doris says
Your pinecone wreath place cardholders are so charming! They add a cozy, rustic touch to any table setting. Love the easy steps and creative tips—thanks for sharing!
Missy says
These are so cute! We have tons of pine cones in our yard…I just wish they were small and adorable like yours! This is such a great project for fall and for a Thanksgiving table!