• Home
  • About
    • About Me
    • The Rowes
  • Shop
    • Etsy Shop
    • Amazon Storefront
  • Recipes
  • DIY/CRAFTS
  • PR & Advertise
    • In The Press
    • My Disclosure
    • Privacy Policy
  • Resources
  • Contact
    • Contact Me

Super Easy DIY Shamrock Boutonniere

03/10/2013 by Kelly Rowe 15 Comments

This post may contain Amazon or other affiliate links. As an Amazon Associate I earn from qualifying purchases.

Pin
Share
Tweet
Share
Share
219Shares

Well, at last weeks par-tay, I had mentioned that I had the intention to post at least ONE St. Patrick’s Day project.   I have no idea why  I have such a hard time getting my arms wrapped around St. Patty’s Day crafts?!?!  I guess it’s just not one of those celebrations that I  hold near and dear to my heart {giggle}.  However, I do {love} seeing all the crafty fun around the world wide web.  Anywho, here we are… today I’m sharing a super easy Shamrock Boutonniere.
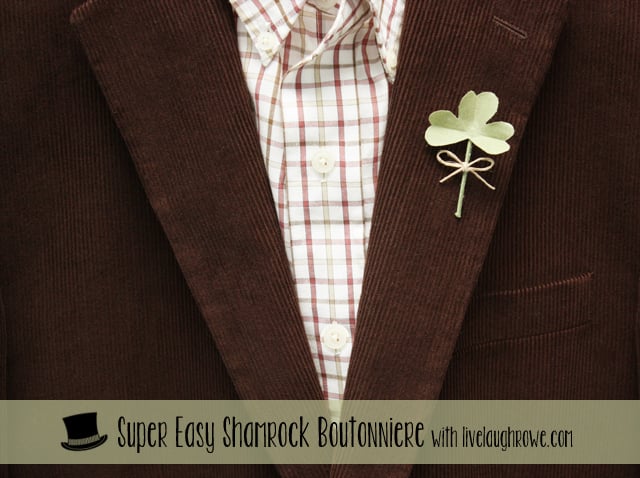
shamrock bouttonniereThis projects takes less than 20 minutes (less the drying time), so it’s quick, easy and it adds the shamrock and green to your attire in celebrating St. Patrick’s Day.    Let’s grab a few supplies and get started!

boutonnieresSupplies include:  Fabrics of choice, hemp cord, matte mod podge (or fabric stiffener), paint brushes, floral stem wire and (not pictured), wax paper and a glue glun.  To attach to your clothing, you’ll also need a safety pin or corsage pin.

Firs things first, you’ll need to create a shamrock template.  Start to trace your shamrock onto your fabric of choice and cut.
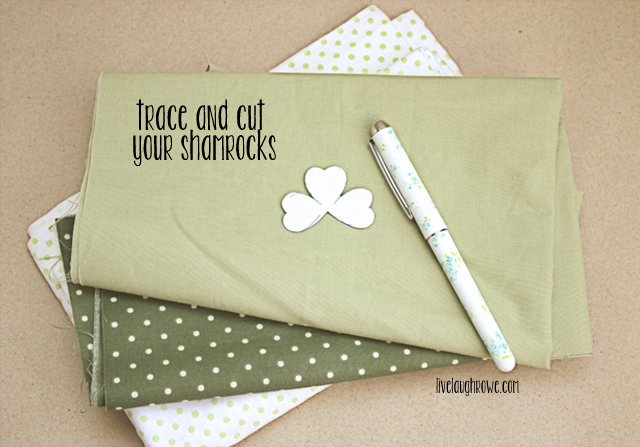
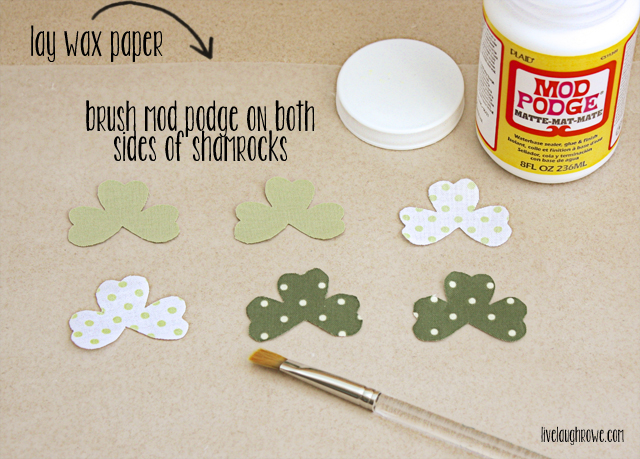
trace and cut your shamrocksLay out a piece of wax paper and brush on your mod podge (or fabric stiffener) on one side, allow to dry.  Then brush your mod podge on the second side and allow to dry.

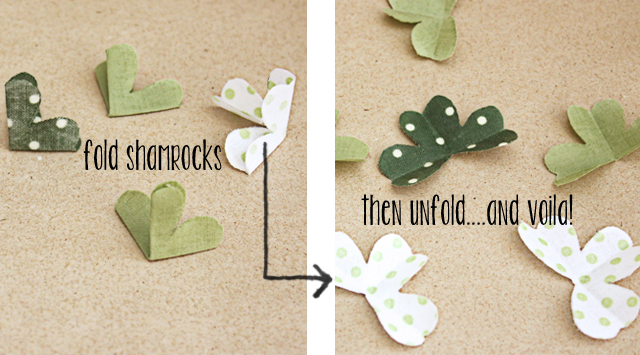
St. Patrick's Day CraftsAfter the fabric is dry and stiff — you’re going to crease your shamrocks by folding it in half lengthwise and then in half again.

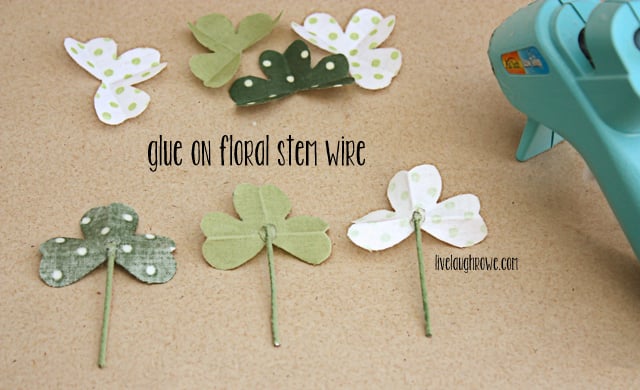
 shamrock pinsYour shamrocks are officially ready to be made into a boutonnieres!  Cut your floral stem wire to your desired length.  Mine were cut to about 1-1/2″ in length.  You’ll place a dot of glue on your floral stem wire and attach to the back of your shamrock.  Of course you can layer your shamrocks and have 2-3 shamrocks on your boutonnieres if you’d like.  I chose to keep mine on the simpler side; however, there are a ton of possibilities!

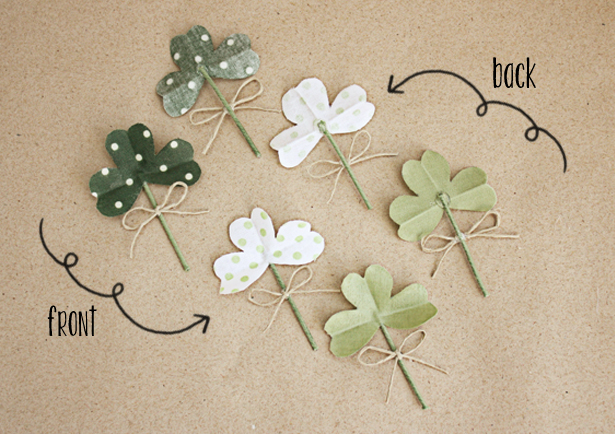
shamrocksNow make a small bow with your hemp cord and attach with another dot of glue.  Aaaaaaaaand, you’re done! You can glue on a safety pin (which is what I did), attach with a corsage pin, or make your stem a little longer so the guys can tuck it into their jackets button hole!

shamrock pinsSeriously, super duper easy with a simplistic and somewhat rustic twist to ‘the wearing of the green‘ for St. Patrick’s Day.  What do you think?   They would make a great wedding boutonniere for an Irish wedding too.  I do hope you enjoy!

Subscribe to Updates | Like on Facebook | Follow on Pinterest
Kelly140


Pin
Share
Tweet
Share
Share
219Shares

Filed Under: Crafts, St. Patrick's Day, Uncategorized Tagged With: boutonniere, shamrock

About Kelly Rowe

A DIY fanatic, Kelly shares her journey through her blog, Live Laugh Rowe, where she showcases her recipes, tutorials, crafts, home projects, and all things DIY. This East Coast Girl at heart believes family is number one as she finds the perfect balance of being a daughter, wife, sister, entrepreneur, writer and woman of God. Be sure to follow along as she shares her passion for life, love and family! Google+

« Vintage Inspired Easter Bunny Favor
Epiphanie Bags »

Comments

  1. Kristine says

    03/10/2013 at 3:01 pm

    What a GREAT idea! Thanks for such a fun DIY. 🙂

    Reply
  2. Cindy Eikenberg says

    03/10/2013 at 5:21 pm

    So cute! pinned and shared on FB. Have a great Sunday!

    Reply
  3. Amy says

    03/10/2013 at 10:52 pm

    I don’t get all crazy over SPD either. I just made a bow so my kid won’t get pinched all day. Love your project!

    Reply
  4. nest of posies says

    03/12/2013 at 8:32 am

    LOVE this!!! and that top picture is perfect!!!

    Reply
  5. Amanda says

    03/13/2013 at 7:04 am

    I’ve put together a round up of shamrock crafts on Craft Gossip today and included your post. 🙂 You can see it here
    http://homeandgarden.craftgossip.com/15-shamrock-crafts-for-st-patricks-day/

    If you would like a Craft Gossip badge showing you’ve been featured, you can grab one here 🙂
    http://homeandgarden.craftgossip.com/grab-a-craft-gossip-button/

    Thanks for sharing!

    Reply
  6. Brenda @ a farmgirl's dabbles says

    03/13/2013 at 12:09 pm

    Super cute – I love how small and sweet they are!

    Reply
  7. EmmaK says

    03/14/2013 at 9:35 am

    Supercute shamrock craft idea!! Will make some for my family
    Popping over from the Thursday Favorite Things Bloghop
    Emma
    http://www.mommyhasaheadache.blogspot.com

    Reply
  8. Rosey says

    03/14/2013 at 12:22 pm

    How perfectly cute and festive too!
    I’m visiting today from Thumping Thursdays. 🙂

    Reply
  9. Sherri @madefrompinterest.net says

    03/14/2013 at 1:27 pm

    What a clever way not to get pinched. Thank you for hosting the link party.

    Reply
  10. Katherines corner says

    03/15/2013 at 9:15 pm

    Kelly these are so cute! Thank you for sharing your lovely blog at the Thursday Favorite Things blog hop xo

    Reply
  11. yumeating says

    02/26/2014 at 7:35 am

    Love these! Pinned it to my “Good to Be Irish” board. I get excited about St. Patricks Day but I am sure it has a lot to do with being Irish. It’s the only time of year I can buy all the fun Irish, Ireland, Shamrock related stuff in the stores. Especially places like Ross, TJMAxx and Marshalls. I stock up on tshirts at Old Navy. It’s my month of spending. I have already scheduled some Irish traditional recipes and have a few guest posts lined up. I am really looking forward to March this year! Going to have to spruce up my crafting skills too!

    Reply
  12. Bonnie @ The Pin Junkie says

    03/06/2014 at 3:39 pm

    This is such a cute idea and so easy to do! Thanks for sharing this project at The Pin Junkie. It was featured in a St. Patrick’s Day roundup at http://www.thepinjunkie.com/2014/03/st-patricks-day-crafts-and-recipes.html

    Reply

Leave a Reply Cancel reply

Your email address will not be published. Required fields are marked *

Recipe Rating


Recent Posts

Wreath with Nest and Eggs
Poppy Field

sign-up-for-live-laugh-rowe-weekly-newsletter

About Me

Hey there! About Kelly
Copyright © Live Laugh Rowe • Privacy Policy • Log in
Hey there!
I've been waiting for YOU.
Let's stay connected, shall we?
Sign up for daily or weekly updates.
Decisions. Decisions. {wink}
By signing up, you agree to receive Live Laugh Rowe e-mails.
Although I'd hate to see you go, you may unsubscribe at any time.
Your information will *never* be shared or sold to a 3rd party. I promise!
Wait! Before you go...
Let's stay connected, shall we?
Sign up for daily or weekly updates.
Decisions. Decisions. {wink}
By signing up, you agree to receive Live Laugh Rowe e-mails.
Although I'd hate to see you go, you may unsubscribe at any time.
Your information will *never* be shared or sold to a 3rd party. I promise!